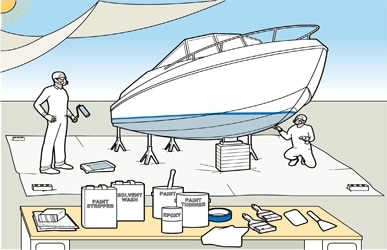
Refinishing Your Boat’s Bottom
Ethanol is reducing your engine’s efficiency. Fuel prices are sure to rise. And, the way things are going, I’d bet fuel taxes spike as well. These things are out of your control, but you can combat them. Give your boat a “bottom job,” and it will run faster and more efficiently. We took in an eight-year-old Aquasport, the bottom of which was pocked and cratered by years of uneven wear. After applying materials and using tech assistance from Interlux (www.yachtpaint.com, 800-468-7589), the hull surface wasn’t just showroom smooth, it was better than new, since we fixed some manufacturing glitches in the process. You can get the same results with two weekends’ work. The time required makes haul-out a good time to tackle this project, because you won’t feel the pressure to launch that comes with spring. Just follow these steps.
Stripping
Step 1. Set up your work area and don the safety gear. For best results, the ambient temperature should be 60-80 degrees F. If direct sun is on the stripping area, create shade using the tarp as a fly.
Tip: Apply masking tape just above the painted waterline so its position isn’t lost once the paint is gone.
Step 2. Scrape off loose, flaking paint. Brush a liberal coating of Interstrip 299e onto about 10 square feet and let it soak for 15 minutes, then scrape off the paint. Soak time will vary from 15 minutes to two hours, depending upon the number of coats being removed. It took 40 minutes to penetrate the five old coats on our Aquasport. Experiment. Our two-man team, working in tandem, stripped 130 square feet of bottom and transom in seven hours and used 1.5 gallons of 299e.
Step 3. Remove residual paint splotches. We used spray oven cleaner, but paint thinner works. Wipe down the hull with Fiberglass Solvent Wash 202 to allow better adhesion of subsequent products.
Sealing, Filling and Painting
Step 1. Our Aquasport had a number of laminate voids, plus some userinstalled gouges. Fill imperfections with Watertite Epoxy Filler. Using a spreader or putty knife, swipe the goop across the gouge and then scrape off the excess from several directions. Two applications might be necessary – don’t try to fill all in one pass. Overfill slightly, then after two hours, sand it flush with 80-grit paper and a sanding block, followed by 120-grit.
Step 2. Wipe down filled areas with 202, as epoxy “blushes” with a waxy film upon cure that will retard adhesion of bottom paint.
Step 3. Mask off the waterline and any underwater metals, including drive housings, engine-mounting brackets, through-hulls, swim ladders and trim tabs. Mix the paint thoroughly.
Step 4. Apply bottom paint. For best results, use a 3/8-inch nap roller cover, cutting in around fittings, drives and engines, struts, etc., with a chip brush first. Apply a minimum of two coats. We chose an ablative paint instead of a “hard” coating, since these wear away evenly in use, largely eliminating the need to have to strip down to bare ‘glass in the future.