If you have a boat with just one battery, it’s wise to add a second battery to the boat, giving you twice as much battery capacity in case, for instance, you inadvertently drain a battery with the stereo while the engine is off. You can use the second battery to start the engine and then switch to the low battery to give it a charge while you’re running.
Adding a battery is an easy project using a dual battery switch (sometimes called a marine battery switch or marine dual battery selector switch) from a company such as Blue Sea Systems (bluesea.com) or Perko (perko.com), which we used here. When properly installed, these marine battery switches let you choose one of the two batteries, combine them or disconnect both with the turn of a dial. More complex systems incorporate automatic charging regardless of switch position, but this setup is simple, upgradeable and gets the job done.
Getting Started
Skill Level: 2.5/5
Time to Complete: >4-5 Hours
Tools and Supplies Needed to Hook Up Dual Batteries in a Boat
- Second marine battery meeting engine specifications
- Perko 8501 battery selector switch
- Battery box with tie-down or battery bracket
- 2/0 marine-grade cable, red & black
- 2/0 marine-grade cable lugs, either crimped or soldered
- Heat-shrink tubing to seal cable-lug connections
- If you prefer, pre-made marine cables in various lengths are available from Ancor (marinco.com) and others.
- Terminal caps for each positive battery terminal
- Power drill and drill bits
- Stainless-steel mounting screws
- Screwdriver set
- Socket wrench set
- Heavy-duty crimper or soldering gun and solder
- Wire stripper
- Cable clamps and tie-wraps
Allowable Battery Voltage Drop
American Boat and Yacht Council (ABYC) standards permit a 3 percent voltage drop for critical electrical systems. The length of the run (measured as the length of positive wire from the source to the device and back to the source along the negative wire) and the diameter or “gauge” of the cable determine the amount of voltage lost or dropped. To determine the cable size you need, utilize the What Circuit Wizard and Wire Sizer apps available on your smartphone.
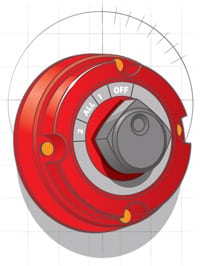
1. Pick the Best Battery Switch for Your Boat
Make sure the dual battery switch is designed for two batteries (some are on/off switches) and will handle the amperage when starting the engine. A rating of 250 amps continuous is sufficient for most outboards and gasoline inboards. You can also buy switches with locks for security against boat theft, and some have field disconnect circuits to protect the alternator in case you turn the batteries off while the engine is running.

2. Install the Second Battery to the Boat
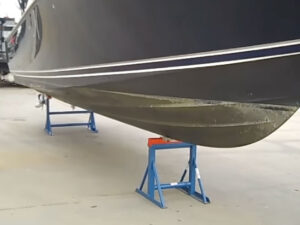
Choose a marine battery that meets the engine specs. Installation should comply with Coast Guard and ABYC standards. Wet-cell batteries should be secured in a battery box. Absorbed glass mat batteries don’t need boxes. Both need tie-downs or brackets, and the positive terminals should be covered with nonconductive boots. Please visit the US Coast Guard website for more information about safety standards.
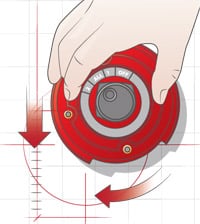
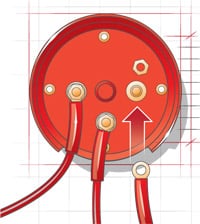
3. Pick a Location for the Battery Switch on Your Boat
Selector switches have a four- to six-inch-wide footprint, so pick a surface where you have enough space. ABYC standards dictate that the switch be as close to the batteries as possible and readily accessible. Some can be flush-mounted for a cleaner look above decks, but make sure it’s protected from spray. Hold off on final installation until after you have connected the positive cables to the posts in the back.
4. Connect the Positive Cables First
Cables should have “marine cable” stamped on the insulation. Size 2/0 cable handles most outboards and gasoline inboards. Connect the positive terminals of batteries 1 and 2 to the corresponding posts on the back of the switch, and then connect the positive cable from the engine to the output post of the switch. Also connect the positive accessory wire to the output post.
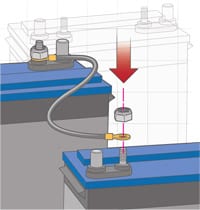
5. Connect the Negative Cables Last
In order for the dual-battery system to operate properly, you need a crossover cable between the negative terminals of the two batteries. Also, connect the negative cable lug from the engine/ground and the negative accessory wire to either of the negative battery posts, and make sure all terminal nuts are tight. (One smart option is to replace wing nuts with locking hex nuts.)