It started with a 1996 Mako. The owner, Tom Murphy, had a couple of little upgrades in mind for his 19-footer. He thought we could tackle them on a Friday afternoon. Then another friend, Chris Wilson, wondered if we could include his 21-foot Carolina Skiff. Now we were looking at eight upgrades on two boats. From experience, I knew it wouldn’t be as easy as they thought. You’re about to witness the real story behind this makeover madness.
Day One: 19-Foot Mako, 1996
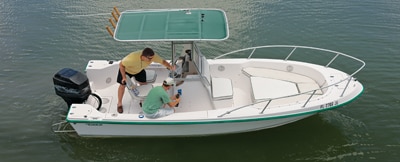
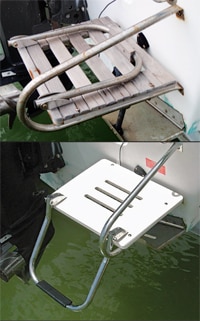
The Upgrade: Replace Teak Swim Platform
Tom wanted to refinish the teak platform, but on closer inspection it seemed like a fruitless task. The stainless support arms were littered with stains, and the teak was toast. In the end, he was persuaded to forego the refinish job and replace the original with a SeaTeak poly swim platform from West Marine. It will require much less maintenance in Tom’s salty environment, and it instantly improved the look of his boat.
Expected Cost: $169.99
Extra Supplies: Stainless fasteners, tube of 3M 5200
Expected Time: Two hours
Actual Time: It seemed to never end for reasons disclosed below, but I’m calling it four hours.
Experience Told Me: Not all platforms are created equal. Tom chose a universal replacement platform that wouldn’t be an exact fit but saved money and, with a little modification, would make a good-looking, serviceable replacement. In the rig he chose, the underside of the platform contacted the actuator of the starboard trim tab. We carefully modified the underside with a Dremel tool to gain clearance, only to have the platform again contact the ram as it began to sit more level. Ultimately, the amount of material that we removed with the Dremel uncovered the hollow interior of the molded poly step, but in that location it didn’t detract from looks or durability. We made Tom’s cost-cutting platform work.
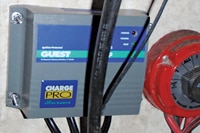
The Upgrade: Install Battery Charger
With a long history of batteries letting him down, Tom reasoned that a fixed-mount, onboard Guest battery charger would be a good addition. Its fully potted construction means it should be rugged, weather-resistant and even shock- and vibration-proof. Easy-to-read status indicators also allow quick visual inspection of the battery’s condition.
Expected Cost: $99.99
Extra Supplies: Stainless fasteners, inlet receptacle, tube of 3M 5200
Expected Time: One hour
Actual Time: 45 minutes…if you don’t count the two-hour road trip in search of hardware
Experience Told Me: Mounting locations and needs differ, so selecting proper mounting hardware would be up to us.
A local hardware store didn’t have what we needed, but West Marine did. And, while we were there, we picked up a nice addition to the project. The charger itself comes with a standard six-foot AC power cord, but leaving it lying around inside the console isn’t the cleanest installation. A better solution is the ProMariner universal AC plug holder, which allows you to install a weather-resistant receptacle in a convenient location.
Day Two: 19-Foot Mako, 1996
The Upgrade: Replace Aging Pry-Out Deck Plates With New Screw-In Models
Tom’s deck plates weren’t a problem functionally, but they looked awful. Turns out the amount of talc used in their production made them weather exceptionally fast. They were ruining the look of an otherwise clean cockpit. We contacted Beckson for three four-inch plates and two eight-inch plates with nonskid — they had the exact dimensions and color we needed. While we were at it, we also took the opportunity to upgrade to screw-in plates, in place of the original pop-outs, for a more secure closure.
Expected Cost: $105.95
Extra Supplies: Tube of 3M 5200
Expected Time: One hour
Actual Time: Two hours, 15 minutes
Experience Told Me: These were relatively simple and straightforward replacements, but you never know how overzealous the previous installer might have been with the silicone, or how strong the bond still is. We had to do a lot of careful prying with a putty knife.
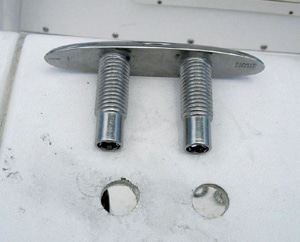
The Upgrade: Install Pull-Up Midship Cleats
Tom’s Mako featured no midship cleats, which are great for attaching a spring line or for temporarily hanging a fender. No fisherman, however, wants hardware that will potentially tangle a line. Attwood’s pull-up Neat Cleats offered a nice solution. When not in use, they present a catch-free profile above the gunwale. When you need them, they pull up and stay in position.
Expected Cost: $67.99
Extra Supplies: Hole saw, tube of 3M 5200
Expected Time: 30 minutes
Actual Time: 30 minutes
Experience Told Me: In hindsight, this might have proven the easiest job of all. Cleats require only two seven-eighths-inch holes. We added a hole saw to the original shopping list to give us a clean cut, then simply secured the cleats in place, aided by the convenient access below the gunwale. Some cleats come with templates. I’m not sure if ours were lost in the trash or what, but we fashioned one on paper to get the proper alignment.
Day Three: 21-Foot Carolina Skiff
The Upgrade: Replace Plastic Steering Wheel With Stainless Wheel/Knob
The primary reason behind upgrading to West Marine’s super-sport wheel was purely aesthetic for Chris, but there’s a functional improvement as well. The stainless wheel will hold up better than its plastic predecessor would in the Florida sun. The knob also makes big turns simple and requires only one hand on the wheel. We anticipated this to be one of the quickest and easiest upgrades.
Expected Cost: $199.99
Extra Supplies: Proper size nut
Expected Time: Unbolt one wheel, pull it off, and slip another in its place? About 20 minutes tops.
Actual Time: About 45 minutes
Experience Told Me: The wheel might have been plastic, but the mounting area is metal, as is the shaft. Years of salt air and water had bonded the two together. We briefly used a wheel puller, but it was hard to get a lasting bite on the flexible plastic. Ultimately it just took some good old-fashioned muscle to break things free. Another thing you should know about this task? The wheel comes with a stylish five-eighth-inch center nut sized for most hydraulic steering systems. Our project boat used standard mechanical steering, meaning a half-inch replacement part had to be ordered. No local stores stocked it, but we did find one close enough to hold things temporarily in place.
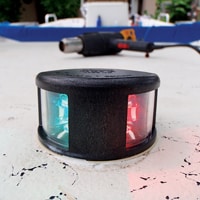
The Upgrade: Replace Incandescent Running Lights With LEDs
Incandescent bulbs use more energy and don’t last long in a tough marine environment. That’s why so many manufacturers are turning to LEDs, such as the Aqua Signal Series 31 LED navigation lights, which are typically brighter and more visible to boot. Replacing the lights is easy; a few waterproof, heat-shrunk butt connectors, a heat gun and a wire stripper/crimper and you’re good to go. Right?
Expected Cost: $45.99 bow; $45.99 stern
Extra Supplies: 35-foot wire, butt connectors
Expected Time: Another simple project, maybe 20 minutes each
Actual Time: Two hours, again not counting the trip to West Marine…twice
Experience Told Me: New lights are only as good as the wiring carrying the juice. In this case the previous owner had installed household wire, and it was now losing the battle to corrosion. We ended up replacing all the wiring to the bow light as well as the anchor light. This required an additional trip to West Marine when it became apparent that our heavier-gauge wiring wouldn’t fit inside the Carolina Skiff’s rub rail without causing an unsightly bulge. The Skiff’s poling platform also meant we’d have to thread the new wiring for the anchor light through some tricky aluminum tubing. We remembered it’s best to use the old wiring to pull the new wires through.

The Upgrade: Install Fish Finder/Chart Plotter
This would be the big-ticket item, a sweet Lowrance HDS-5 Nautic Insight combination fish finder/ chart plotter with a high-resolution 480 x 480 display and 16-channel GPS. It instantly upped the “fishability” of Chris’ Carolina Skiff and would allow him to find his way through new waters. It also looked darn good on the console.
Expected Cost: $799
Extra Supplies: None
Expected Time: One hour
Actual Time: Two hours, thanks to some wiring issues — again
Experience Told Me: The unit’s bracket would install neatly in the same position where a retired unit was; the transducer simply bolted in place on the transom. Most of Chris’ electronics, though, ran directly to the battery for power, resulting in a spaghetti pile of wires under the console. It took time to straighten this mess out.
The Upgrade: Install Common Hot-Feed Fuse Block, Ground Block
All the multiple wires made the absence of a hot-feed fuse block and bus bar glaringly obvious. A fuse block unloads all those positive connections that boaters pile on their battery-post screws, keeping things neat under the console and running a single wire to the battery. It also keeps all the fuses in one central location for easy inspection. Most of all, it’s safer than direct-to-battery connections, bringing the boat into compliance with ABYC standards, which state that the only appliance that should be “hot-wired” to the battery is the bilge pump. A bus bar does likewise for the corresponding ground wires. This project wasn’t on our list but suddenly seemed a must-do.
Expected Cost: $439.98
Extra Supplies: None
Expected Time: One hour
Actual Time: One hour, 30 minutes
Experience Told Me: There’s nothing particularly tricky here, but if you’re dealing with a jumble of wires, especially below a cramped console, it’s easy to mix things up. The installation itself went easily — then we spent about 30 more minutes chasing down why we suddenly had no power to our new fish finder/chart plotter.