LED Retrofit
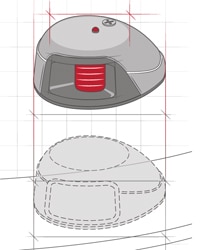
LED navigation light brands include Attwood (attwoodmarine.com), Perko (perko.com), Sea-Dog (sea-dog.com) and SeaSense (seasense.com). Try to find a direct size match for your old incandescent light fixture, saving a patch job or exposing uneven fading of the boat finish. If you can’t find a match, pick a slightly larger footprint. Red/green nav lights must meet the U.S. Coast Guard-required illumination pattern sweeping from dead ahead to 22.5 degrees abaft the beam, visible at a distance of one nautical mile.
LED Retrofit
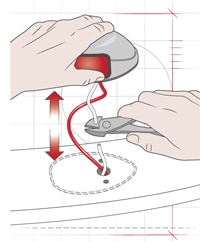
Remove the old fixtures; pull the positive and negative wires out through the hole and cut them. Inspect the remaining wire for corrosion, chafing or other damage. If suspect, replace with marine-grade wire for the entire run. Scrape away any old sealant or gasket residue on the mounting surface, but be careful not to gouge the finish. You can sharpen a putty knife to a keen edge and round the corners to avoid gouges. Patch any holes you can’t reuse and clean up the mounting surface with an acetone-soaked rag.
LED Retrofit
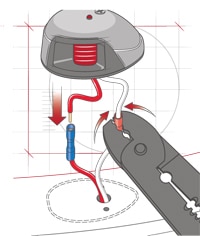
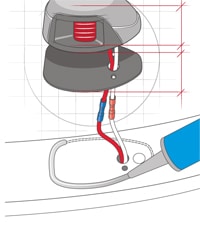
The electrical wires for nav lights often run in hard-to-reach recesses in the bow, so it’s critical to seal wire connections against moisture and corrosion. Coat the stripped end of each wire with dielectric grease. Then splice the pigtails of the LED lights to the power leads using crimp-on butt connectors with heat-shrink collars. If the LED wires are thinner than the power leads, double over the stripped ends to fit snuggly in the butt connector. Cover the connection with heat-shrink tubing, and use a heat gun to seal it tight.
LED Retrofit
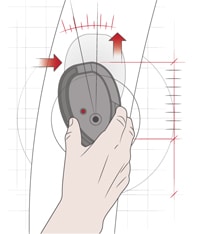
With a single bicolor light, position the fixture on the bow pointing dead ahead and the light pattern should be correct. With separate sidelights, curving bows and bulwarks can make positioning tricky. Many horizontally mounted fixtures have pointed backs that align parallel to the centerline. Vertically mounted sidelights are easier, as long as the vertical surface runs parallel to the centerline. Shim as required. Separate lights need not be at the bow, as long as they meet the visibility requirements stated above.
LED Retrofit
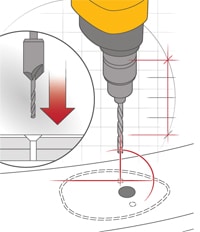
Once the fixture’s in the correct position, mark the mounting holes, using the base of light itself as a template. Then drill each hole, being mindful of what’s behind the mounting surface, such as wires. Use a countersink to slightly bevel each hole to keep the gelcoat from cracking. At this stage, I prefer to pre-fit each mounting screw, driving it in gently and removing it. This ensures that the hole is the right size and also helps eliminate stripped screw heads during the actual installation.
LED Retrofit
Most LED nav lights come as “potted” solid-state units that are completely waterproof. To help seat the fixture, however, many have rubber or foam gaskets on the underside. Yet, I still like to bed the fixture, as well as the mounting screws, with marine sealant to keep water from seeping underneath and into the bowels of the boat. Lay a bead of sealant under the fixture before battening the mounting screws. A stainless-steel, chrome-brass or plastic beauty cap might screw or snap onto the unit to complete the installation.
LEDs (light emitting diodes) now illuminate our lives, including our boats. LEDs are bright, cool, efficient and long-lived. What’s not to like? For one, the price. LED navigation lights can cost three times as much as conventional lights. Electromagnetic interference also poses a concern (see Quick Tip). Still, they’re all the rage. Here’s how to replace combination or individual sidelights with LEDs.
Getting Started
Time to Complete: >2 Hours
Skill Level: 2/5
Tools and Supplies:
*LED red

*Power drill
*Screwdriver set
*Wire cutter
*Wire stripper
*Crimping tool
*Putty knife
*Heat gun
*Marine crimp-on butt connectors
*Heat-shrink tubing
*Rubber gloves
*Cleanup rags
*Acetone ($7.48/qt., lowes.com)
*Life-Calk


LEDs (light emitting diodes) now illuminate our lives, including our boats. LEDs are bright, cool, efficient and long-lived. What’s not to like? For one, the price. LED navigation lights can cost three times as much as conventional lights. Electromagnetic interference also poses a concern (see Quick Tip). Still, they’re all the rage. Here’s how to replace combination or individual sidelights with LEDs.
Quick Tip
Without proper shielding, LED switching circuitry can generate electromagnetic interference (EMI), resulting in static on VHF radios and stereos as well as “hash” on fish-finder displays. A CE mark on the LED indicates that it is shielded to attenuate EMI.