If your crew likes to go in the water for wake sports, diving or just for a swim, a boarding ladder is a must-have item. There’s also the safety factor: Take a spill overboard, and a boarding ladder can be a godsend that fulfills the ABYC standard for a “means of solo reboarding.” One of the most popular boarding ladders today is the Garelick Model 19803 three-step, quick-release sport/diver ladder. Its steps and angled design make it easy for divers with fins to get in and out. Here’s how to install one on a sterndrive-powered runabout.
Getting Started
Skill Level: 4/5
Time to Complete: 6 Hours
Tools and Supplies
*Garelick Sport/Diver Model 19803 three-step boarding ladder ($199.65; marinesupplydirect.com)
*Drill motor and bits
*Jigsaw with fine blade for cutting metal
*Screwdriver set
*Socket wrench set
*Yardstick
*Masking tape
*Pencil
*3M 5200 marine or equivalent sealant
*5/16-inch stainless-steel bolts (at least 1¼ inches longer than transom width), washers and Nyloc nuts
*No. 10 stainless-steel self-tapping screws (four needed to install mounting brackets)
*1/4-inch-thick 5052-H32 aluminum plate to make backing plate ($20.16 for 1-foot-square piece; metaldepot.com)
*Clean rags and rubber gloves (for cleaning up sealant)
Quick Tip: Cover the work area on the transom with masking tape. This will give you a better surface for drawing lines and help prevent scratching the transom finish.
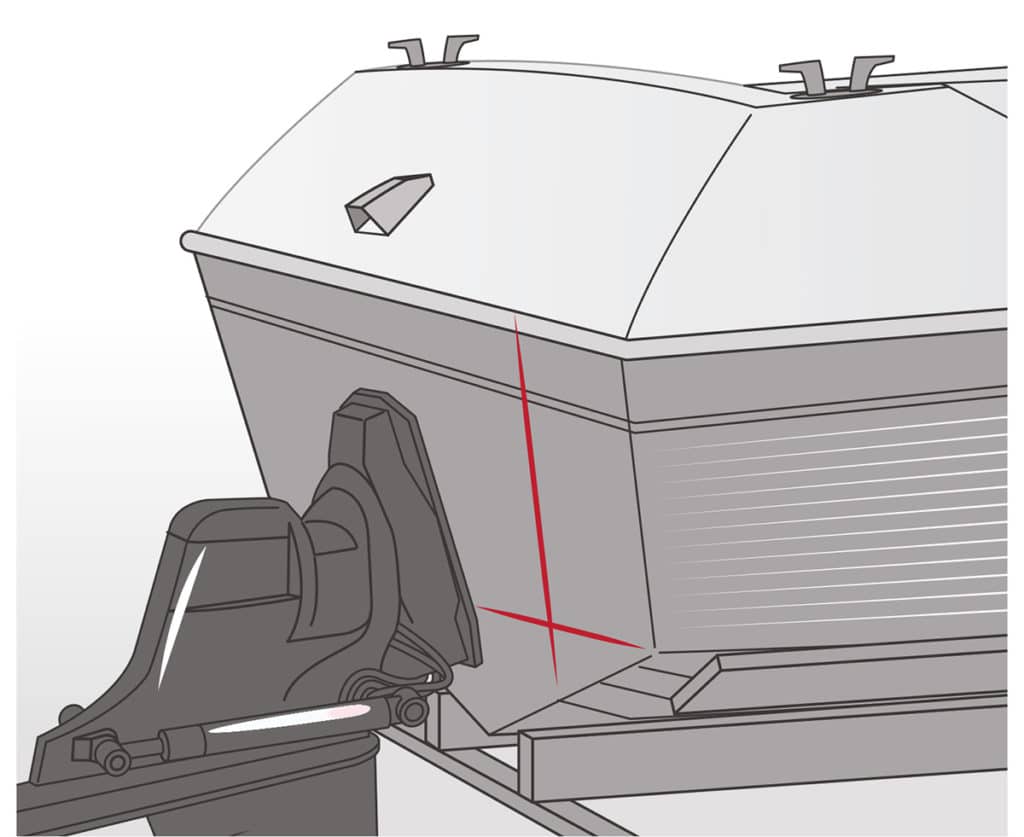
Choose a spot on the transom far enough to the port or starboard side to prevent the ladder from interfering with the turning of the drive or outboard, whether it’s tilted up or trimmed down. Draw this vertical line (90 degrees to the waterline) on the transom. Next, draw on the transom a line that corresponds to the hull’s waterline while the boat is at rest. Boating Magazine

Position the ladder along the vertical line that you just drew to the desired mounting height. Keep in mind that it is optimal to have the two lower steps of the ladder below the waterline for ease of boarding. Mark the ladder position at the top of the mounting bolt; this will locate the top two holes for the mounting plate (included with the ladder). Boating Magazine
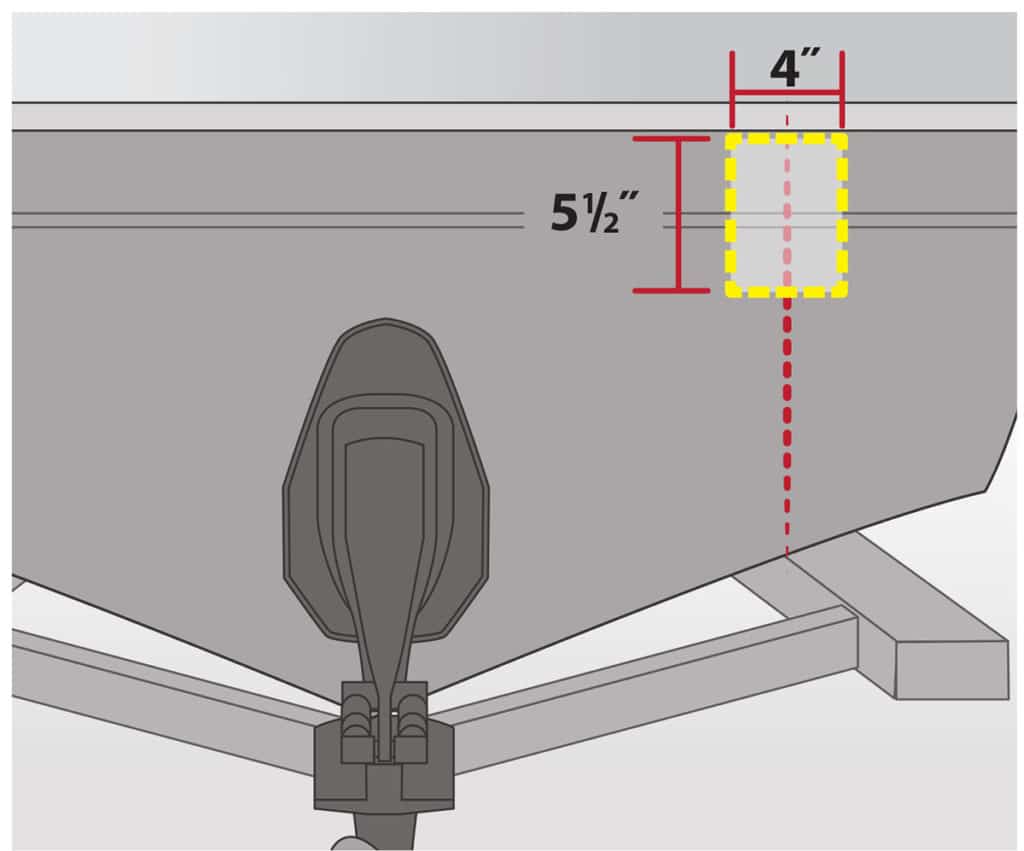
Before drilling any holes, check behind the intended mounting plate location to ensure that there are no wires, hoses or structural supports that might interfere, and that there’s at least a 4-inch-wide by 5½-inch-high flat area for a backing plate (not included, see “Make a Backing Plate”). If there’s an issue, consider moving to the other side of the transom. Boating Magazine
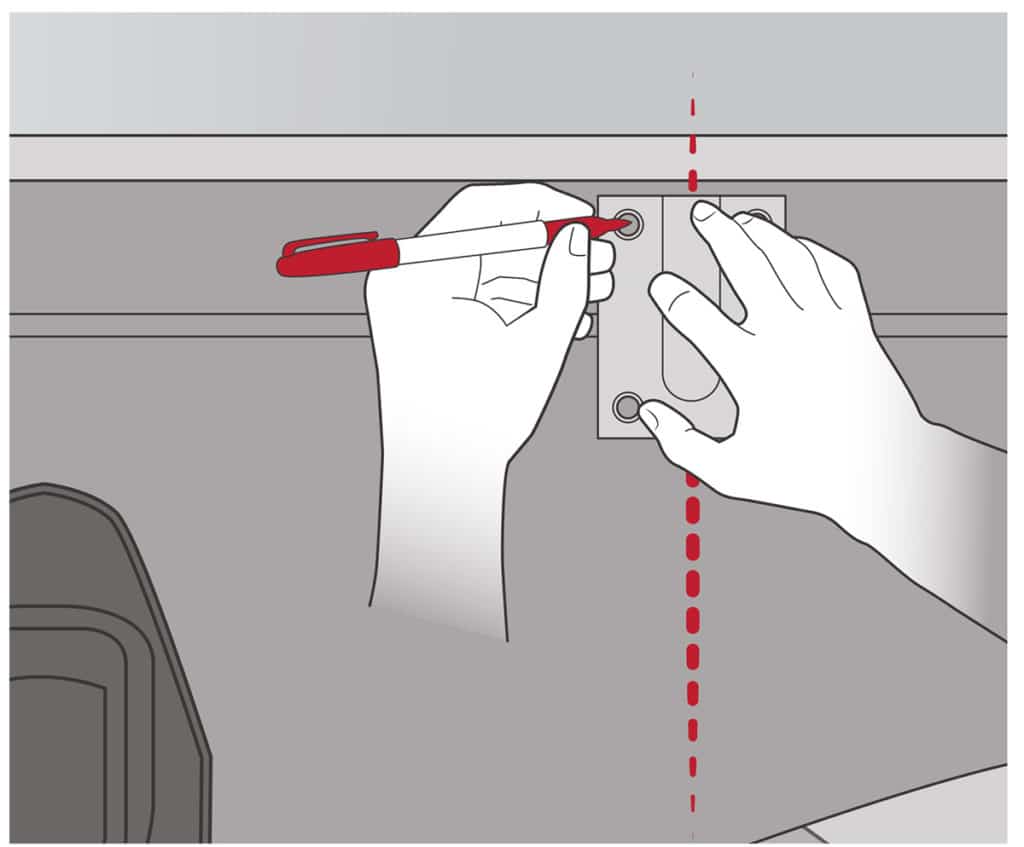
If all is clear on the backside of the transom, mark the four mounting-hole locations using the mounting plate as the template. The vertical line should bisect the mounting plate. The mark you made at the top of the ladder in Step No. 2 will locate the positions of the uppermost two mounting holes. Recheck the positioning before drilling. Boating Magazine
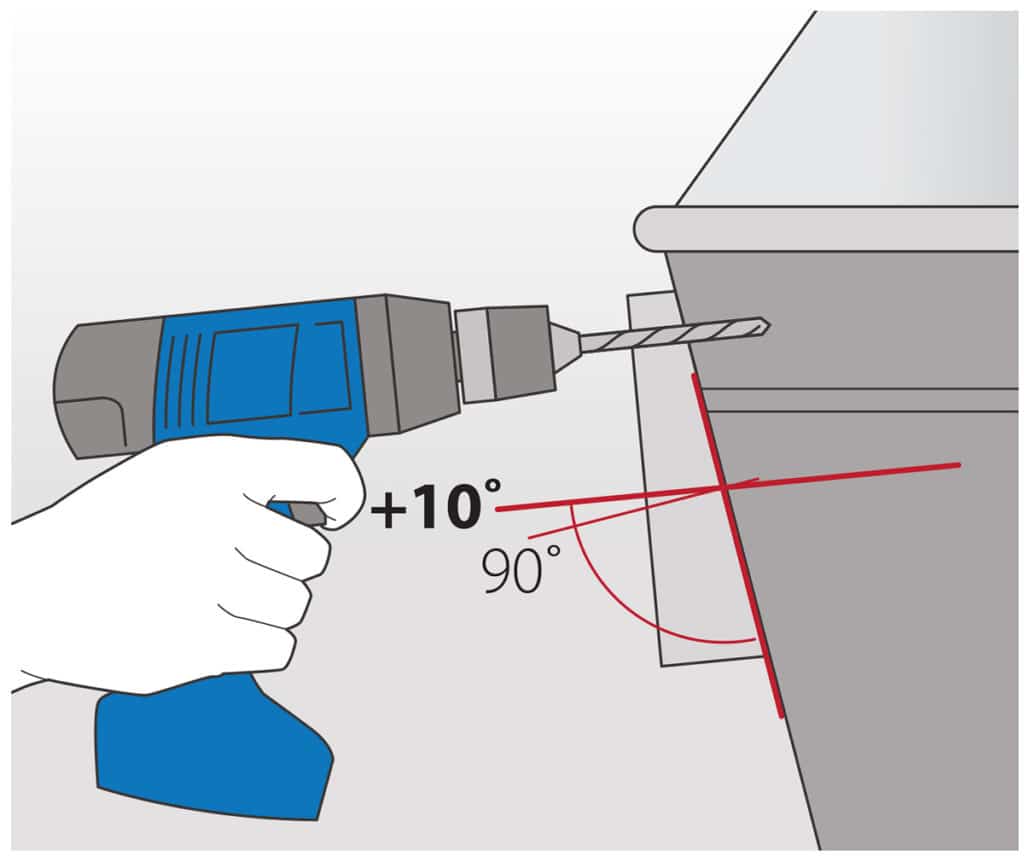
Using the included 10-degree poly spacer (or a custom shim, if required) and stainless-steel mounting bracket as an angle guide, drill one three-eighths-inch mounting hole through the transom, and use one bolt to attach the mounting assembly flush against the transom. Use the bracket as an angle guide to drill the remaining mounting holes. Boating Magazine
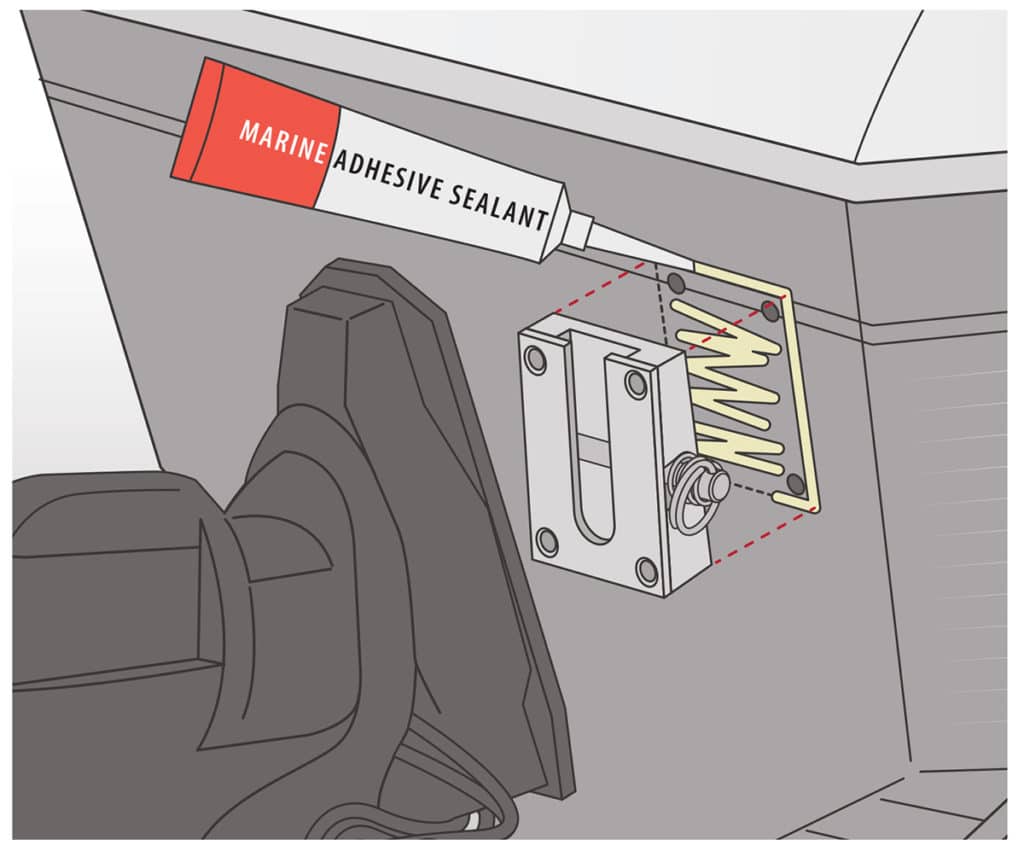
Apply a generous bead of sealant such as 3M 5200 between the poly spacer and transom, and bolt on the bracket using five-sixteenths-inch stainless-steel bolts, washers, Nyloc nuts and a backing plate. Wipe away any excess sealant once all four bolts are tightened. Then retorque the bolts 24 hours later. Attach the ladder into the bracket and try it out. Boating Magazine
The Garelick Model 19803 comes with two storage brackets that let you stow the ladder in a locker, under a gunwale or elsewhere. Position one bracket so it clips just below the bottom step and the other just above the top step. Use two stainless-steel screws for each bracket. Boating Magazine
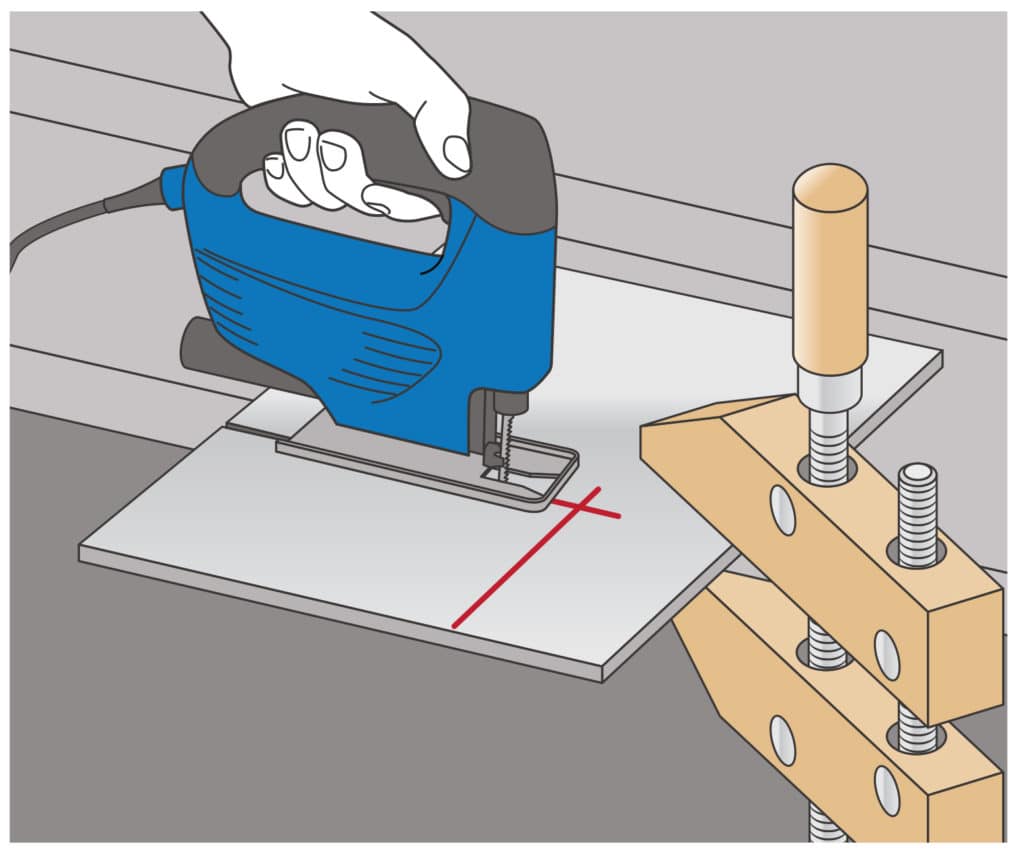
Using a jigsaw with a fine blade, fashion a 4-inch-wide by 5½-inch-tall backing plate from quarter-inch-thick aluminum. Use the ladder’s mounting bracket as a template to mark and drill four corresponding holes. Round the corners of the plate to minimize stress points as you tighten the bracket in place. Boating Magazine