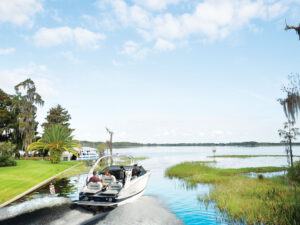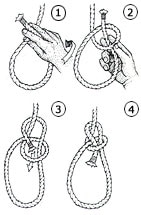
BOWLINE
The bowline (pronounced “bo-lin”) is rightfully known as the king of knots. It is easy to tie and untie, increases its grip as tension is applied, and will never jam. It takes times and practice to learn, but the effort will be well rewarded. Use the bowline for attaching jibsheets and halyards to sails.
1. With your palm down, hold the working end between your fore- and index fingers, placing it over the standing part with your thumb. 2. Twist your wrist so your palm faces up and a loop has been formed in the line. 3. Pass the working end behind the standing part and then back through the loop. Remember, after the end passes under one part it must then pass over the next. Always alternating. 4. Before putting into service, snug the parts up to make sure they are set.
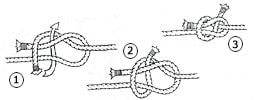
SHEET BEND
A bend joins two ropes. The worst way of doing this is with a square knot, which can slip or come apart. The best way is with the sheet bend. It is easy to tie, strong, secure, and works well with ropes of dissimilar sizes. If you are going to remember one bend, this is it.
1. Make a loop in the end of one rope. If one line is heavier than the other, make the loop in it. Pass the end of the other rope through and around the loop as shown. 2. The working end should exit the knot on the same side as the loop’s short-ended side. 3. You may have noticed that the sheet bend is similar in construction to the bowline, so it can be tied in the same manner.
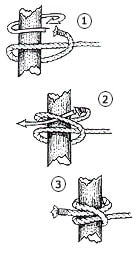
CLOVE HITCH
The clove hitch is for tying to pilings when there aren’t any dock cleats. Its best feature is that it can be easily tied when there is strain on the line, as there might be when docking in strong winds. The first turn around the piling is usually enough to hold the boat, keeping everything in place while you finish tying the knot. This is essentially a temporary knot, and may slip if the direction and strain on it changes.
1. Take a turn around a piling. 2. Take a second turn, this time crossing up and over the standing part of the line and the first turn. Tuck the end under and through the crossing you just made. 3. Pull both ends to snug up the knot. For a more permanent knot add two and a half hitches around the standing part of the line.