Getting Started
Time to Complete: 7 Hours
Skill Level: 3/5
Parts
*Shurflo Pro Blaster washdown pump
*2 Jabsco quick-disconnect fittings
Tools and Supplies
*Drills, bits, hole saw
*Stainless fasteners
*Phillips screwdriver
*10-gauge marine-grade wire
*Solderless ring terminals
*Adhesive-lined shrink tubing
*Heat gun
*15A circuit breaker
*Bronze check valves and T-fittings
*Shields Series 162 poly-reinforced PVC hose
*Stainless hose clamps/straps
*Sealant
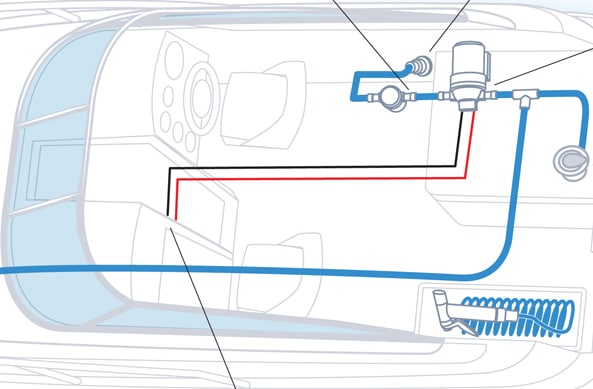
If fish guts in the cockpit or anchor muck and slime on the foredeck are an issue for you, there’s nothing like a high-powered washdown pump to help in the cleanup. All it takes is a few hours of scrambling around the bilge to install the pump, piping and a single two-wire run. Add a couple of deck-mounted quick-connects, and you’re in “tidy heaven.” To make life easier, T-off the existing head intake — it’s easier than installing a new through-hull.
Many newer boats do not have raw-water toilets but instead use water from the freshwater tanks. In this instance, the washdown pump can be plumbed from any other raw-water intake, such as a live-baitwell pump inlet. The exception would be the cooling-water inlet for engines or gensets, since simultaneous demand for water could starve the engine’s cooling capacity with dire results. This installation will assume a raw-water inlet is available. If not, install a new through-hull seacock.
Step 1
If the boat is in the water, close the existing head intake valve, remove the hose and attach a new bronze T-fitting. Attach a check valve to each branch of the T-fitting to prevent air from entering either line.
Step 2
Locate and mount the washdown pump in a dry location in the bilge up to six feet from the raw-water intake, but be sure to allow sufficient room to place the raw-water strainer on the inlet side of the pump. For extra-quiet operation, insert a 1/8- to ¼-inch rubber gasket between the pump and the bulkhead. Screw the second T-fitting to the outlet side of the pump.
Step 3
Route the hose from either side of the pump outlet T-fitting to fore and aft termination locations. The forward outlet could be mounted in an anchor locker and the aft would be on a bulkhead in the transom walkthrough. Drill holes for the quick disconnect fittings, but don’t install them yet. Using a good sealant like 3M 4200, seal the screw holes as well.
Step 4
Reconnect the head intake hose to one side of the seacock T-fitting/check valve. Connect the other side of the seacock T-fitting/check valve to a short section of hose running to the inlet side of the raw-water strainer. Run a second short section of hose from the outlet side of the strainer to the inlet side of the pump. Double clamp all connections.
Step 5
Run the hoses from the pump outlet T-fitting to the holes drilled for the quick-connect bulkhead fittings. Support the long hoses every 18 inches with clamps or straps. Pull the hoses through the holes and double-clamp them to the fittings. It’s easier to work out in the open. Once the hoses are attached, install the fittings to the bulkhead or deck.
Step 6
Run a length of 10-gauge wire from the positive (red) and negative (yellow or black) leads on the pump to a 15A circuit breaker on the DC distribution panel or a conveniently located subpanel. Use properly sized insulated ring terminals at the panel and join the pump leads to the wire run using insulated butt connectors with heat-shrink tubing.