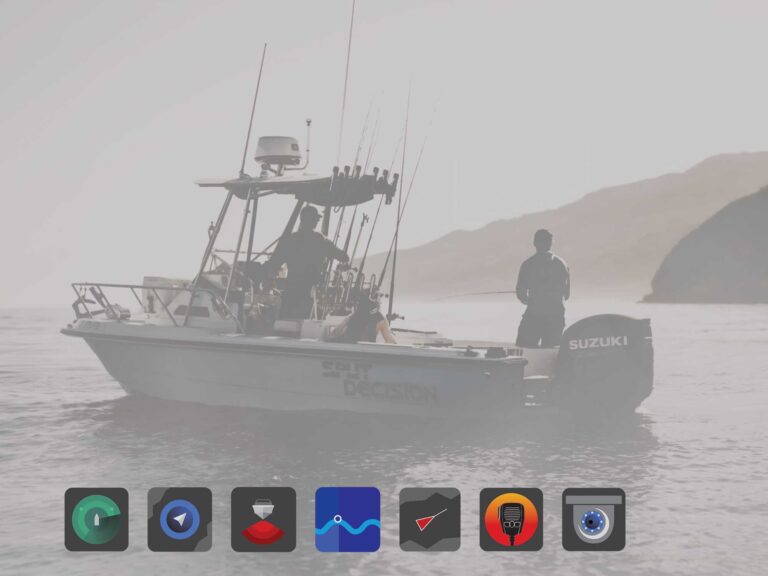
Drilling Holes In Your Hull
Besides docking on a windy day with a new boat in front of an audience, drilling holes is one of the most dreaded tasks for a do-it-yourself boater. But boats are full of holes, from antennas on the hardtop to transducers on the bottom. So why do we fear them?
Probably because, on some level, we know water isn’t our element. Despite our boat blessing us with the ability to visit a different realm, a special place reserved for the members of our rank, its primary purpose is to keep the water out.
There’s merit to this fear. According to marine survey firms, leaks at through-hulls are estimated to be the cause in 18 percent of sinkings while under way. The numbers are worse at the dock, where failures of fittings below the waterline account for a full 50 percent of sinkings. BoatU.S. insurance claims back up the data. According to BoatU.S. numbers, fittings cause 44 percent of dockside sinkings and 16 percent while under way.
But, if you want conveniences like a head or livewell, or even an extra cleat, you’ve got to drill holes. To learn more, we went to the pros at Regal Boats and documented the proper procedures for installing accessories.
The Risk
From bowriders to express cruisers, boats have dozens, possibly scores, of holes. There are holes for water pickups, drains and transducers, and above the waterline for bilge outlets, air-conditioners and exhaust. And the deck? Fresh from the cut-and-grind booth it looks like Swiss cheese. There are holes for cleats, tow eyes, grab handles, speakers, lights and more. And that’s on a brand-new boat. Why should you fear drilling one or two more?
Well, because problems can happen when good holes go bad. We’ve cited the serious consequences, but there are other risks. Gelcoat can spider-crack or chip; electrical wiring can be damaged; you may even accidentally drill right through the hull side.
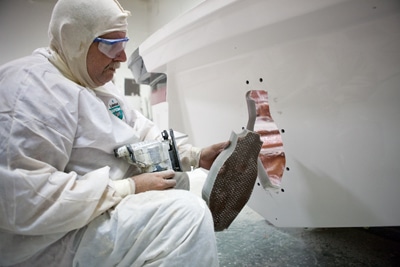
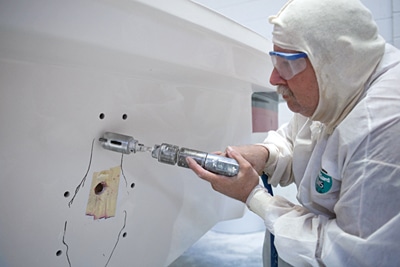
“Measure twice and cut once,” cautions Regal plant manager Mark Vahle, echoing an age-old construction adage (the flip side of which is “measure once and curse twice”). “Verify what’s behind the hole you intend to drill,” Vahle says. “You don’t want to think you’ve got two inches before you hit the hull side and discover you’ve only got one. Fiberglass repair costs a lot of money!”
Drill, Baby, Drill
What are the proper tools? You need two: a drill and a jigsaw. Standard drill bits will do for holes under an inch in diameter; for larger cutouts, use a bi-metal hole saw. Use sharp, fine-tooth blades. Coarse blades will grab and chip the gelcoat. Masking tape provides good protection. Use it to cover the boat’s surface at the area to be drilled or cut.
Placement is critical. Regal uses pre-made templates with pre-drilled holes. Workers put the template in place to drill with confidence. You can make your own templates out of plywood by tracing the part pattern and then drilling through. Clamp your jig in place, and critical alignments are virtually guaranteed.
You can also use a simpler template. Many items, like cleats, may come with a paper or cardboard template to follow. If not, make one of your own, or use the piece you’re installing to carefully mark the hole pattern.
To ensure that your bit stays put at the center of a hole when starting the drill, punch a small nick in the surface with an awl first. It prevents the bit from skipping.
Here’s another tip. Rather than drill through the entire depth of the material, Regal techs drill partway through, then stop to pop the “plug” from the cut out of the saw. Once clear, they continue. Cutting in stages prevents “plugging up” the hole saw, a problem that plagues home mechanics.
Cutting a square hole? Use your jigsaw. Mask the area to protect the gelcoat. Rounded corners prevent stress cracks, so drill the four corners, then use the jigsaw to connect the dots. If you must cut a right angle, use a knife to score an arc around the corner first. Should you start a crack, it won’t spread beyond that line. Likewise, countersink screw holes to avoid starting a crack.
“Gelcoat has no flex,” Vahle explains. “Even a small crack tends to travel over time.”
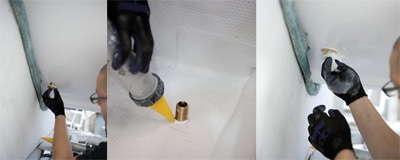
Seal the Deal
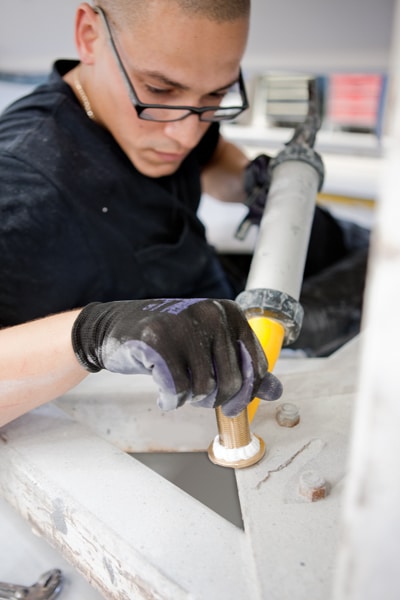
Cutting or drilling is just the start. To finish the job, you must properly bed the fitting with sealant.
Start by cleaning the surface with adhesive remover or acetone. Above the waterline, silicone sealants are often acceptable. For below the waterline, or for additional bonding strength, opt for a urethane-base sealant such as Sikaflex 291 or 3M 5200.
Place a generous bead around a fitting’s flange, so that sealant evenly oozes out around the perimeter of the hole as you push it into place. If additional screws are required to secure the flange, squeeze a bead of that same sealant into each hole before installing them. Inside the hull, run a bead of sealant around the interior of the hole, and then snugly tighten the collar or nut.
Urethane sealants often yellow when exposed to the environment. If Regal needs the strength of a urethane but the clean appearance of silicone, workers may install a fitting with urethane, then overcoat it with silicone. Vahle says, “That’s going to stay white out in the environment.”
Working neat with sealant can be tough. Regal pros share these tips: Use a plastic scraper, or scrap of Formica, to remove most of the excess. Avoid razor blades; it’s too easy to damage the surface. A scrap of foam rubber with soapy water wipes away the final filmy excess better than paper towels do.
If the hole is through cored fiberglass, you’ll need to seal out moisture. Many coring materials don’t readily absorb water. Regal does little more than coat them with gelcoat. Wood cores, however, require added attention.
To properly seal a wood core, use epoxy resin, and brush it onto the exposed surface to thoroughly wet out the exposed end grain of the wood. Allow the epoxy to soak in. Recoat several times. Some pros suggest preheating the area with heat lamps or a heat gun, allowing the resin to penetrate even deeper.
Don’t forget post-project common sense. If you’re drilling through the bottom of your boat, check that it’s watertight before you go offshore. “Drop it in on your trailer and verify there’s no leak,” suggests Vahle.
Yup, boats are chock full of holes. But as we discovered, a few more, when properly drilled and sealed, won’t rock the boat. On the contrary, those holes just may make it possible to add the equipment and features that make your boating experience more enjoyable, convenient and even safer.
So plan ahead, use the right tools, and drill that hole. It’s easy when you know how.
Safety & Skill
Safety
Seasoned pros wear safety glasses or goggles. You should as well.
Safety
Wear a dust mask or respirator during all drilling and cutting procedures.
Skill
Keep a controlled grip and make sure the drill is square to the surface.
Skill
Use a centerpunch to dimple the surface so the bit won’t skip.

Safety
A pair of light gloves prevents abrasion from splinters and chips.
Skill
Don’t push down hard. Instead, let the saw do the cutting for you.
Skill
Keeping the tool square and level is important when using a hole saw.
Skill
For deep cuts, work in stages, stopping the hole saw and clearing it.
Saw Laws
Drill First
Drill holes through the “corners” to insert the blade and avoid overcutting.
Cut Away
After the holes are drilled; connect the dots, cutting along the marked line.
Hull Hole Bevel Devil
Bevel or chamfer the edges of holes with a countersink, or even a file, for the very best seal.
Inside Out
Make sure you seal both sides of through-hull fittings, applying even, generous sealant beads.
Mess Master
Avoid paper towels. use a scrap of foam rubber and soapy water to clean up excess sealant around the fitting.
Dealing with Balsa
Balsa coring needs careful attention. Why? “That stuff soaks up water like a sponge,” Mark Vahle says. If you want to keep any future water intrusion at bay, it’s essential to first “bed the core” by removing as much wood as possible and replacing it with a paste of epoxy resin thickened with a suitable filler, like colloidal silica. Start by removing the balsa from the hole’s perimeter. Use a Dremel or ice pick, working between the fiberglass skins to a depth of at least a half-inch. Work down to the fiberglass to ensure the best bond. Mix the resin and then add the silica, thickening it to a paste. Next add the hardener. Next, use a tongue depressor to work the goop into the void, moving in one continuous direction to eliminate trapped air bubbles. A single session should do it. For depths deeper than a half-inch, allow one layer to cure to avoid building up excessive heat that cracks the resin. Once cured, sand the edges and add the next layer.Last, sand the edge back to the shape of the original hole.
Chafe Protection
If you’re drilling a hole for routing electrical wires or control cables, it’s essential to cover the edges for chafe protection. “For a customer, it could be as easy as taking electrical tape and wrapping it around wiring where it passes through a hole,” Vahle says. Wire looms offer more permanent protection. Regal will also fill some smaller holes with silicone; when it hardens, it eliminates any movement within the hole. Larger holes can be trimmed with PVC conduit, which can also be secured with silicone. Beware of bare fiberglass edges; they can be extremely sharp and cut through insulation with movement and time.