Installing an autopilot is relatively easy. We installed the new, compact SP-110 from Si-Tex Marine Electronics (si-tex.com), which can be configured for mechanical or hydraulic steering systems, aboard a 22-foot outboard-powered cuddy-cabin boat with Teleflex SeaStar hydraulic steering (teleflexmarine.com) and a GPS/chart plotter. Unlike many autopilots, a physical rudder feedback unit is not required, simplifying the project.
Getting Started
Finish Time: 6 hours
Skill Level: 4/5
Tools and Supplies:
*Box wrench set
*Phillips screwdriver
*Electric drill and bits
*Wire stripper and crimper
*Assorted heat-shrink marine wire connectors
*Clean-up towels for hydraulic fluid spills
*Hydraulic fluid (SeaStar HA5430)
*Funnel
*Petroleum-resistant pipe sealant
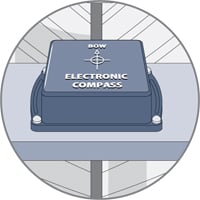
1. Electronic Compass
Mount the electronic compass horizontally in a dry location, low in the boat, close to the centerline and free of magnetic interference, such as from stereo speakers. The heading arrow must parallel the centerline and point toward the bow. We mounted ours in a dry compartment below the cabin V-berth.
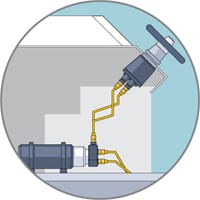
2. Autopilot Pump
Mount the hydraulic reversing pump in a dry location as close as possible to the hydraulic steering helm in order to facilitate running and connecting hoses between the two. Also, due to magnets in the pump motor, keep it at least 40 inches from the electronic compass and its cable, and your boat’s compass.
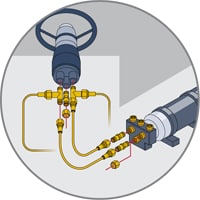
3. Hydraulic Plumbing
Adapter kits (Teleflex HF5501, $115, westmarine.com) allow connecting the helm and pump. Use a petroleum-resistant pipe sealant on the male threads when installing fittings. In connecting hoses to the pump, it doesn’t matter which side is port or starboard , because the SP-110 configures itself.
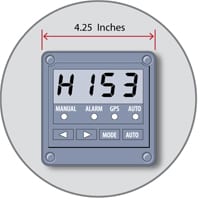
4. Autopilot Control
The faceplate of the SP-110 control head measures 4¼ inches square, yet its canister back makes it a glove fit in a 2½-inch-diameter gauge hole. It’s secured with the four supplied screws. The electronic compass plugs into the “compass” port on the back, as does an NMEA 0183 cable for GPS input. The SP-110 must be wired to a separate on/off power switch with a 20-amp fuse. Two additional wires on the back of the control must be connected to the autopilot pump.
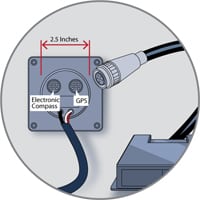
5. GPS Connection
Though not required, GPS input allows the SP-110 to adjust for speed and to allow for automatic steering to waypoints. The Si-Tex comes with an NMEA 0183 cable that plugs into the “rudder” port on the back of the control. Refer to the GPS manual for the proper connections needed on the GPS end. Adapters are available from Si-Tex.

6. Bleeding the System
Refill and bleed the steering system. Add fluid while turning the motor or drive back and forth using the “jog” arrows on the control. For detailed top-off and bleed instructions, visit boatingmag.com/hydraulic or seatechmarineproducts.com. The autopilot’s ready for sea trial and calibration. For a video of the SP-110 sea trial, visit boatingmag.com/autopilot.


