The winter season is showing its teeth right about now — but that’s no reason to let your boat collect dust. On the contrary, now is the perfect time to tackle some of those small projects that can be hammered out quickly. Here are 20 great tips to fix minor ailments and have your boat ready to rock once the weather begins to warm.
1. Get a Grip
Place sandpaper around a filter — between filter and filter wrench — to make removal of greasy, slippery fuel and oil filters easier.
2. Screwed
You broke a screw off flush, or nearly so, and need to extract it? Cut a slot with a Dremel tool grinding-wheel attachment, and then remove it with a screwdriver.
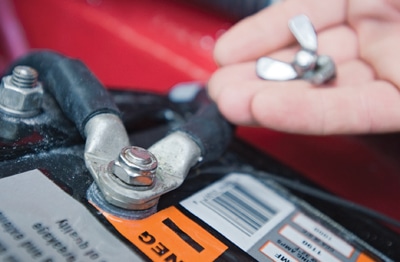
3. Wing Ding
Replace wing nuts on battery terminals with lock nuts (typically three-eighths-inch for positive and five-sixteenths-inch for negative) for season-long resistance to loose connections due to vibration.
4. Third Hand
A pair of mini locking pliers is a great substitute for a helper when you need to tighten fasteners penetrating bulkheads, decks or other areas where you can’t reach around the other side to hold the nut. Lock the pliers on the nut, and then apply a wrench or screwdriver to the fastener’s head. The nut will spin initially, but after a half turn or so, the locking pliers will inevitably encounter an obstruction, preventing the nut from turning and allowing you to sock the bolt down tight.
5. Smoooother
Always de-wax your hull before compounding, lest you muddle the finish rather than make it shinier. Pettit’s 15095 de-waxer ($25 a quart, westmarine.com) is one of several commercially available de-waxers, and in a pinch, you can use acetone.
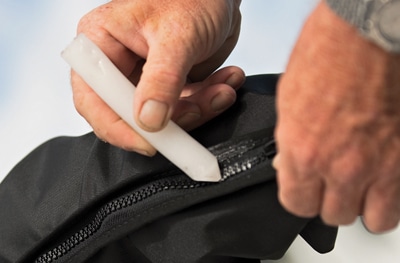
6. Snap Vigil
A candle or a white crayon makes lubricating canvas and cushion zippers and snaps…a snap.
7. Sticky Fingers
Use masking tape while caulking fixtures to produce a clean, crisp bead; “round” corners can be taped by applying small pieces of tape at increasing angles across the corner radius. Rub the tape edges with a thumbnail or screwdriver butt to ensure that no caulk gets underneath.
8. Breathe Easy
Does the engine stall inexplicably after getting under way? It could be a clogged fuel vent. Before tearing apart fittings and hose, perform this quick and easy check: Open the fuel fill cap and run the boat (when it’s not raining, and on calm water so no spray will get in the tank). If the problem stops, you know you have a clogged vent.
9. Bring Out the Best
A clean, empty mayonnaise jar is a great fuel system diagnostic tool. After removing the water separator, dump its contents into the jar. After a few minutes of settling, water in the fuel will be indicated by layering, like oil and vinegar, of the fluid in the jar.
10. Safety First
Never throw solvent-soaked rags, such as might be used while bottom-painting, in the trash. They can spontaneously combust. Instead, place them in a metal bucket, glass jar or coffee can before disposal.
11. Ground Found
To check for a faulty fuel gauge, “ground out” the circuit by placing a screwdriver shaft (or other conductor) across the terminals on the sending unit. If after you do so the gauge needle moves to “full,” the gauge is good and the sender is bad; if the needle doesn’t move, the gauge needs to be replaced or the wires are bad.
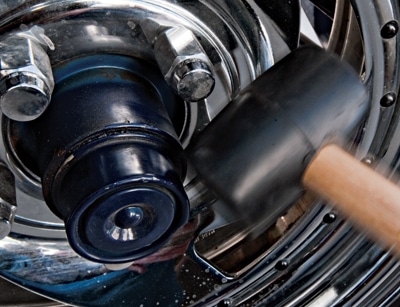
12. Hammer Time
While you can use a block of wood and a hammer to remove/reinstall “bearing buddies” and grease caps on your trailer’s wheel hubs, a rubber mallet is the right tool for the job — less clumsy to use and leaves one hand free. A rubber mallet is also ideal for popping a loose rub rail back in place. White rubber won’t leave black marks.
13. Push, Push, Push
For cleaner caulk lines, use a cartridge gun, not toothpaste-style tubes, and always push rather than pull the gun.
14. Move It or Lose It
If your trailer is used only for spring launch and fall haul, make sure to move it a few feet once in a while to prevent the bearings from taking a set; alternatively, jack it up and spin the wheels once in a while. It’s also a good idea to tow the trailer a mile or so to exercise the tires and help prevent belt separation.
15. KY
Lubricate filter gaskets with a dab of oil before installing to ensure the O-ring doesn’t bind.
16. Lid Kid
Using a large nail, punch holes in the rim of paint cans to allow excess paint to drain back into the can rather than clogging the rim and making a poor seal with the lid.
17. Lost Contact
Do you have a transom-mounted transducer that’s not working so well? Assuming the mounting height and location are good, try angling the face forward a few degrees; that is, press down a bit on the rear of the transducer.
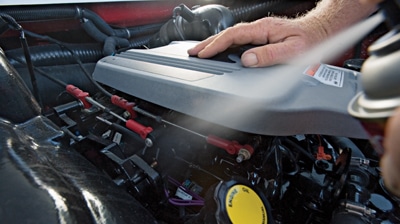
18. Spray Away
While we love WD-40 and its myriad uses, we prefer silicone spray lubricant, like CRC Heavy Duty Silicone ($8.48, jamestowndistributors.com), to coat our engine power heads and blocks, because it dries to a waxy film rather than staying wet, and so doesn’t attract grit and dirt. Spray the entire engine when cold with this twice a season, paying particular attention to fasteners, and your mechanic will love you.
19. Hieroglyphics
Always pour paint out of the can over the front of the label; pouring over the back may obliterate the directions, and you may need them down the road. Alternatively, remove and file away the label and mark the can lid with a Sharpie pen so you know what it is. If you obliterate the directions, marine paint companies such as Interlux have detailed user guides for their products online.
20. Balloon Trick
Half-used cans of paint will last longer and stay fresh if there’s no air in the can with the paint. Commercial vacuum products, like the Pump-n-Seal ($32.95, pump-n-seal.com) are available. Other guys open the valve on a propane torch above the can before resealing to displace oxygen. a simple solution that works for up to a year is to place an inflated balloon atop the half-filled contents of the can to displace the air before re-lidding.