Full-liner, foam-injected hulls help make small boats hard to sink. Yet they create issues when it comes to installing flush-mount gunwale rod holders. Spray and wash-water can pour into the rod tubes and accumulate inside the gunwales, soaking the foam, adding weight and promoting mold and mildew. Also, cup holders can drain into wiring, causing shorts and corrosion. The solution is to install drains, allowing any water that enters to quickly exit. Here is how we installed drains on an existing set of gunwale rod holders on a full-liner boat.
Skill Level: 2 of 5
Time to Complete: >1 Hour per Rod Holder
Tools and Supplies
- Rod-holder-base drains
- 3/8-inch push-in impact drains
- 3/8-inch-inside-diameter clear vinyl hose
- Power drill and 1/8- and 1/2-inch drill bits
- Heavy-duty shears
- Rubber mallet
- Tie-wraps
- Life-Calk sealant
Install the Drain Cup
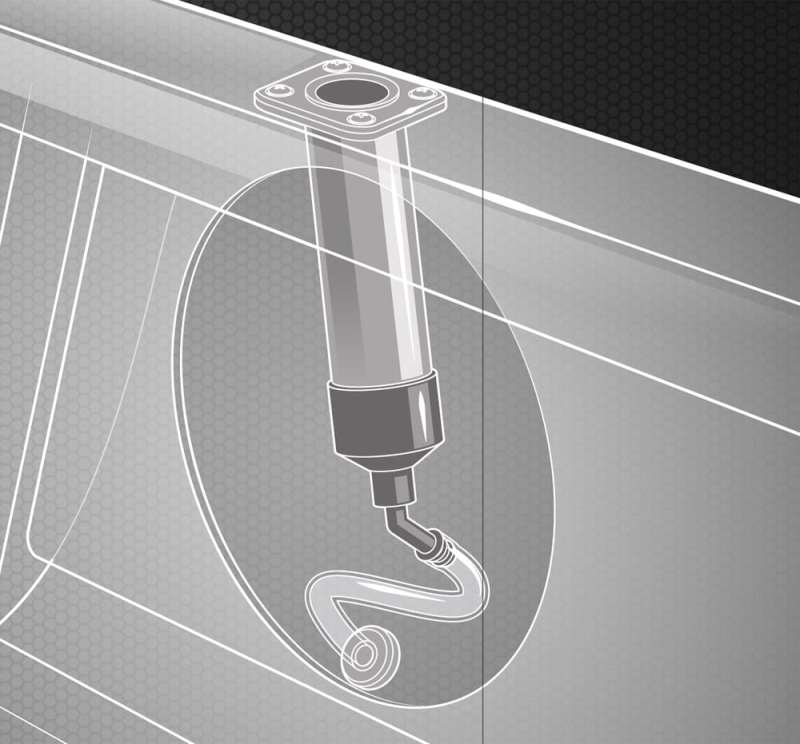
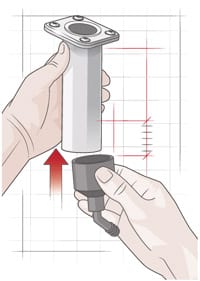
Remove the rod holder and fit the bottom with a rod-holder-base drain cup. These molded vinyl cups come in 2-inch and 2 3/4-inch diameters to fit small and large tubes, and each is fitted with a 3/8-inch hose barb at the bottom. The fit is tight, so warm the vinyl in the sun before fitting the cap to the rod tubes. Affix a tie-wrap for assurance. You can also order rod holders with built-in drains. In either case, don’t reinstall the rod holder just yet.
Determine Position for the Drain
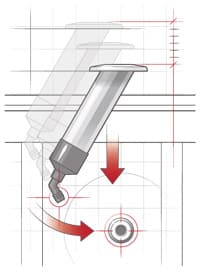
Hold the rod holder along the inside of the boat with the flange parallel to the gunwale in line with its mounting point to determine where to install a 3/8-inch push-in impact drain. The spot should be a flat, nearly vertical surface on the inner wall that is slightly below the bottom of the rod-holder tube. Mark the spot with a pencil and look into the rod-holder hole to make sure there are no hoses or wires behind the wall where you plan to drill.
Drill a Hole for the Drain
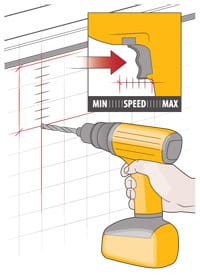
Use a sharp 1/8-inch drill bit to bore a pilot hole, then a sharp 1/2-inch bit to drill the final hole for the drain fitting. Dial the drill motor up to highest speed and apply only light pressure at 90 degrees to the surface to cut the cleanest hole possible. While the drain is 3/8-inch in diameter, once you press on the clear vinyl hose, the assembly will fit snugly and securely in the 1/2-inch hole. Drill too slowly or apply too much pressure and you’ll bugger up the fiberglass.
Snake the Hose In and Up
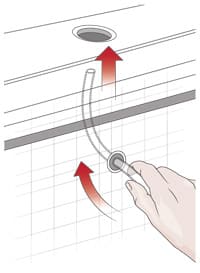
Push a length of 3/8-inch-inside-diameter clear vinyl hose through the hole and snake it up inside the gunwale to the hole for the rod holder. This is fairly easy, though it might necessitate gouging away a bit of foam around the area where the bottom of the rod holder will sit. It will also require more hose than you will eventually need to install the drain.
Read Next: Top Rod-Holder Accessories
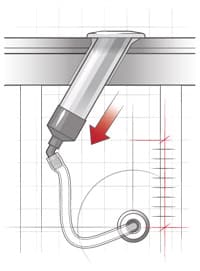
Attach Hose to the Rod-Holder Drain
Press the upper end of the hose onto the hose barb of the drain cup. For an extra measure, you can use tie-wraps to secure the hose to the barb. With this done, reinstall the rod holder, pulling out excess hose as you lower the rod tube in place. Be sure to bed the rod-holder flange and mounting screws with marine sealant to keep water from seeping underneath and below.
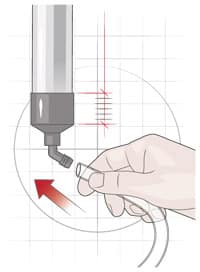
Install the Push-In Drain
Trim the excess hose, leaving about 1 1/8 inches hanging out of the hole. Press the drain fitting onto the hose, and then push the assembly into the 1/2-inch hole. Apply a bit of marine sealant to the inside of the drain flange before seating it. This press-fit will be tight and might require a few taps from a rubber mallet to seat it completely. To make sure there are no kinks in the tubing, pour some water in the rod holder to see that it drains freely.


