Underwater lighting isn’t a necessity on a boat, but it sure does look good when you’re moored up at night. While cutting a hole in the hull can be a tad scary, several hull lighting options are available that fasten on the outside of the hull, in this case quite conveniently on trim tabs. This is a one-person job, but it doesn’t hurt to have someone around to help.
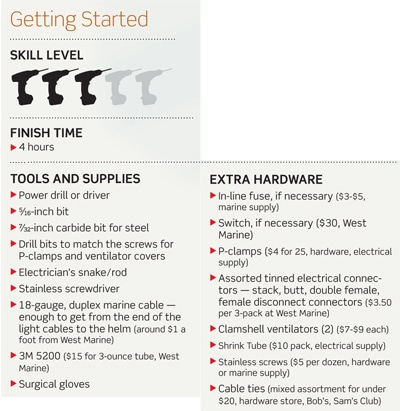
I went for the Perko 0178 trim tab mount lights ($499 a pair). They’re compact and have brackets to adjust height for different types of trim tabs, and I like the plastic housings since these are going in salt water — no additional electrolysis problems to worry about. They come with eight feet of 18-gauge wire, have a 50,000- hour rated service light, are available in blue or white and draw less than a half-amp each.
Step 1: Position the lights on the top side of the trim tab near its trailing edge. In case the trim tabs have a lip, these Perko lights include a shim for boosting the light over the lip. Using the light as a template, mark the holes and drill them with the 7/32 bit. A drop of oil will ease the cutting and protect the bit.
Step 2: Use 8-32 stainless-steel pan head machine screws and locknuts to fasten the lights to the tabs. The nuts fit in a recess in the lights; insert the screws from the bottom of the tab.
Step 3: Tilt the trim tabs fully down; this will give you the distance you’ll need to accommodate the movement of the tabs without straining the power cable. Fasten the cable to the trim tab actuator with cable ties.
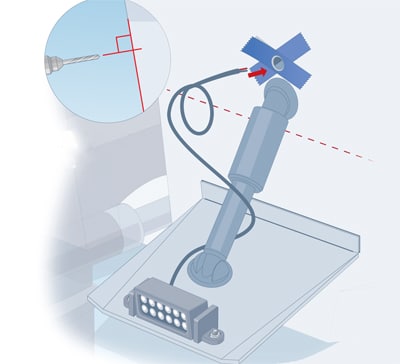
Step 4: Drill a 5/16-inch hole through your transom above the waterline from the outside, taking care to align the drill bit square to the angle of the transom. Placing masking tape over the drilling point protects it from chipping, as does running the bit in reverse to grind a small dimple first. Make sure nothing will be damaged inside when the bit comes through. Pass the wires through the holes. Then bring both wires to one side of the boat in preparation for running them forward to the helm. Typically, you’ll run up the starboard side since that’s where most helms are located. At this point the wire from the light on one side will be longer than the wire from the light on the other side. Cut the longer wire so that its end is even with the shorter wire’s and strip 1½ inches of insulation off the ends of each positive (white) and ground (black). Form these into a “J” shape to prepare for splicing to the duplex cable from the helm switch (black) in Step 7.
Step 5: Now that you’ve stopped shaking from drilling holes in your boat, squeeze enough 3M 5200 adhesive into the hole that it bulges out both sides. Wearing protective gloves, smear and smooth the squeezed-out goop around the cables at the holes to ensure water doesn’t seep into the transom core material. Have paper towels at hand because 5200 adhesive is messy to work with. A spritz of fresh water from a spray bottle will help the goop skin over and cure faster.
Step 6: After the 5200 cures, position the clamshell covers as well as the P-clamp wire mounts, and mark holes for screws. Drill the holes with a bit appropriate for the screw and only as deep as necessary to receive the screws. Inject 5200 sealant into the holes before securing the screws. Smear a dollop of goop up into the void of the clamshells around the cables.
Step 7: Slide shrink tubing on each wire/splice set before starting the splice. Bend both wires into a J shape and bend both the positive and negative pairs of light wires into J shapes. Hook the now paired J’s from the lights to the corresponding J on the duplex: both positives (white) to the duplex red; both grounds (black) to the duplex black. Twist the bottom of the J’s tight to make the splice. Give each a light tug before shrink-sealing to make sure the connections are solid. Heat the shrink tube with a heat gun or lighter. After it cools, loop the wiring into a figure eight and secure with cable ties so that any strain is taken up by the cable, not the splices.
Step 8: Feed the electrician’s snake down to the cable and pull the cable through to your boat’s electric panel. In fact, send a length of string trimmer line down with the snake. That way, you’ll have a snake or pull in place for any future wiring jobs.
Step 9: Disconnect the battery by turning the switch off. If the panel has an open bay for an additional switch, attach a multistack connector and affix the light cable there. If not, you’ll need to purchase and install a new switch. Select a location for the switch and cut or drill a hole to suit (see Step 10).
Step 10: Connect a power line (positive) from an existing switch or bus, ditto with the negative, to the lighting cable and connect both to the switch. If you install a new switch, make sure to install an in-line fuse before the switch in the incoming power line, not on the positive wire going out to the lights! Reconnect the battery and flip the switch, and enjoy the light show.