Almost every boat today has a voltmeter of some kind—either as a dedicated gauge or as part of a multifunction display. But voltage does not tell the whole story when it comes to marine battery status and management. You really need to know how much electrical energy you have available in a battery, and at what rate that energy is being withdrawn or added at any given time.
For this kind of information, you need a battery-monitoring system. Offered by brands such as Balmar, Blue Sea Systems, Mastervolt, Veratron and Xantrex, these monitors keep you informed about a variety of battery measurements, including state of charge, amp draw, and overall battery health, as well as volts. This kind of information allows you to plan and respond quickly if, for example, the house battery capacity drops to a critically low percentage. You might decide to turn off non-critical accessories or start the engine or generator to help recharge the battery.
This kind of information not only provides peace of mind, but it also allows you to plan and respond quickly if, for example, the house battery capacity drops to a critically low percentage of its overall charge. You might decide to turn off noncritical accessories, or start the engine or generator to help recharge the battery.
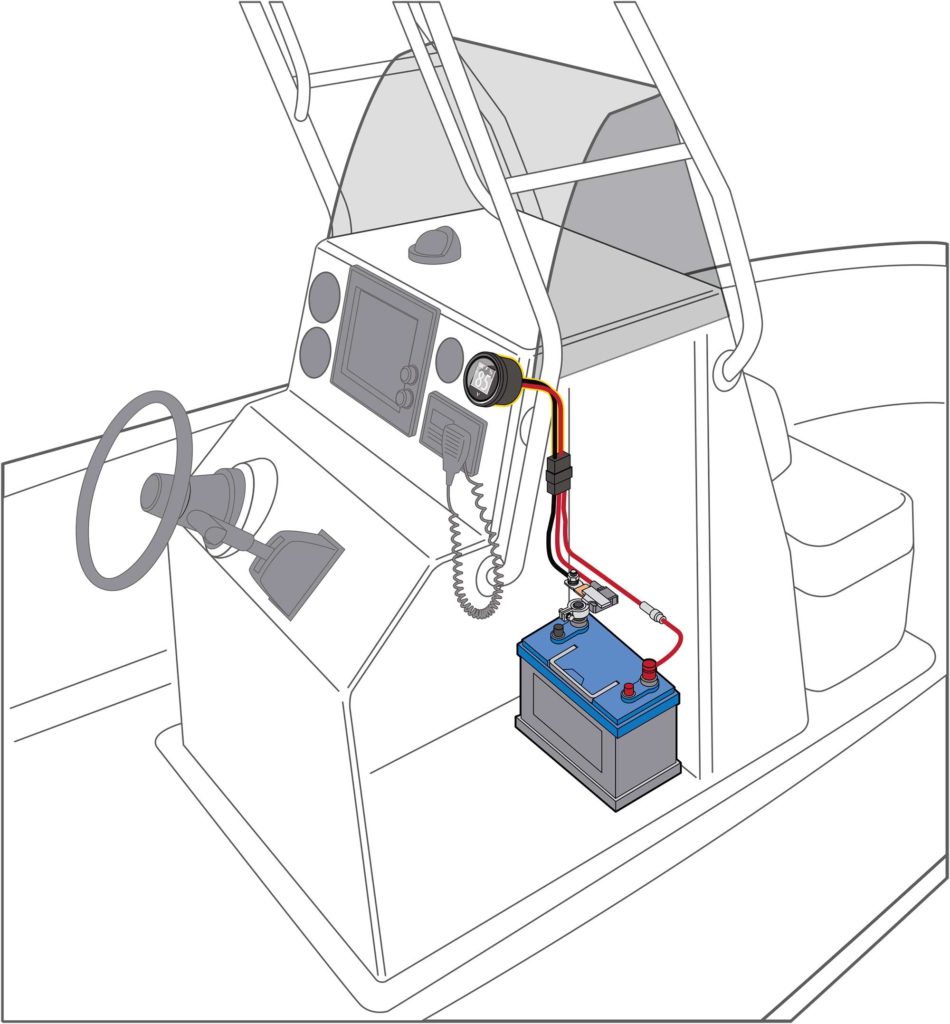
For this project, we decided to install Veraton’s 12-volt Intelligent Battery Monitor (IBM) system for a 31-series marine deep-cycle house battery. Designed for lead-acid batteries only, this system uses a sensor with a shunt attached directly to the negative pole of the battery to read current on a compact Veratron VL Flex helm gauge, among other available Veratron instruments. Before beginning, you should disconnect the negative terminal on the battery, otherwise you risk a short circuit. Also, turn off the engine ignition switch and remove the key.
Skill Level: 2.5 of 5
Finish Time: Approx. 4 hours
Tools and Supplies
- Veratron VL Flex Intelligent Battery Monitor Kit/12-Volt Model B00084701; $229.99; veratron.com
- Power drill and drill-bit set
- 2 1/8-inch-diameter hole saw
- Socket-wrench set and ratchet
- Phillips screwdriver
- Electrical fish tape to help route wire harness
- Wire supports and grommets for chafe protection
- Protective shop glasses
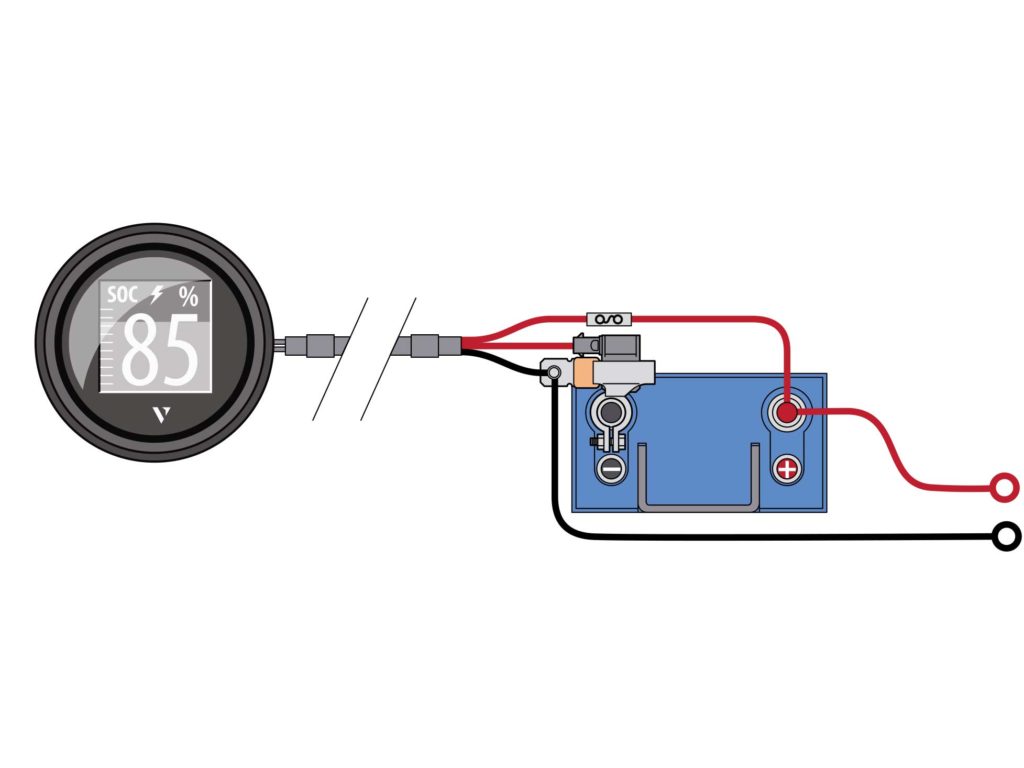
Connect the ground wire on the supplied wire harness to the sensor’s ground bolt. Take care not to damage the sensor while tightening the screw. Mount the ground cable (that had been attached directly to the battery) to the sensor’s post. Clamp the sensor to the large-diameter secondary negative lug on the house battery. Plug the Hirschmann connector on the harness to the battery sensor, and connect the harness’s red wire with an inline 3-amp fuse to the battery’s positive post.
Tip: If your negative battery cable has a terminal clamp that fits a large lug, attach the supplied battery pole adapter to the smaller post in the sensor. This will allow the terminal clamp to fit the sensor.
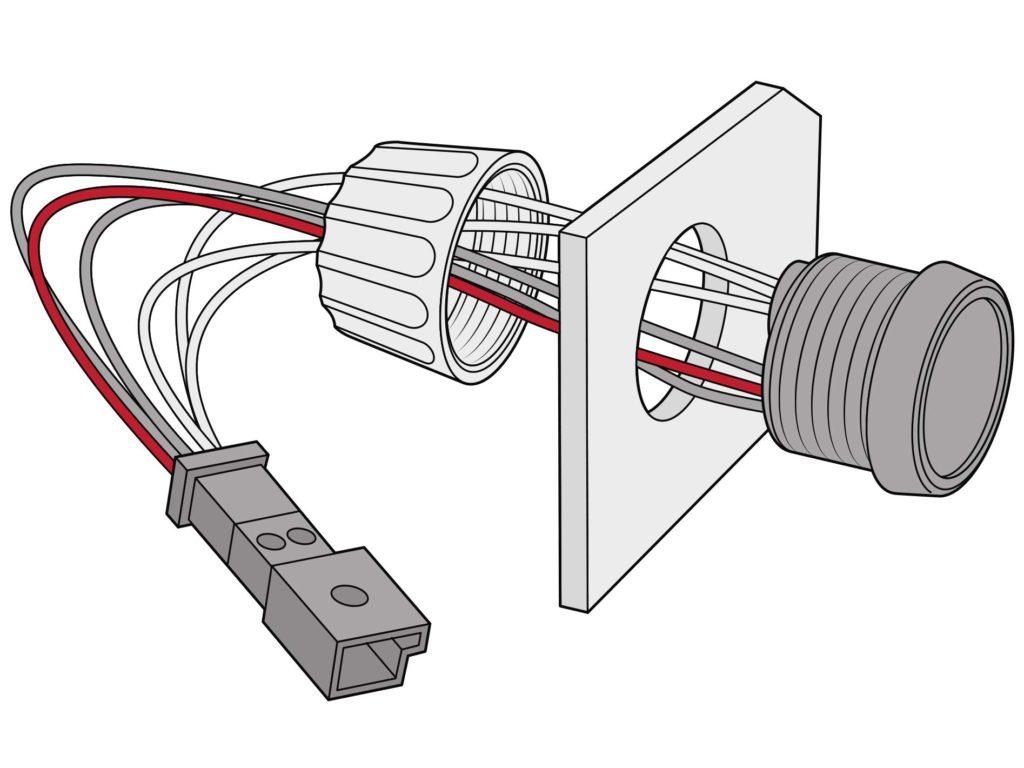
Cut a 2 1/8-inch-diameter hole in the mounting surface, taking care not to damage any wiring or hoses. Make sure there is at least 2 9/16 inches of depth to reach behind. Insert the gauge from the front, and attach the spinlock from behind. With the face of the gauge is upright, tighten the spinlock by hand. To install the push-button control, drill a 1/2-inch-diameter hole in a spot in close to the gauge. Remove the mounting nut and insert the wire pigtail and button into the hole from the front and secure it with the hex-nut from behind.
Tip: The VL Flex gauge comes standard with a black bezel, but optional bezels let you match an existing helm layout. To replace a bezel, gently pry the old bezel off with a screwdriver from behind and press on the new one until flush with the instrument glass.
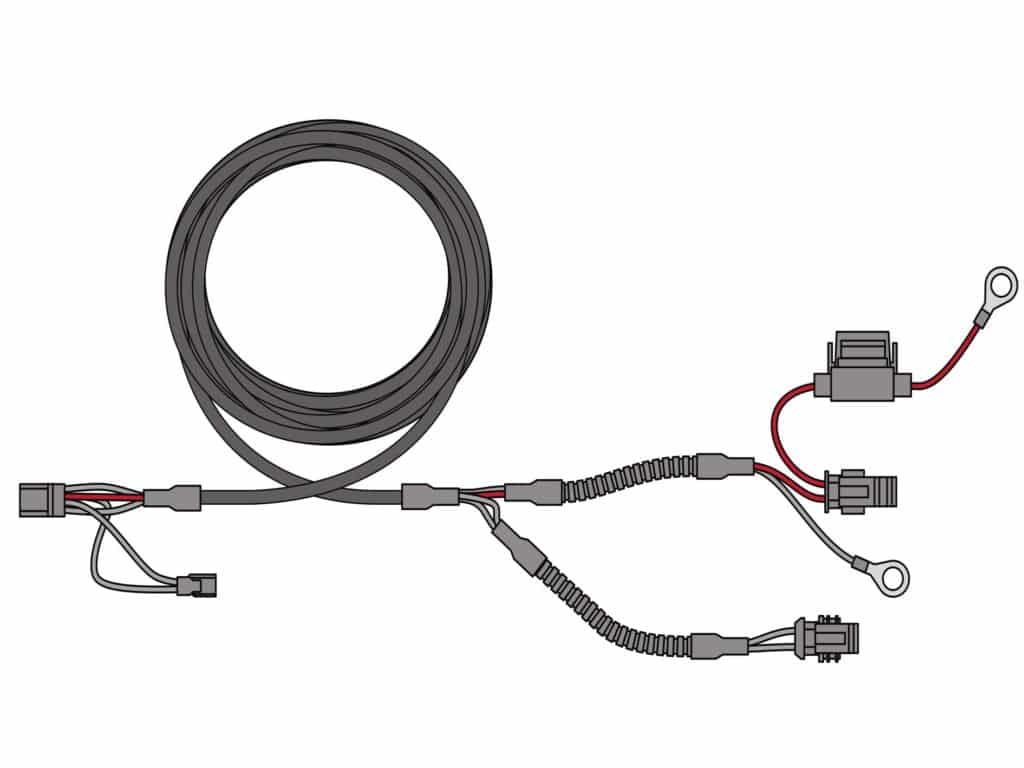
Route the 19.6-foot wire harness from the battery to the location of the VL Flex monitor, ensuring that it’s supported and fitted with chafe protection throughout its run. At the helm end of the harness, connect in the eight-pole Hirschmann plug to the back of the monitor, plug the smaller connector to the control button pigtail, connect the red 12-volt power supply wire to the boat’s ignition, and connect the pink wire to the helm illumination circuit.
Tip: If you need a longer wire harness to reach from the battery to the helm on your boat, you will need to extend the wires yourself using marine-grade wire and crimpon connectors with heatshrink collars.
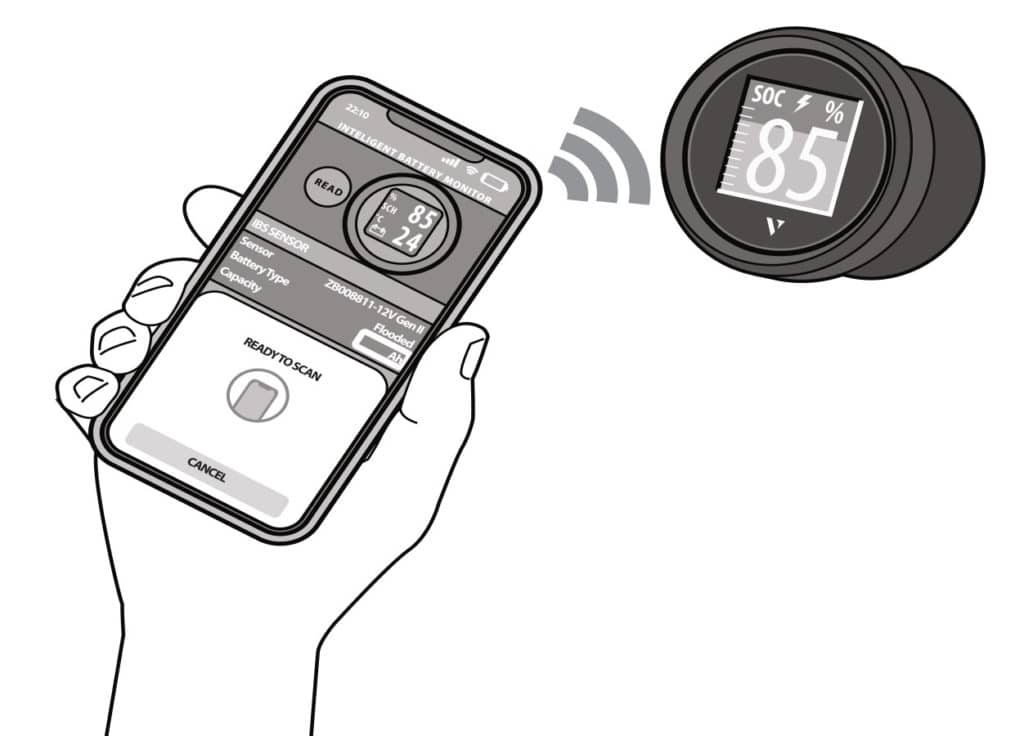
Parameters of the IBM system—such as the battery type and capacity, gauge type and alarms—must be configured prior to use. This is done through the IBM app, which can be downloaded free of charge for both Android and iOS devices. A simple and detailed explanation of the process is available as part of the in-app instructions. Then you load the parameters from your phone to the gauge wirelessly. Thanks to an embedded receiver, the VL Flex 52 can be configured without the need of a power supply.
Read Next: How to Pick the Right Marine Lead-Acid Battery
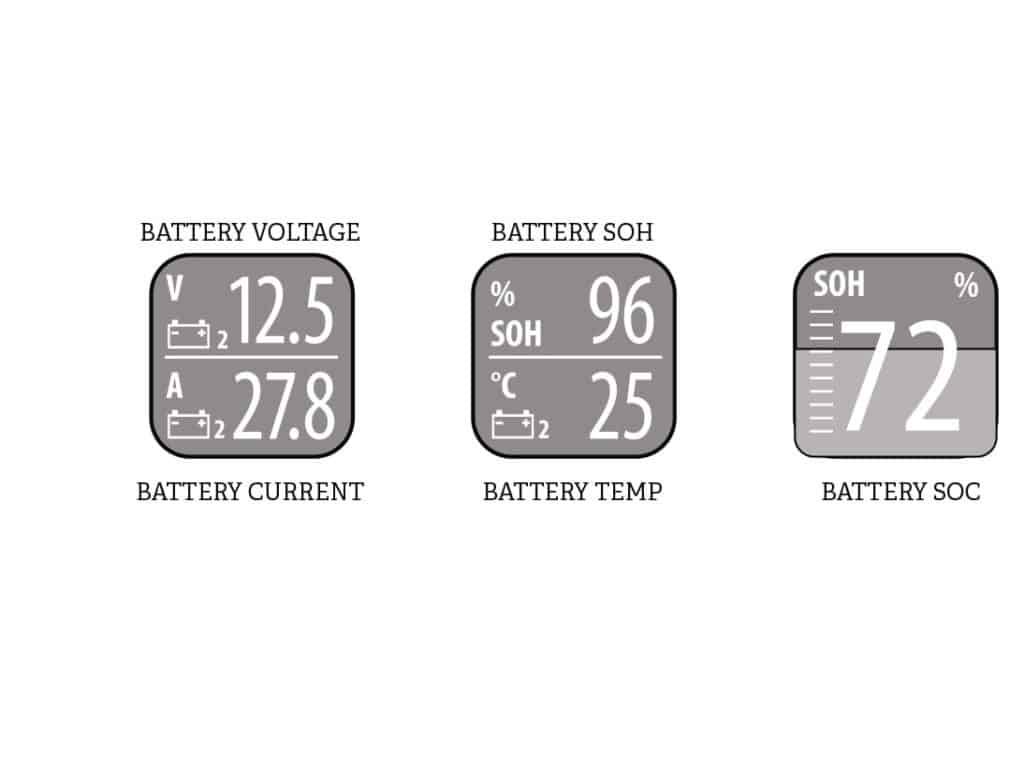
The VL Flex gauge for the IBM system can monitor a variety of battery parameters, including current voltage, amps (charging or discharging), battery temperature, battery state of health (actual amp-hour capacity stated as a percentage of labeled amp-hour capacity), and state of charge (reflected as a percentage of total capacity). The last window also has a lightning icon to show if the battery is being charged. Press the control button to scroll through each information panel.
Tip: The VL Flex monitor can also be used to monitor levels of onboard tanks for fluids such as fuel and fresh water. This requires an additional tank-level sensor, which connects to a spare resistor plug on the IBM wire harness. To learn more, visit veratron.com.