Even if your boat has a head with a shower, nothing beats taking a shower in the cockpit after a swim, or when it’s so bloody hot you need a refreshing rinse. Single-valve “cold” shower assemblies take the least space. If you have a water heater, or think you might be installing one in the future, you might as well install a dual-valve hot/cold shower. This installation assumes a pressurized, cold freshwater system plumbed with reinforced PVC tube. While Scandvik, Shurflo and Whale all make transom showers, we chose the Heater Craft Aquatik 803SB (defender.com, $110) for a couple of reasons. It has a convenient hot/cold mixing valve and a long, 10-foot hose. Even better, it has a sexy, curvy European look we just couldn’t resist.
1. Create a master plan.
Lay out the piping run from the freshwater source to the shower valve assembly’s location to ensure clear passage all the way. Stay clear of hot engine parts, sharp protruding fiberglass, hull-to-deck screws and other obstructions. The shower head comes with 10 feet of hose, so when selecting the transom or bulkhead location, keep in mind that there needs to be enough open, clear space behind and below the enclosure for the hose to drop into. Often, a small, mesh laundry bag is used to contain the retracted hose.
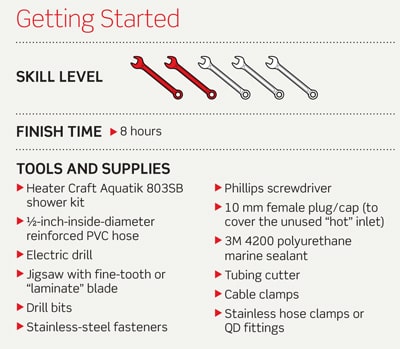
2. Cut out the opening.
The enclosure requires a cutout of 5 inches by 8 inches and 6 inches of depth. Tape the provided template to the mounting surface. Drill a ½-inch pilot hole for the jigsaw. Cut out the opening. Slide the enclosure into the hole and mark the mounting screw positions. Drill 7/64-inch pilot holes for the stainless-steel screws.
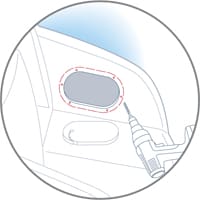
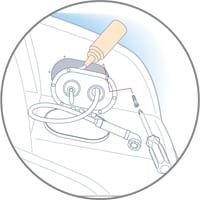
3. Tap your water line.
Locate a convenient place to tap into the pressurized side of the existing cold-water supply line. Cut the line, insert a T-fitting, and run the piping to the shower enclosure. Apply two stainless hose clamps to all three sides of the T and support the piping every 18 inches with cable clamps. If your boat, like most today, is fitted with quick-disconnect (QD) plumbing, use that instead of clamps.
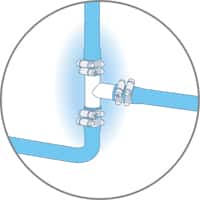
4. Connect all the pieces.
Screw the supplied female adapter to the threaded inlet on the shower body, and connect to the piping. Push the shower hose through the enclosure, thread the supplied thread-to-barb adapter to the outlet, slip the hose over the barb, and secure with the supplied stainless hose clamp. Screw the 10 mm cap to the unused hot-water inlet.
5. Slide in shower unit.
Turn on the pump and check for leaks. Prior to permanently mounting the enclosure, hand-fit it, and push the shower hose in to be sure it goes in and out without any problems. Then, apply a thin line of sealant around the mounting flange and slide the shower unit into the opening. Secure with the supplied screws.


