Bad fuel is the death knell for a boat, because it will gum up the system, choke off the engine and leave you looking for a tow home. Even so-called clean fuel can cause fits with a fuel system thanks to its ethanol content. The solution? Running the fuel through a water-separating fuel filter.
Many new outboard and inboard boats come with a remote filter pre-installed in the fuel system. But many older boats don’t. No worries: You can order a kit from West Marine or other supply store and install it yourself over the weekend. The total time to complete the installation is less than 3 hours.
Tools and Supplies to Install Marine Fuel Water Separator
- Aftermarket fuel water separator kit from a reputable manufacturer
- Cordless drill
- Fuel system’s grade thread sealer
- Marine-grade silicone sealant
- Proper diameter hose clamps
- Coast Guard-approved fuel hose (if necessary)
- Universal wrench kit
- Screwdriver to suit
- Scrap of plywood (if mounting plate is necessary)
- Epoxy glue (if necessary)
- Caulking gun (if necessary)
How to Change a Fuel Water Separator
Step 1
First, you’ll need the proper kit. For an outboard fuel water separator, that generally means a filter equipped with a clear plastic collection bowl. For inboards, use a filter fitted with an aluminum bowl for gas, or a clear glass or plastic inspection bowl for diesel. A disposable filter without a collection bowl can also be used.
Step 2
Open hatches to ensure ventilation. Close the fuel valve at the tank and cut the supply hose at the mounting location, and then drain the contents. Or, plug the line by inserting a bolt and securing with a hose clamp.
Step 3
Install the head unit vertically, above bilge water, between the tank and engine (or primer bulb if on an outboard). The hoses should reach the engine and tank without kinking or making sharp turns. Drill pilot holes in the mounting point, inject sealant and fasten with self-tapping stainless-steel screws. If mounting to the hull side, epoxy-glue a painted piece of plywood in place as a mounting plate. Drill, seal and screw as above.
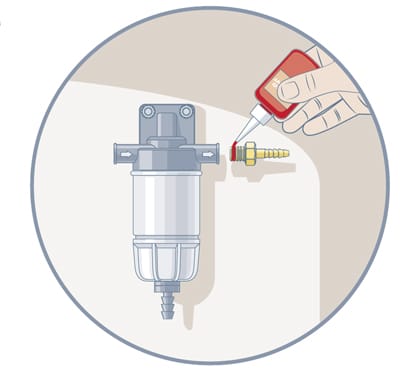
Step 4
Install the filter’s fuel fittings using thread sealant, and smear some motor oil on the gaskets or O-rings for the element and the inspection bowl.
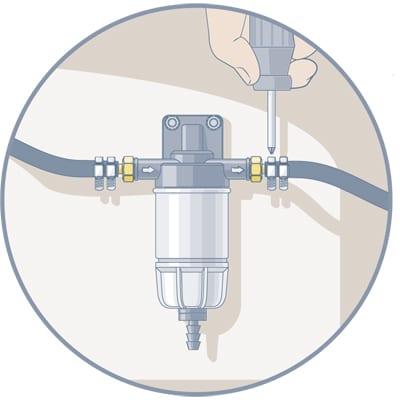
Step 5
Attach the hose from the tank to the “in” port and from engine to the “out” port. Double-clamp firmly but don’t pinch the rubber hoses. If extra hose is needed, use U. S. Coast Guard-approved Type A1-15 of the same diameter as the hose it’s replacing.
Step 6
Start the engine. Check for leaks at a fast idle, and then sea-trial the system close to home at high rpm, watching closely for leaks all the while.

What Size Fuel Water Separator Do I Need?
Most manufacturers recommend a 10-micron “spin-on” filter to best deal with E10 fuel. Working through your engine manufacturer will help to match the proper filter to the fuel system, or you can buy a filter kit from reputable manufacturers such as Racor, Sierra, Moeller, Mallory or Tempo. These kits generally include the filter element, a collection bowl (clear plastic for outboards, aluminum for inboards) and a mounting bracket or head unit made of aluminum or stainless steel. Some kits may include the brass or stainless-steel threaded fittings for the hose barb.