A common boating mishap is getting fishing line wrapped around the prop shaft behind the propeller of an outboard or sterndrive. Left unattended, the line will melt into a solid blob and can cut into the seals around the shaft, allowing water to leak in and gear lube to leak out. So it’s important to replace bad seals immediately.
This project focuses on a MerCruiser Alpha One drive. You’ll need to source the equivalent specialty tools mentioned and torque specifications appropriate to your lower unit. To prep, put the boat on a trailer, drain the gear lube, remove the propeller and its hardware, and pull the gear case from the drive shaft housing. Now let’s get started.
Skill Level: 4 of 5
Advertisement
Finish Time: 8 hours
Tools and Supplies
- Slotted screwdriver
- Channellock pliers
- Socket set
- Breaker bar
- Merc cover nut tool (part 91-61069)
- Merc two-jaw puller and puller bolt (parts 91-46086A1 and 91-85716)
- Merc Perfect Seal (part 92-34227-1)
- Merc Special Lube 101 (part 91-113872A1)
- Merc carrier anode (if needed; see dealer for correct size)
- Small pry bar (to remove old seals)
- Loctite 271
- Inner and outer prop shaft seals (see dealer for correct part)
- Bearing carrier O-ring (see dealer for correct part)
- Quick-drying solvent, like lacquer thinner
- Cleanup towels
- Lower unit stand
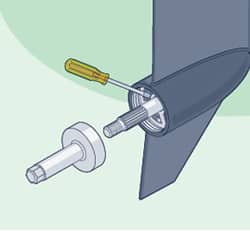
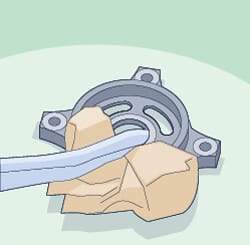
Remove the screws and washers holding the carrier anode and pull it off. If eaten away, replace it. If not, clean up the exhaust residue. Use a slotted screwdriver to push all tabs from slots in the cover nut. Use a cover nut tool (MerCruiser part 91-61069) with a socket and breaker bar to unscrew the cover nut. Pull the tab washer away from the bearing carrier.
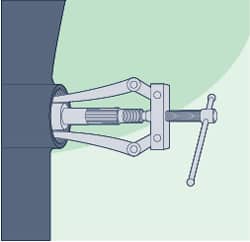
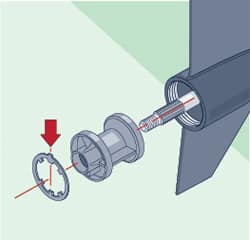
Use a two-jaw puller and puller bolt (Merc parts 91-46086A1 and 91-85716, respectively) to extract the bearing carrier from the lower unit. Remove and discard the O-ring from the forward part of the bearing carrier. It needs to be replaced. See your dealer for the correct replacement O-ring. There may be a small key; look for it and don’t lose it.
Clamp the bearing carrier in a vise with protective jaws, and pry out the outer and inner prop shaft seals with a pry bar or seal puller, being careful not to damage the bore. Don’t remove the needle bearing under the seals unless it needs replacement, because removal damages the bearing.

Clean the seal bore with a quick-drying solvent like lacquer thinner, and apply a light coat of Loctite 271 to the seal bore. Place the inner seal in the bore with the lip-side facing in toward the needle bearing, and press it in place using the taller end of a Merc seal installation tool (part 91-31108). Then insert the outer bearing, lip-side out, and press it in place using the opposite end of the same tool. Lube the seals with Merc Special Lube (part 92-113872A1).
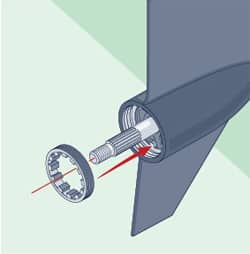
Clean the carrier bore and apply a coat of Perfect Seal (Merc part 92-34227-1). Install a new O-ring and slide the carrier over the prop shaft, rotating the shaft clockwise to align the gears. Align the “V-notch” with the top side while seating the carrier. Slide the tab washer over the prop shaft, making sure the external tab is in the opening at the top of the gear case and the V-tab fits in the V-notch of the carrier.
Lube the threads of the cover nut, and reinstall with markings to the outside, tightening to specs with the cover nut tool. With Channellock pliers, bend one of the tabs of the tab washer into a slot on the cover nut. Tighten the nut if you need to align the tabs. Install the carrier anode.