Tools and Supplies
*Monster Tower MT1 ($799, monstertower.com)
*Allen-wrench set
*BoatLife LifeCalk polysulfide sealant
*Box/open-end wrench set
*Socket-wrench set
*T-square (to square the deck hinges)
*Tape measure
*Chalk line (to snap a line between the mounting bases)
*Power drill and bits
*Countersink bit
*Cleanup rags (to wipe off excess sealant)
First developed for ski boats and V-drive tow boats, wakeboard towers have since migrated to all sorts of craft, including runabouts and deck boats. The elevated, central tow point enhances water-sports activities such as water skiing, wakeboarding and barefooting.
Adding a universal tower from companies such as Aerial Wakeboarding Products (aerialwakeboarding.com) or Monster Tower (monstertower.com) is relatively easy. Here we show how to install Monster Tower’s MT1, which fits boats with beams ranging from 5 feet to 8 1/2 feet wide. This tower also can be folded back for trailering or to store the boat in a garage or to accommodate an existing boat cover.
Installing a Wakeboard Tower
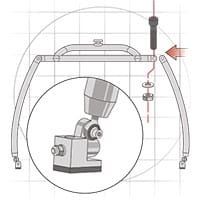
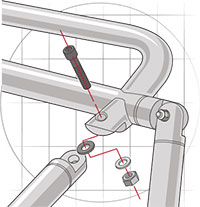
1. Connect the Rear Legs
Loosely bolt the rear legs to the top section, applying a film of anti-seize compound (supplied) to all of the stainless bolts to prevent galling. Also, attach the two-piece universal mounting bases to the bottom of the rear legs, making sure that the larger, cube-shaped portion of each sits forward. The tubes come sheathed in bubble wrap. We’ve removed it here, but Monster Tower suggests leaving it on for the install to prevent scratches from tools.
Installing a Wakeboard Tower
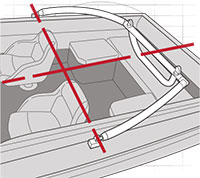
2. Position the Top
Have someone hold the top section while you position the rear mounting bases along the gunwale, knowing that these will need to be at least 48 inches aft of the front bases. Use a tape measure to place the tow point in the middle of the boat with the top bar parallel to deck. Also make sure the tower will fold down in a convenient spot. The bases should be exactly opposite each other. To mark them, draw an outline around each base when the top is in the correct position.
Installing a Wakeboard Tower
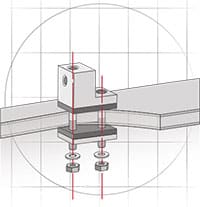
3. Mount the Rear
Bases Use the aft bases as templates to mark the two mounting holes. Check for obstructions and then drill the holes. Use 1/4-inch aluminum plate or ¾-inch plywood for a backing plate (Monster recommends using a plate that spans both the front and rear bases); then install the bases with the supplied hardware, rubber pads and factory backing plates, applying sealant to the mounting holes. Ask a buddy to help tighten the locknuts from inside the boat.
Installing a Wakeboard Tower
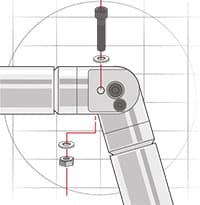
4. Attach the Front
Legs Loosely bolt the front legs to the top, using the supplied Teflon washers in the joints between the top and legs. Also install the front mounting bases to the bottoms of the front legs, making sure the larger portion of the base bottom is forward. The front bases attach to the front legs with bolts and nuts that have hand knobs, so you do not need any tools to secure these. For this step, attach them loosely, because you will remove them to install the bases.

Installing a Wakeboard Tower
5. Mount the Front Bases
Lift the tower into position and bolt the rear legs to the rear bases. Next, determine and mark the location for the front bases, making sure the top is still in the correct position and there’s not interference with the swing of the walk-through windshield. As before, the bases need to be exactly opposite each other. Remove the front bases, using them as templates to mark and drill the mounting holes. Mount the bases as described in step 3.
Installing a Wakeboard Tower
6. Secure the Tower
Attach the front legs to the front bases using the supplied hand knobs. Next, you will want to lock the top section with the rear legs to laterally stabilize the tower. Do this by drilling two holes through each joint and then inserting and tightening two stainless-steel Allen bolts and locknuts in each of the two joints. Finally, tighten all of the bolts, including the eye bolts at the bottoms of the four legs. Now get out on the water and have some boarding fun.
Retorque
It’s important to retighten all of the tower hardware after each of the first few uses, per the torque specs in the installation instructions. Also, avoid using a motorized nut-driver to install the stainless-steel hardware, since the high rpm generates excessive heat that can result in galling.
Quick Tip
Generously mask off the general areas where the mounting bases are to be mounted to prevent scratching the boat’s finish, give you a better surface for marking the positions and avoid excessive chipping when drilling holes. For additional tips on drilling into fiberglass, click here.