New-Boat Survey Tips
You’ve probably heard the horror stories, but never met anyone who’s had it happen to them. That’s because, nowadays, most boats are well made. But it happens. You buy one fresh off the showroom floor and it’s worse than a lemon — it’s a nightmare. A bad dream with walk-on parts from dealers, builders, mechanics, and, in the worst cases, lawyers. What follows is not a tall tale from a dockside bar. It happened and it was ugly. The only good part is that we can all learn something from it and try to make sure it doesn’t happen to us.
If Only…
We’ll call him Dan. Two years ago Dan bought a beautiful 32′ sportfisherman, a dealer demo sold as new with a full factory warranty. He paid up, took delivery, and life looked sweet.
But the problems started right away. Some were niggling concerns: When he turned the battery switches to Off, some 12-volt equipment stayed on; a missing support strut for the engine room hatch kept it from staying open. Some were more serious: The boat wouldn’t steer properly at cruising speed, and the engines showed excessive corrosion after only a few hours of use.
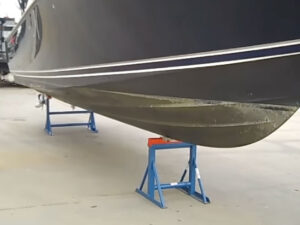
So Dan hired Maddock Marine Services, a marine surveying firm from Hampton Bays, New York, to document the problems.
“I knew this was going to be serious before I climbed aboard,” says Maddock. Walking across the boatyard his experienced eye noticed that the hull didn’t look symmetrical: The spacing between the chines and strakes was different port and starboard. It turned out he was right — the boat was 2″ wider, keel-to-chine, on one side. Maddock’s survey soon revealed other defects as well, such as structural bulkheads that didn’t reach the hullsides. A lake-bound runabout wouldn’t last with such feeble support, never mind a sportfish intended to run the open ocean. In the end, Maddock’s report ran 40 pages with a dizzying list of defects. When Dan saw it, he was crushed, and all he could manage to say was, “If only I had known.”
The manufacturer tried to correct the problems and was successful with some. Others such as the unbalanced hull could never be remedied. Now both sides have put attorneys on notice, and the fate of the boat, and several hundred thousand dollars, is in question.
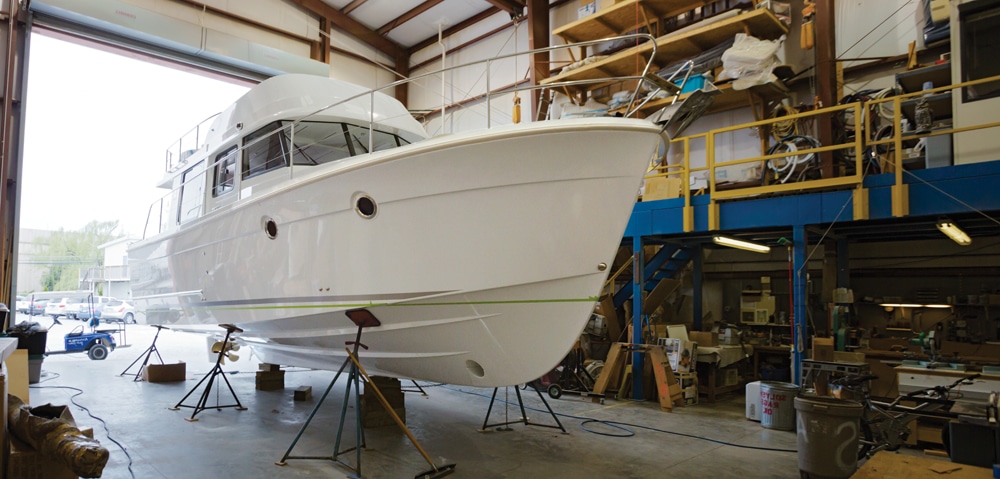
Dan is an experienced boater with two decades of sea time. If it can happen to him, it can happen to you. To ensure that it doesn’t, consider hiring a marine surveyor to inspect your new boat before you buy. Yes, new boat.
As we have seen, builders make mistakes. It’s rare, but they shouldn’t become your problems. Once you’ve found the boat of your dreams, here are some points to go over before calling a surveyor. This list is a lot more targeted than a typical walkthrough. Although it’s not an actual survey, it’s a good start on keeping the nightmares at bay.
MACHINERY
Can it breathe?
Make sure vent hoses aren’t crimped. Underway, try lifting the engine hatch. It should lift easily. If there’s suction, it means the engine is starving for air.
Numbers, please
Check that the engine’s numbers match those on the contract. Look for engraved plates riveted to the block. You may need degreaser to read them.
Lock up
Turn the steering wheel from lock to lock. More than seven turns may mean a leak or low fluid. Look under the boat — rudders should fully turn to their stops.
Pumped?
Check to see if the hydraulic steering pump is the right size. Get the pump’s model number from its engraved plate and compare it to the manufacturer’s literature.
Open access
Throw the levers on every seacock. Do plumbing, stringers, or anything else block them from opening or closing?
Double up
All raw-water intakes need to have two hose clamps on each end.
Strain is good
Raw-water intakes, especially for engine cooling, should have South Bay external hull strainers or basket-type strainers inside the boat. Baskets are better as they can be cleaned from onboard. Ones with a clear bowl show what’s going on inside.
Back down
Secure yourself in the engine room and have a helper throttle hard in reverse, then in forward, one engine at a time. Watch the motor mounts for deflection — anything more than ¼” is a problem.
Stud check
Look to see if the threaded studs of each motor mount are centered. If not, something’s out of line.
Maxed out
Run the engine at full throttle underway to be sure it turns up — gets within the manufacturer’s maximum rpm range (get this online or from brochures). Under- or over-revving could mean the wrong prop was installed, which can lead to excessive engine wear.
Exhausted
Exhaust risers should be at a height above the waterline per the engine manufacturer’s specs to prevent back flooding. They should be connected to the transom by a flexible coupling to keep from vibrating loose. The entire exhaust run, which is filled with water and therefore heavy, should be robustly secured and supported.
Straight shaft
The prop shaft’s flange and the one from the transmission must meet evenly with no gaps and no offset. Use a feeler gauge to check.
Get clearance
On inboards, measure the distance from the hull to the tip of the prop. This should be at least 15 percent of the prop’s diameter — more is better. Any less and there’s a chance of “hammering,” an annoying harsh vibration felt while underway.
A good tip
Rotate an inboard’s prop to make sure that each tip is the same distance from the hull. Rest a block of wood on the hull and to the side of the prop and measure from tips to block. Any unevenness in either test means an unbalanced prop.
Fight fires
Inspect the type/size/quantity of fixed fire extinguishers. Compare against the Coast Guard’s regulations for your boat type at: uscgboating.org/safety/fedreqs/equipment.htm.
It’s automatic
Verify the operation of the automatic fire suppression system. 1) Start the engines and look for a green indicator at the helm. 2) Disconnect the plug from the fire suppression system cylinder. 3) Verify that the red light comes on, the alarm sounds, and the engine stops.
HULL & DECK
Hit it
Use a phenolic hammer or the plastic handle of a large screwdriver to tap over the entire hull and deck. A good laminate gives a solid thunk. A hollow or higher-pitched sound may indicate a void and warrants investigation by a fiberglass pro.
Draino
Plug the scuppers and fill the cockpit to the height of any permanent step, such as the bridge deck or cabin entry. Pull the plugs. If 75 percent of the water drains in 90 seconds, and none gets into the bilge or cabin, then the scupper size is adequate. Scuppers should never be smaller than the area of a 1″-diameter circle (about 7⁄8″ square).
Hatched
Hatches and transom doors should be sufficiently dogged (latched), guttered, and gasketed to prevent flooding. They should open fully without stressing the hinges.
Case the joint
Hull-to-deck joints that are glassed, bolted, and glued together are better than ones that are just screwed or riveted. Check for joint gaps from inside the hull in the engine room, inside the anchor locker, and behind cabin furniture.
Lateral thinking
Structural bulkheads should be bonded to the hull with at least a 3″-wide fiberglass tab. There should be a foam or putty “filet” between the bulkhead and hull to prevent a localized pressure point that can crack the fiberglass. You’ll have to climb inside berths and cabinets to find these.
Bolts, not screws
Windlasses, tops, towers, outriggers, and all other deck hardware should be bolted with metal (best) or wood backing plates. You’ll have to worm your way into some tight areas inside the boat to check this.
The bulge
All deck hardware should have a bedding compound of some sort to prevent leakage through the fastener penetrations. Bulges of excess compound around bases that has been squeezed out is a good sign.
Hit the canvas
All tops and side curtains should be tight enough to bounce a quarter. There should be no gaps where spray or rain (check with a hose) can get in. Zippers should have “hoods,” overlaps that keep water out.
In the red
Side navigation lights must be visible to 112½ degrees aft of the bow (that’s slight aft of directly abeam), and have no overlap at the bow onto the other side. Many lights mounted below the gunwale will not do this. Check that deck structures and equipment do not block lights. For full regulations go to uscgboating.org/safety/fedreqs/equipment.htm.
AUXILIARY SYSTEMS
Suck it up
Automatic bilge pumps must have a manual override and an indicator light to show they’re running. The discharge hose must have a vent above the waterline so that water doesn’t siphon back into the hull.
Off is on
Automatic bilge pumps should function when the master battery switch is turned off. To test, reach into the bilge and lift the float switch. The pump should run and indicator light come on.
Stress test
To see if your genset is big enough, turn it on and crank up the air conditioning and other loads for 30 minutes. And remember, bigger isn’t always better, as gensets are happier and more efficient under load.
Don’t share
An easy way for a builder to save money is to have the genset share the main engine’s exhaust, something that should be avoided. Separate exhausts ensure less buildup of carbon, which can otherwise shorten the genset’s life.
Cool it
Ensure that the air conditioner can draw down cabin temperature by at least 20 degrees. Ditto for the reverse-cycle heat function.
Pump check
Fill any and all sinks, basins, shower sumps, livewells, and so on to see if the pumps can evacuate the water. Look to see how much water is left standing after the level drops below the drain intake.
Hard charger
Turn on the battery charger. Using a multimeter set to accommodate 12-VDC, check the voltage at each battery. Dead or weak batteries will show a higher charging voltage.
The new black
Look for corrosion-protected terminals, booted (covered) positive battery and starter motor terminals, wires supported at least every 1’6″, and yellow (which now takes the place of black) 12-volt ground wires.
Energize me
Turn the main battery switch to On. Does all DC gear work? Good. Now turn the battery switch to Off. Everything should go off except for the automatic bilge pumps. Nothing else should bypass the master switch and be wired directly to the battery.
Bonding
All metal fittings likely to come into contact with the water should have a green wire that connects to a single grounding point. This minimizes the possibility of corrosion and keeps swimmers safe from shocks.
Avoid strays
Surveyors use a silver/silver chloride electrode ($120; www.boatzincs.com) connected to one lead of a multimeter and hung overboard. They then touch every wet fitting on the boat with the other lead to check for dangerous and corrosion-causing current leaks. You should do the same.
BELOWDECKS
Loose lockers
Crawl under or inside stowage and cabinet spaces to see if the cabinets are installed securely. Look for loose screws and sloppy gluing or fiberglass work.
Solid galley
Microwaves, refrigerators, freezers, and dishwashers can become projectiles in rough seas. Look for bolted and backed mounts. Then look to see whether the refrigerator and freezer doors have hinges on the stern side. If either does, the door is likely to come open while getting on plane.
Safe galley
If the cooktop has a cover that slides over the burners, make sure it has a cutoff switch so the lid doesn’t burn. The sink drain must have a P-trap to prevent back siphoning of water — this may also help prevent exhaust fumes from the engine or genset getting into the cabin.
Why valve
If the head has an overboard discharge feature, check to make sure you can reach the Y-valve in order to disable it while you’re in port — you don’t want anything emptying where it shouldn’t. Can you get to the shower sump to clean it without unscrewing parts of the boat?