Marine battery charging systems represent must-have items aboard many recreational boats today. Far more sophisticated than old-school bench chargers with battery clips, marine chargers from brands such as Battery Tender, Guest, Minn Kota, Noco and ProMariner feature sophisticated electronics that monitor the state of batteries and charge accordingly.
Waterproof and corrosion-resistant, such permanently installed systems offer convenience. Once the boat is tied up at the dock or at home on a trailer, just connect the charger to shore power or a household receptacle. Charging profiles replenish the juice in multiple stages and keep batteries topped off and ready to go without overcharging, overheating or causing damage, even when the system is plugged into 120 volts AC continuously between trips.
Read Next: Three Things To Look For In Onboard Battery Chargers
Such automatic systems, designed for recreational boats up to about 30 feet in length, usually come – pre-wired with a three-prong power cord to connect to a 120-volt AC electrical source, as well as pre-wired 12-volt DC power cords that connect to a battery’s positive and negative posts. These ignition-protected systems are available for boats with as many as four-plus battery banks. Many chargers have automatic or selectable charging profiles for flooded, AGM or gel lead-acid batteries. Installing a charger is relatively simple.
Skill Level: 1 of 5
Finish Time: Approx. 3 hours
Tools and Supplies
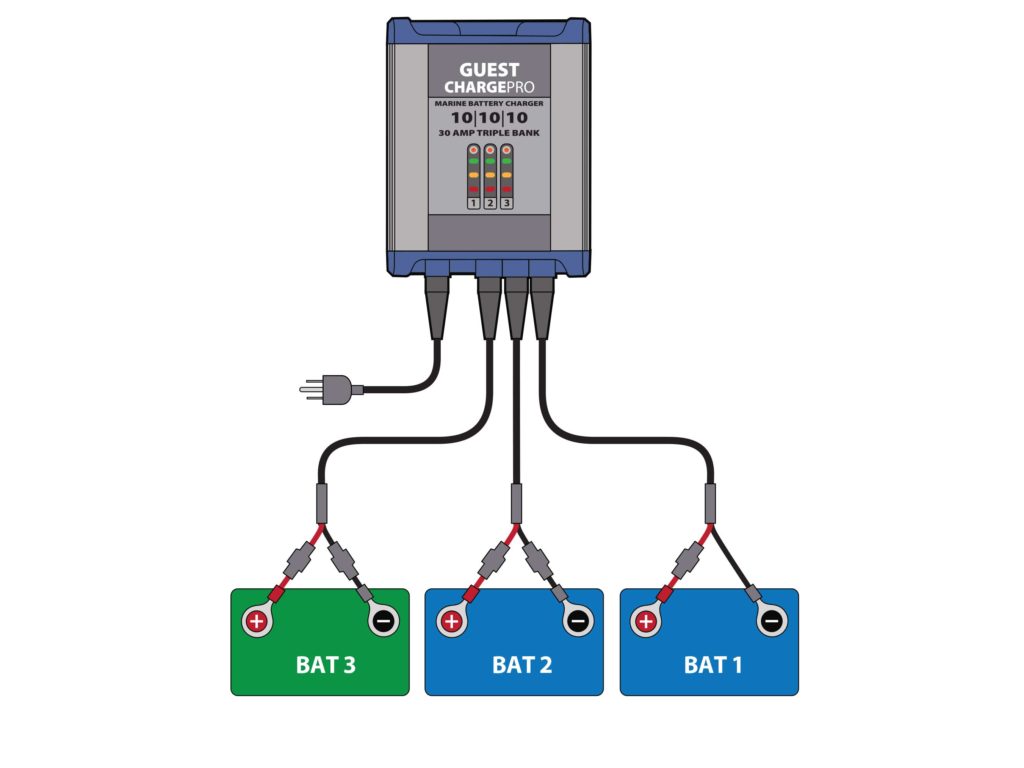
- Guest ChargePro 10/10/10 30-Amp Triple Bank, model 2731A ($330.99, rusticsportsman.com)
- Power drill and drill-bit set
- Phillips screwdriver
- Marker
- Marine sealant
- Fish tape to snake cables
- Socket wrench set to secure ring terminals to battery studs
- Cable-tie mounts, zip ties and mounting screws to secure leads along their runs
- Diagonal cutter to trim zip ties
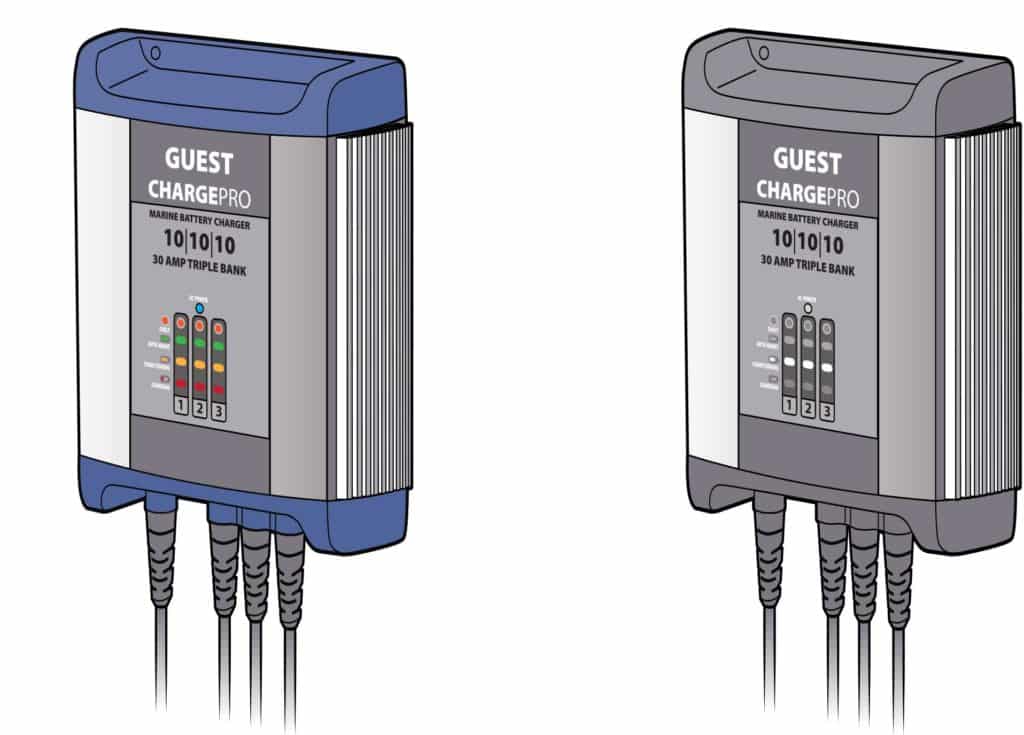
Pick a marine onboard charger based on the number of batteries. In this project, for example, we chose a Guest ChargePro 10/10/10 30-Amp Triple Bank (model 2731A) to charge our three AGM 12-volt batteries (two 27-series cranking and one 31-series house) at 10 amps per bank. In addition, it can charge other three-bank configurations, such as one consisting of a 12-volt cranking and two 12-volt deep-cycle batteries wired in series to power a 24-volt trolling motor, or three 12-volt deep-cycles wired in series to power a 36-volt trolling motor.
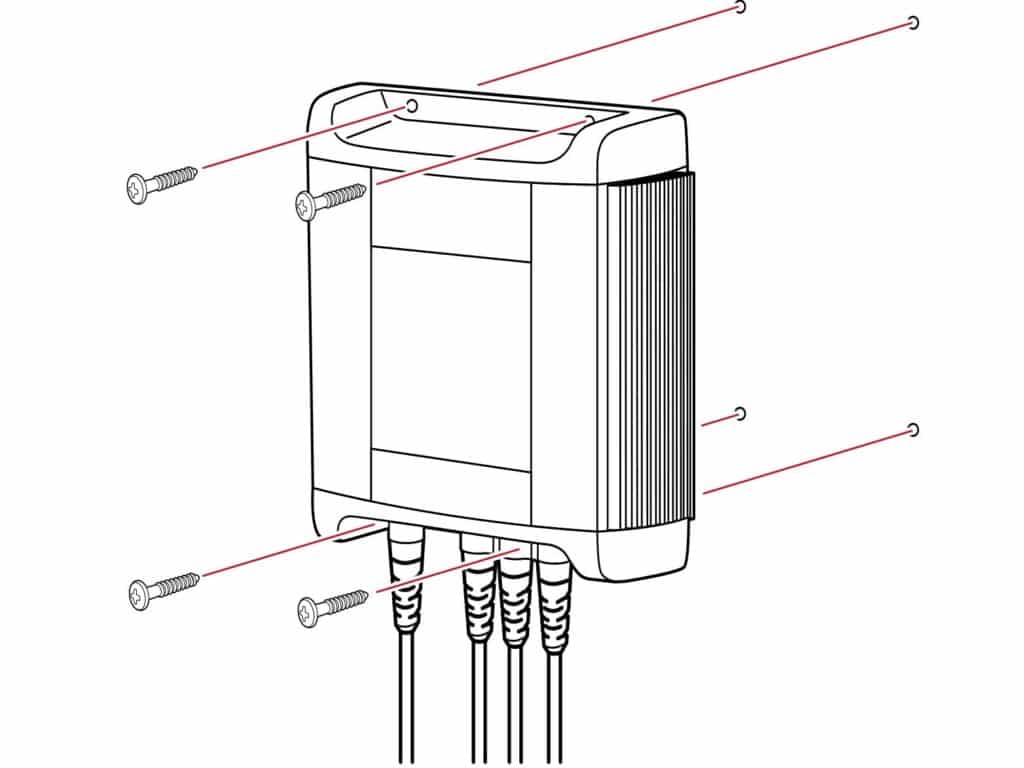
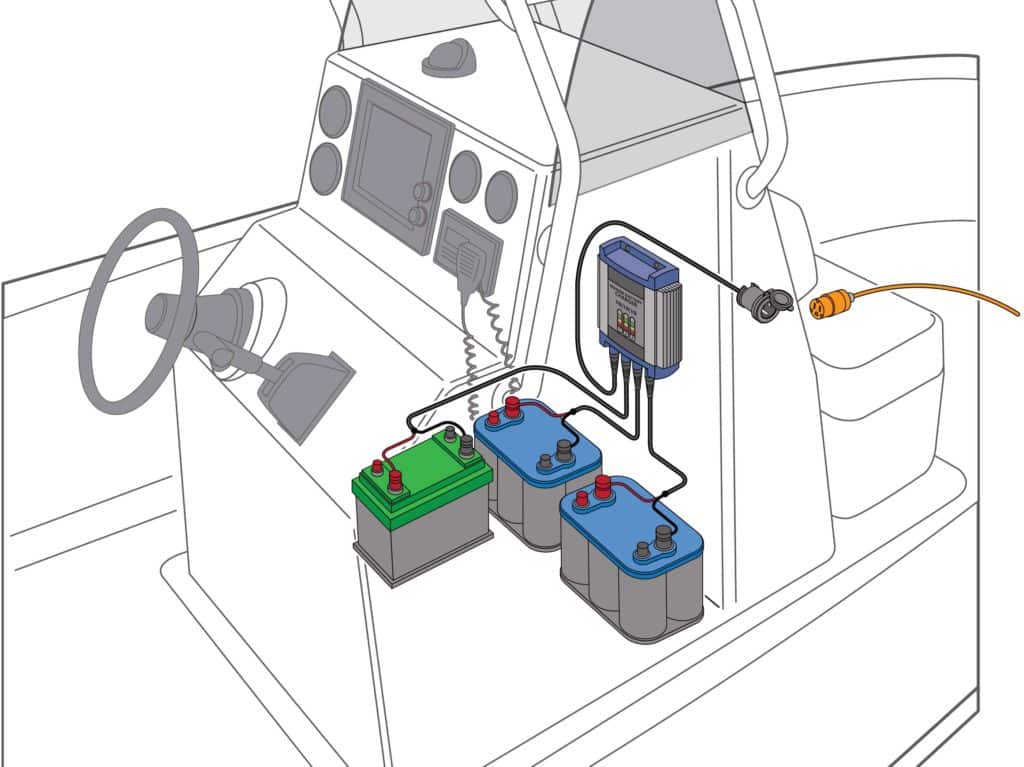
Select a mounting area that stays dry and allows for 6 inches of space in front and on each side of the charger. This unit must mount vertically. Ensure the mounting surface will support the weight of the charger (8 pounds for the 2731A), the DC cords will reach the batteries, and the AC cord will be accessible to plug it into a power source. Use the supplied template to mark and drill the four mounting holes with a 1/8-inch bit. Use a screwdriver and the supplied No. 10 mounting screws to attach the charger, bedding each screw with marine sealant.
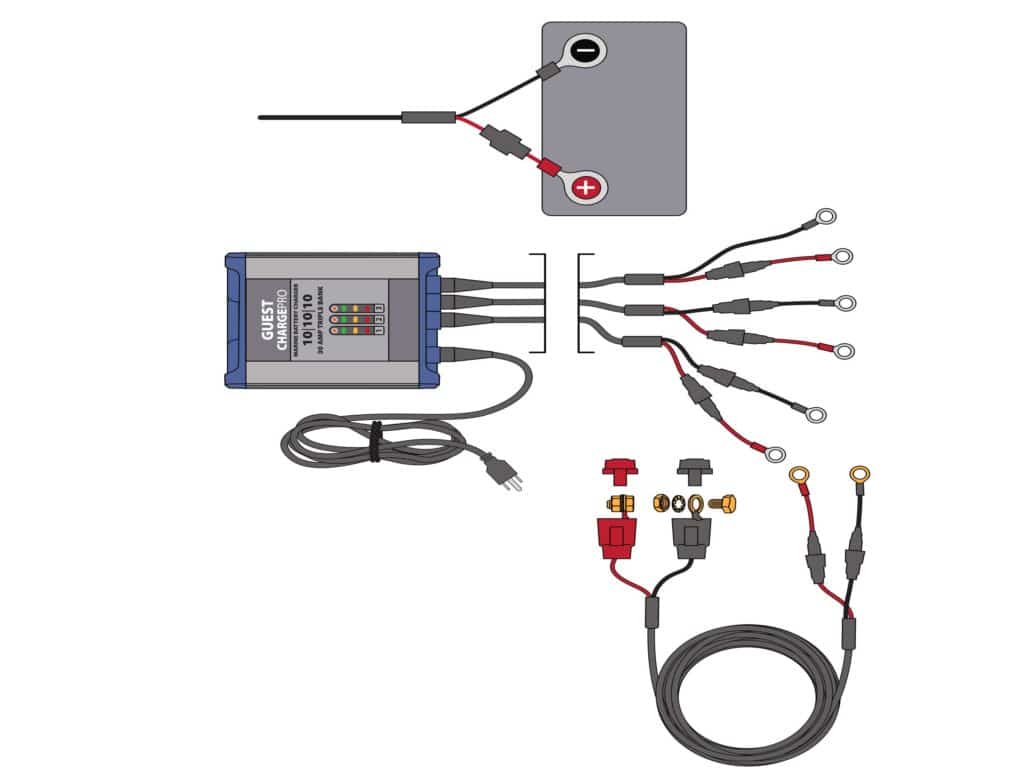
Each 6-foot-long DC lead consists of two wires—red (+) and black (-)—with installed in-line fuses and ring terminals that connect to the posts of each battery. Ensure each battery post is free of corrosion. For this project, the No. 1 and No. 2 leads attach to the cranking batteries, while the No. 3 lead goes to the house battery. Route and support the leads along their runs, and connect ring terminals tightly to the battery posts, ensuring the polarity is correct. If there is excess cable, coil it up and secure it. Do not cut the leads to shorten them.
Tip: If the 6-foot-long DC leads are too short to route from the charger to the batteries, you can order optional Guest ChargePro 5-foot-long extensions that attach via specially engineered connectors with waterproof enclosures to protect the connection from corrosion. $29.99 a pair; westmarine .com
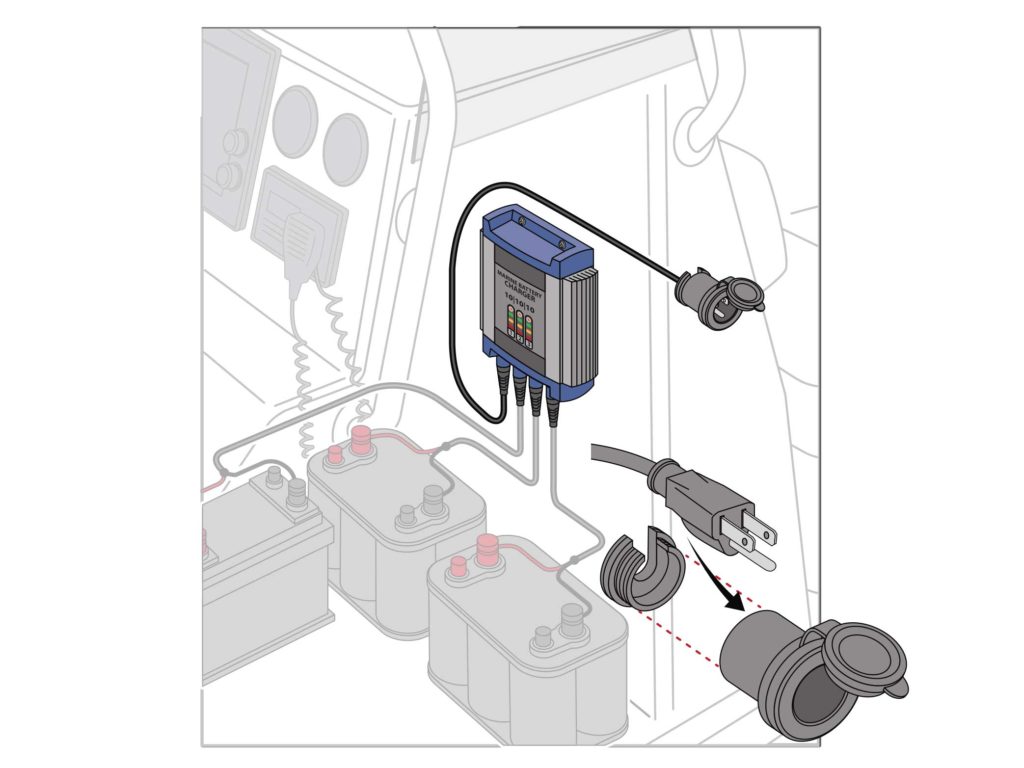
Route the installed 6-foot-long AC power cord to a place that’s easily accessible when you need to connect the three-prong plug to an extension cord. At the same time, make sure it can be tucked away in a dry location when you’re out on the water. It should be in an area that’s at least 24 inches from the charger, batteries and fuel-fill lines. Some boaters route the cord through the bulkhead of a dry locker under a seat so you can lift up a seat cushion to easily get to it. If you do this, seal the hole around the cord to prevent water from getting in the compartment.
Tip: The ProMariner universal AC plug holder solves the issue of where to stow the three-prong plug. It flush-mounts on a flat surface, and the power cord feeds in from behind. A spin-on back captures the plug inside the tube, and a watertight cap keeps out spray. To access the plug, lift off the cap, and reach in and grab it. It requires a 2.5-inch hole. $6.77; westmarine.com
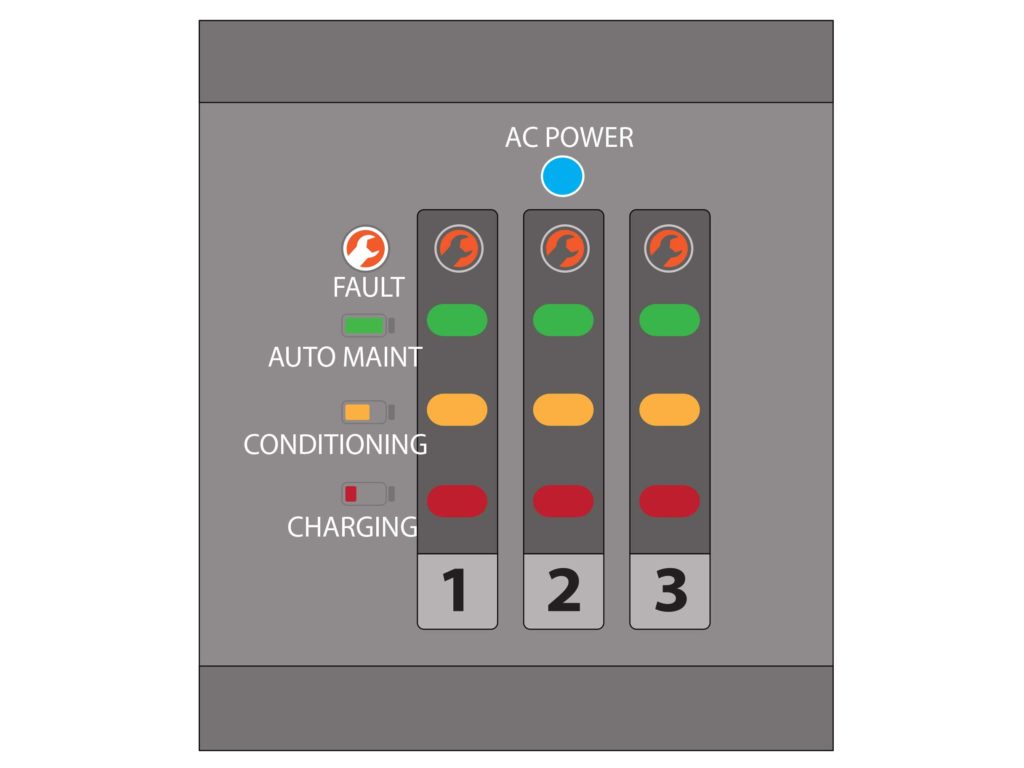
Connect the charger to an extension cord, then plug the extension cord into a GFCI 120-volt AC power outlet. View the LED indicator panel. On the ChargePro, an illuminated blue LED indicates a connection to AC power. Red, amber and green LEDs show the charging status for each battery. If a red fault LED illuminates, it indicates a loose wiring connection, reverse polarity, or DC over- or under-voltage for one of the batteries. In this case, unplug the charger, and review the troubleshooting section of the installation guide to resolve the issue.
With today’s voltage-critical, digitally controlled marine engines, it’s a good idea to unplug the battery charger before starting the engine, be it at the dock or with hose muffs while the boat is on the trailer. If you don’t disconnect the charger, the engine might experience an over-voltage situation that could possibly damage sensitive digital circuitry and other electronic components of the marine powerplant.