
Like it or not, mobile phones are ubiquitous. You can’t escape them, and many people feel naked without one, even when boating. Yet where do you keep your phone while afloat? Many boats have glove boxes for phones, but you can’t see the screen when it’s tucked away. Some boaters use mobile boating apps, so they like to keep the phone out and handy. However, this puts the device at risk of falling onto the deck or into the drink. That’s where the Scanstrut ROKK Wireless Active 12- or 24-volt DC-powered phone-charging mount comes in handy. Its spring-loaded, self-aligning jaws securely hold your phone in tough conditions. It boasts an IPX6 waterproof rating. Combine it with waterproof mobile devices such as the iPhone XR (with an IP67 waterproof rating), and you’re ready for the water.
Read Next: How To Make A Floating, Waterproof Cell Phone Case
The charger allows for docking and undocking with one hand, and it will accept phones up to 6.75 inches tall and as short as 4.75 inches. Its Qi-certified wireless charging system is compatible with a wide range of mobile devices from Apple, Samsung and others. It will charge through nonmetallic phone cases up to 0.11-inch thick.
Skill Level: 1 of 5
Finish Time: Approx. 1 hour
Tools and Supplies
• Scanstrut ROKK Wireless Active waterproof phone charger ($124, westmarine.com)
• Power drill and drill-bit set
• Countersink bit
• Phillips screwdriver
• Assorted marine crimp connectors with heat-shrink collars
• Crimping tool
• Heat gun
• Marine-grade inline fuse holder and fuse
• Masking tape
• Marking pencil
• Marine silicone sealant
• Scissors
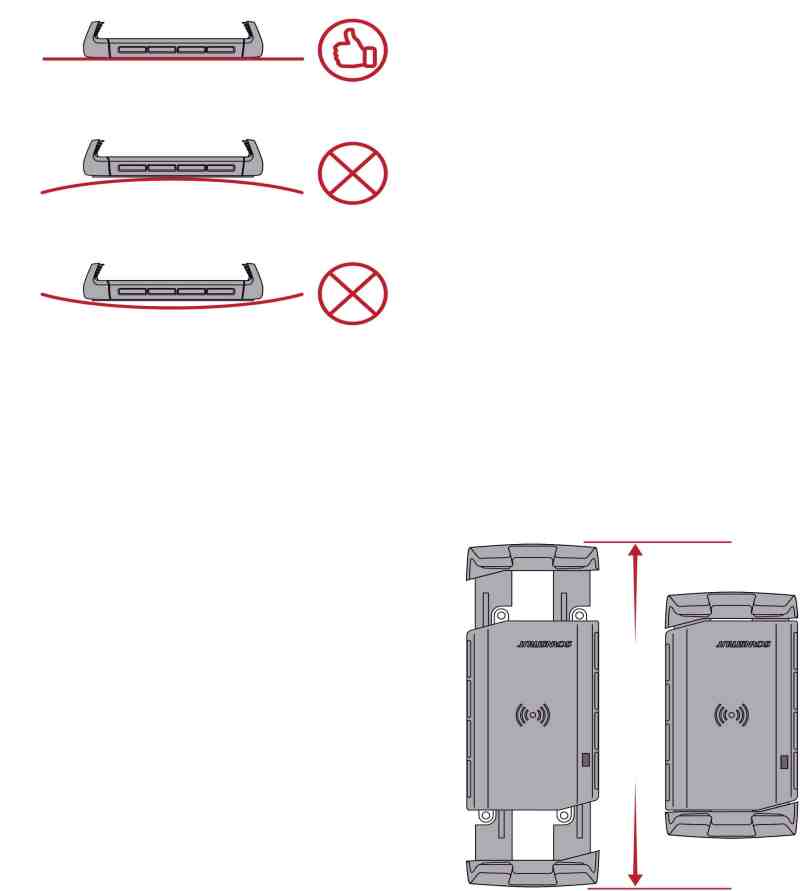
Pick a flat surface. Avoid convex or concave surfaces that do not allow the charger to lie flat for mounting. Choose a spot near the helm that offers easy viewing and access to your phone’s touchscreen so you can use apps while underway. Insert the supplied installation jig between the jaws to hold them open; this ensures there is sufficient room for the station’s spring-loaded jaws to expand and dock the phone. If there isn’t enough room for the phone mount with the jig installed, look for another spot.
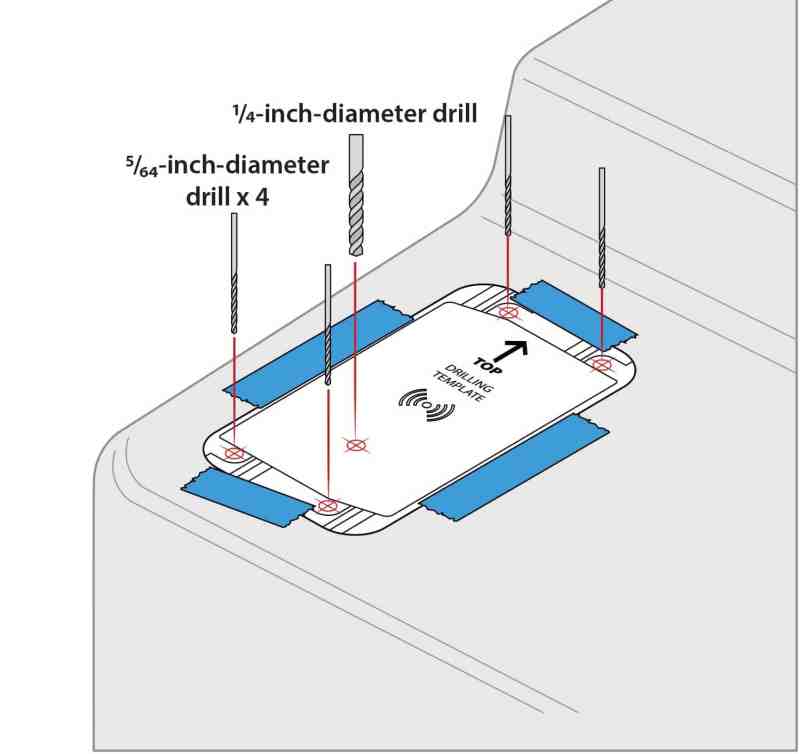
Once you find an appropriate location, cut out the supplied mounting template and tape it in place, then mark the four mounting holes and the hole through which to feed the power cable. Check behind the location to ensure there are no obstructions or interference from wires, hoses or other fixtures. Use a 5/64-inch-diameter bit to drill the mounting holes, and a 1/4-inch- diameter bit for the power-cable pass-through hole. Use a countersink bit to slightly chamfer each mounting hole to minimize gelcoat cracks.
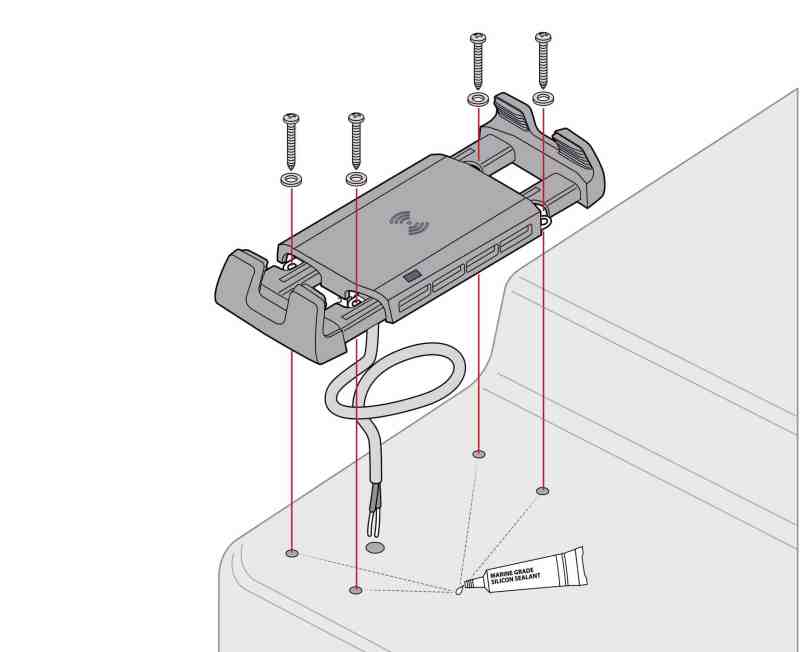
Apply a small amount of marine silicone sealant to the four mounting holes you just drilled. With the installation jig still in place between the jaws of the mount, feed the power cable through the 1/4-inch-diameter center hole and position the mount over the mounting holes. Use the supplied No. 4 stainless-steel self-tapping screws to secure the ROKK Wireless Active in place. Do not overtighten the screw. Wipe away any excess sealant. Remove the installation jig to allow the spring-loaded jaws to retract.
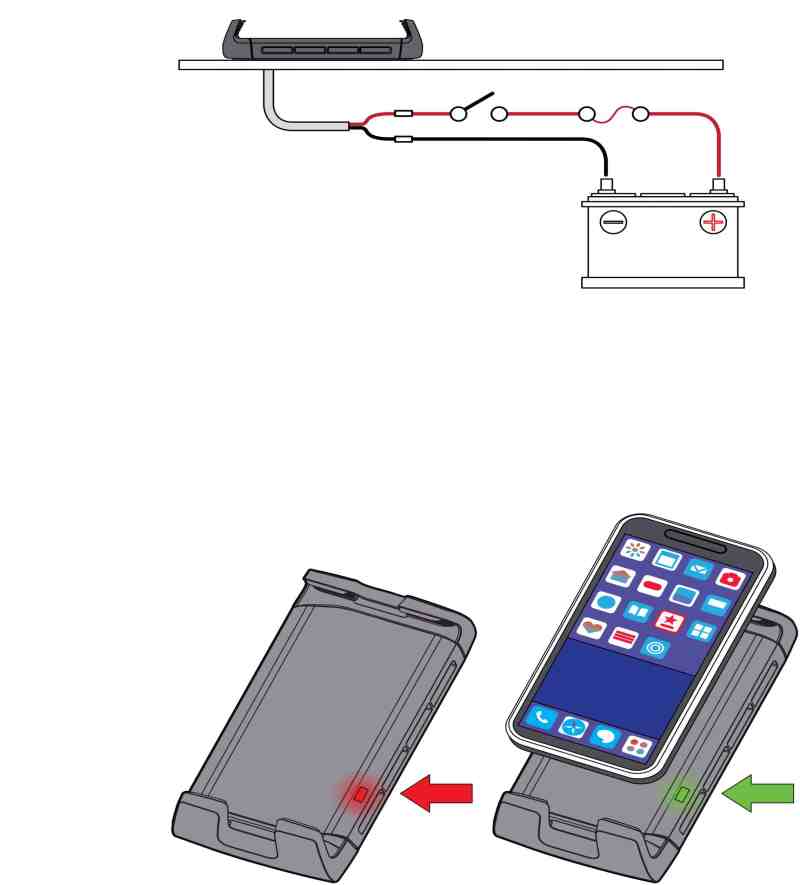
Connect the red positive wire of the ROKK Wireless Active’s wiring pigtail to a 12- or 24-volt DC-switched onboard power supply. Use an appropriately sized fuse in the positive wire based on the length of the wire run and the choice of 12 or 24 volts. Connect the black negative wire in the pigtail to an appropriate onboard DC grounding bus. Use marine crimp connectors with heat-shrink collars to ensure waterproof, corrosion-resistant splices and terminal connections. Use a heat gun to shrink the collars.
Tip: To test the ROKK Wireless Active, switch on the power to the charger, and you should see a fixed red LED, meaning it’s ready to charge. When you place your phone in the mount, the LED will change to fixed green, meaning it’s charging.


