
Interceptors from brands such as Humphree and Zipwake offer a number of benefits. Like conventional trim tabs, these systems can trim down the bow and correct for a list while the boat is underway, and do so in a more efficient manner than trim tabs, according to both companies.
Interceptor systems can also dynamically control the pitch and roll of a boat while underway to create a more stable and comfortable ride, thanks to high-tech sensors, integrated microprocessors, and ultra-fast servo actuators that drive the interceptors.
Interceptors utilize composite blades (in a wide range of widths and styles for different sizes and types of boats) that deploy downward from the surface of the transom to create hydrodynamic lift by intercepting water flow under the boat.
Read Next: How To Trim A Boat When Making Turns
This installation can be tricky as a DIY project, especially if access to the inside of the transom is limited. If access is tight or you just don’t feel comfortable with complex projects, you may want to turn this over to a qualified installer. In this two-part series, we install a Humphree X300 interceptor system—which includes a pair of 11 13/16-inch-wide interceptors, each capable of 2 inches of blade travel—on a 27-foot runabout powered with a single sterndrive.
Skill Level: 4 of 5
Finish Time: Approx. 12 hours for Part I
Tools and Supplies
- Humphree X-Series X300 interceptors; system includes a pair of 1113/16-inch-wide interceptors with servo actuators, a control unit, helm control panel, GPS antenna, wiring and Humphree wrench ($4,000, humphree.com)
- Allen wrenches (4, 5 and 6 mm)
- Socket wrench (36 mm)
- Power drill with 9 mm bit
- Hole saw (60 mm)
- Spring scale or torque wrench with optional torque adapter (for torque measurement)
- Threadlocker
- Straightedge
- Sander (to create flat mounting surfaces)
- Fine sandpaper
- Grease
- Marine sealant, such as Sikaflex 291
- Rags to wipe up sealant
- Marking pencil
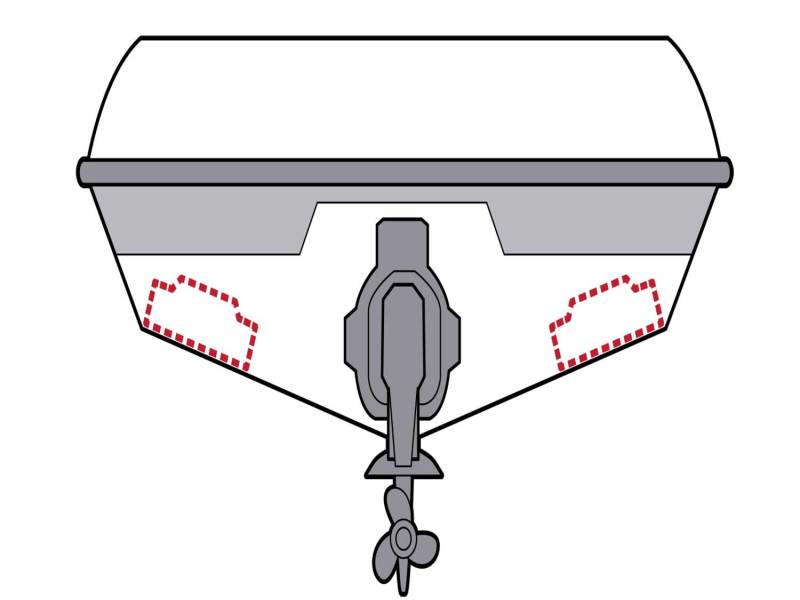
Each interceptor should be installed to the outside of the transom, with the case flush with the bottom of the transom (when the blade is retracted). Avoid positioning the case across a hard chine where it might protrude below the bottom of the transom. Do not install directly in front of an engine or drive where it might disrupt water flow to a propeller. Before finalizing a location, ensure the area inside the transom is free of cables, wires, hoses or any other items that might interfere with installation of the system.
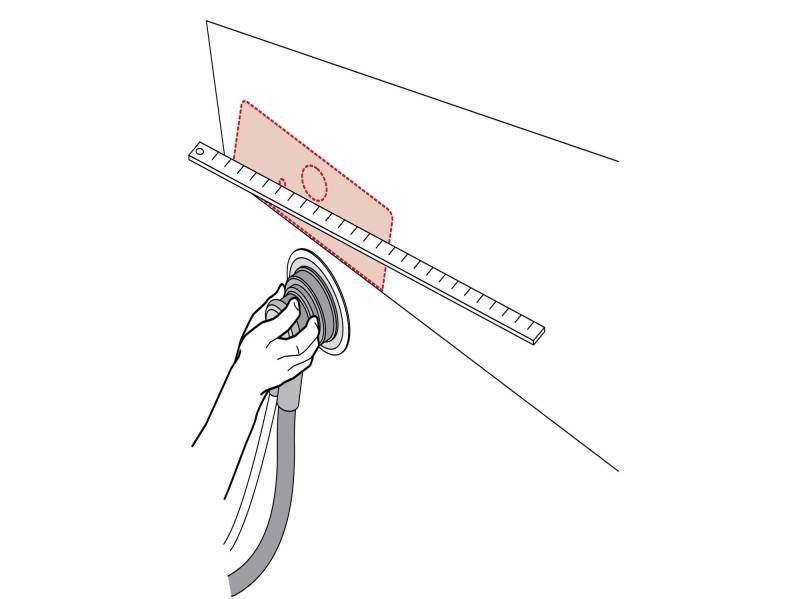
Ensure the outer and inner transom surfaces where the interceptors will install are flat. If necessary, sand or grind the surfaces to create flat, parallel planes. If sanding exposes glass fibers, coat the area with resin and let cure. Ensure the shaft sleeve can be installed 90 degrees to the mounting surfaces. If needed, sand or grind the inner wall to create a mounting area that’s parallel to the outer surface. This will ensure a proper fit of the shaft sleeve once it is installed.
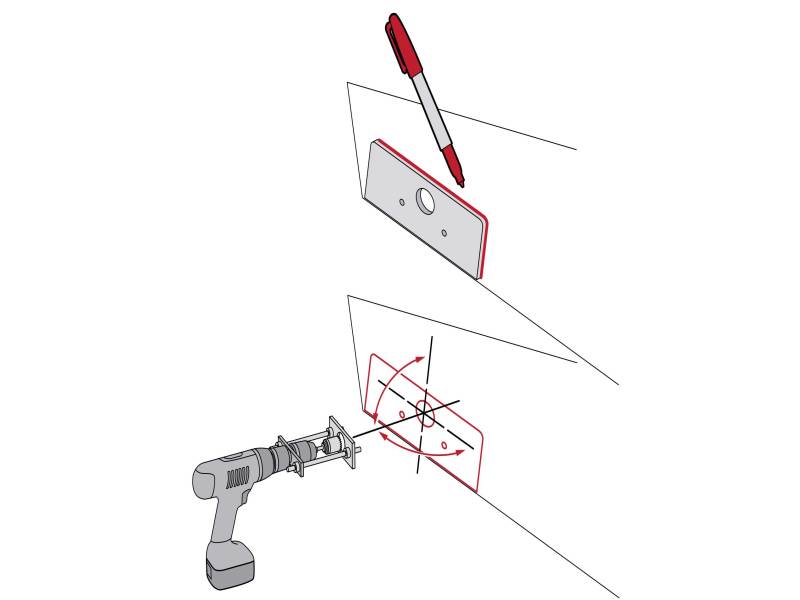
Use the inner plate of the case of the interceptor as a template to mark the hole for each interceptor motor shaft. Use a 60 mm hole saw to cut the hole perpendicular to the mounting surface. Insert the shaft sleeve into the hole, and position the plate in line with the hull bottom. Then mark the holes for the mounting bolts. Remove the plate, and use a 9 mm bit to bore the holes perpendicular to the transom. Chamfer each hole with a countersink bit to help prevent the gelcoat from cracking.

Use suitable-length M8 A4 stainless-steel bolts to dry-fit the interceptor to the transom with M8 washers and Nyloc M8 nuts on the inside. Pre- install the shaft-sleeve nut, and use the supplied wrench and a spring scale (not supplied) or a torque wrench (with the optional torque adapter) to torque to the specs in the instructions. Check the rotational shaft torque to ensure it does not exceed specifications in the instructions. If it meets spec, deinstall the interceptor and move to the next step.
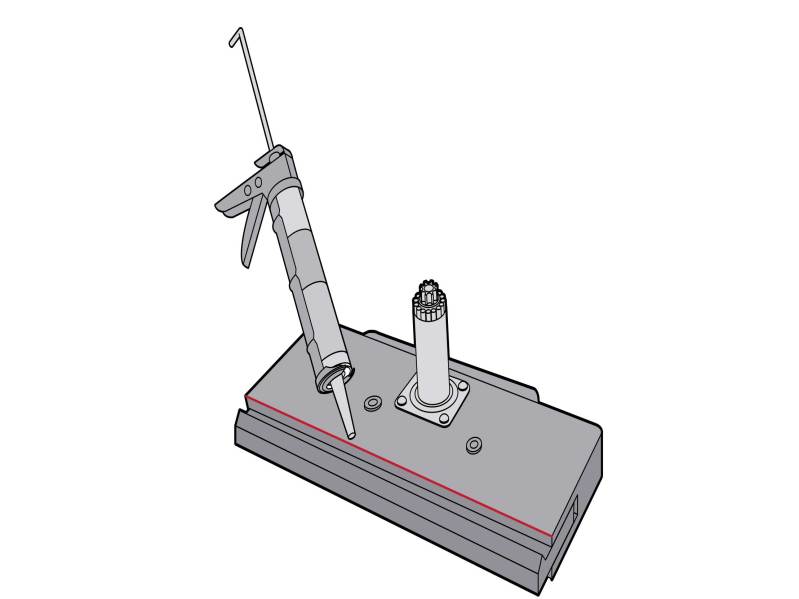
Lightly sand the lower inside edge of the interceptor case. Apply a marine sealant to the sanded area. Insert the shaft sleeve into the hole, making sure the O-ring is greased and in position. Apply marine sealant to the mounting holes in the transom, and insert the bolts. Dab threadlocker to the threads, and secure with the washers and Nyloc nuts. Apply marine sealant to the inside of the transom where the shaft-sleeve nut will meet, and torque the nut to spec. Install the second nut, and tighten it to lock the first.


