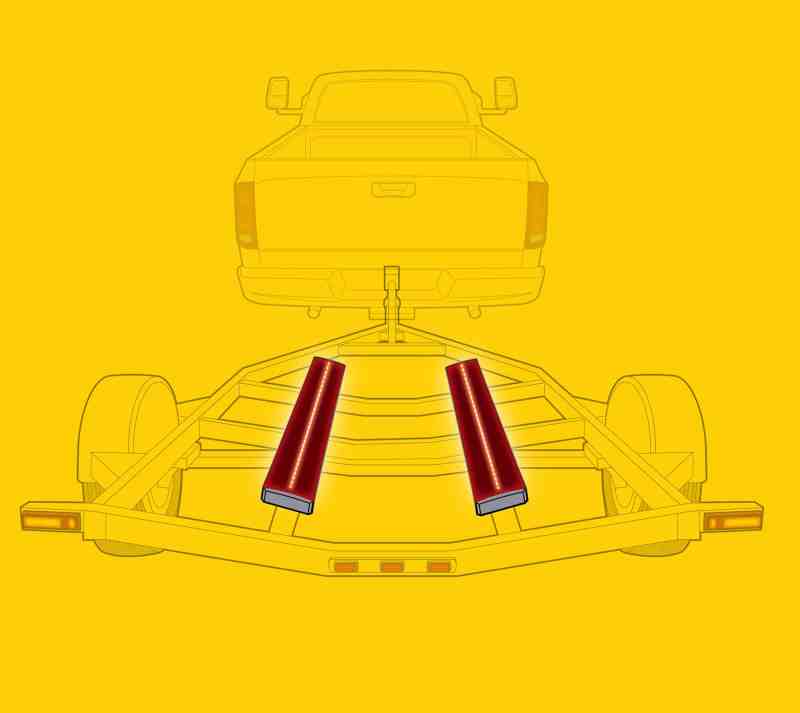
If you’ve loaded a boat on a trailer in the dark, you know the problem. You’re working virtually blind. Even with the trailer lights on, the bunks become invisible underwater. The unique bunk-illumination system from Minnesota-based Gatorbak solves this problem.
There are two unique components: 1) clear synthetic, ribbed bunk covers that do away with traditional bunk carpeting and yet gently cradle your boat, and 2) waterproof LED strips that install under the covers.
Gatorbak’s Premium Clear covers are available in a range of lengths, widths and contours. To make sure you order the correctly sized cover, carefully measure the bunks on your trailer and note the shape. Order a waterproof LED light strip that’s long enough to span the entire length of the bunk. Dry-fit the covers and lights to ensure they fit before beginning your work. We installed a pair of illuminated 8-foot 2-by-6 bunks on our project trailer.
Skill Level: 2 of 5
Finish Time: Approx. 4 hours (excluding drying time for primer and paint)
Tools and Supplies
• Gatorbak premium clear bunk covers ($139.50/pair of 8-foot covers with hardware for 2-by-6 bunk boards, gatorbak.com)
• Molded end caps ($6 each with hardware to fit 2-by-6 bunk boards, gatorbak.com)
• PlashLights waterproof LED strips ($96/8-foot strip, gatorbak.com)
• Zinsser indoor/outdoor 123 primer ($20.98/gallon, homedepot.com)
• Oil-base exterior gloss paint
• Paintbrushes
• Router with 1/2-inch bit
• Trigger clamps ($29.98/Irwin four-pack, lowes .com)
• Marine silicone sealant
• Power drill with bit set and drivers
• Assorted stainless-steel hardware (for attaching bunk boards to trailer)
• Socket wrench set
• Diagonal cutters, marine butt connectors (with heat-shrink collars), shrink tubing and crimping tool for wiring LED strips to the trailer’s running-light circuit
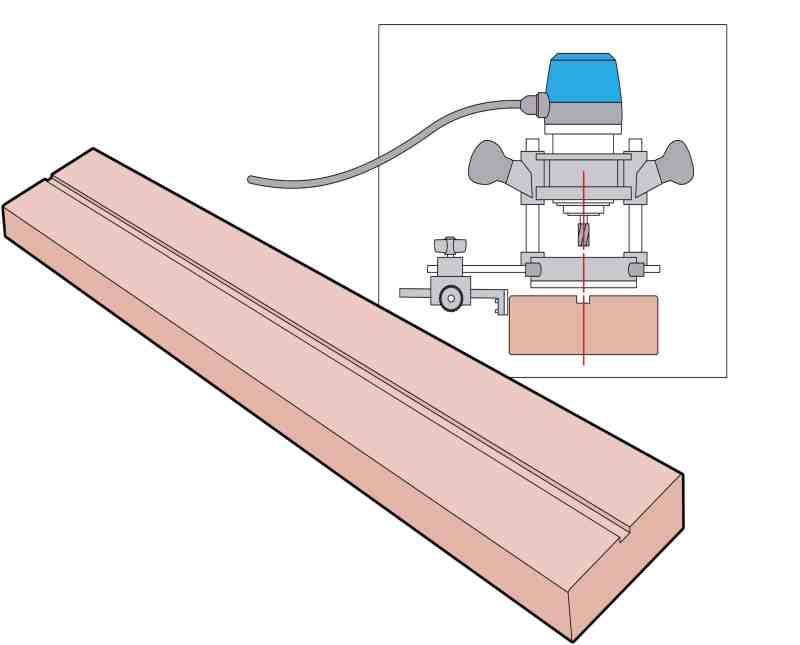
Use treated lumber if possible and allow it to dry for 21 days. Use a router to create a 1/2-inch-wide by 1/4-inch-deep longitudinal channel down the length of each bunk board. Router down the aft end of the board (to route the wire to power the LED light strip). We created the groove to position the light down the center of the board. If through-bolting the bunk board, drill the mounting holes for the boards now, and be sure to countersink recesses on top of the board to prevent the bolt heads from protruding above the board’s surface and preventing the cover from fitting flat.

Priming and painting helps protect the wood from moisture and rot. For primer, Gatorbak recommends Zinsser indoor/outdoor 123 primer. Give each board a generous coat of primer, then sand the dried finish smooth before applying an oil-base exterior gloss paint. Since the covers are clear, you might want to choose a paint shade that complements your boat. For example, if your boat has blue accents, you can paint the boards blue. We used pure white because it matches the base color of the boat. Allow the paint to dry completely before moving on.
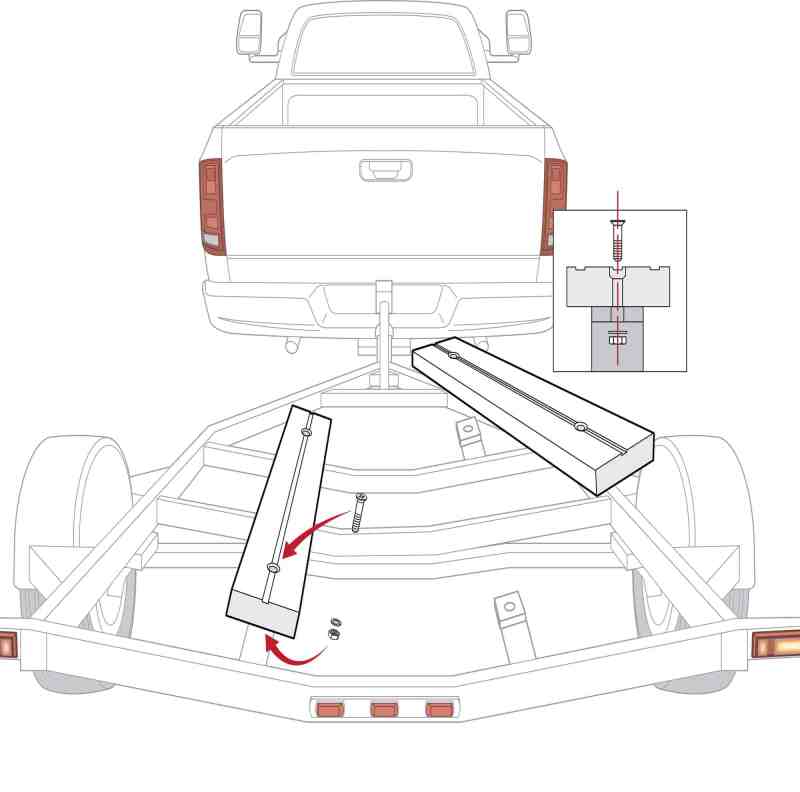
If you’re through-bolting your trailer bunks to the brackets, it helps to install the boards first, then attach the LED strips and covers afterward. This, of course, means removing the boat from the trailer to complete the rest of the project. Use stainless-steel hardware with backing washers and nylon-locking nuts to snugly bolt each board in place. As noted earlier, make sure the bolt heads do not protrude above the upper surface of the board. This step can be completed at the boat launch ramp so that removing the boat from the trailer is easier.
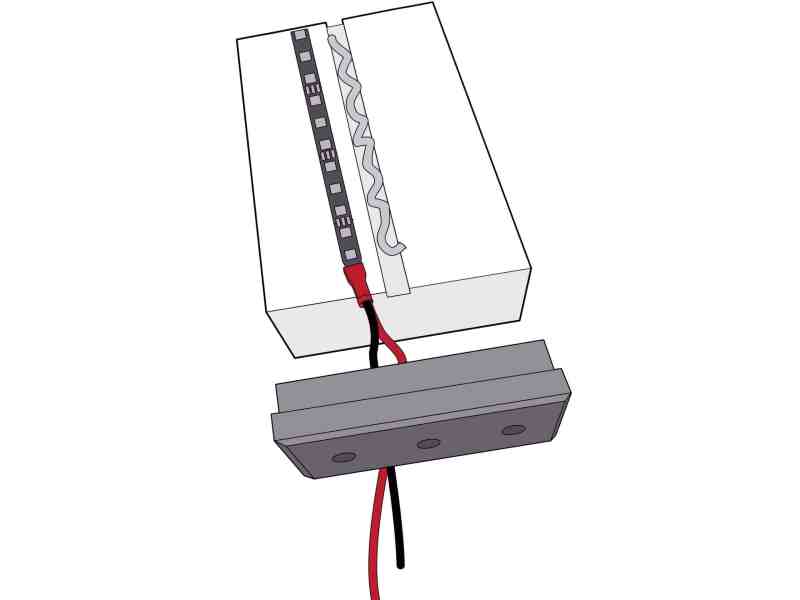
Apply a bead of marine silicone sealant in each groove (optional), then lay in the PlashLights waterproof LED strip. Start at the aft end, making sure the wires are routed down through the groove in the back of the board and that the lights face up, then work forward. Press the strip in the groove so it does not protrude above the surface of the board. Once the bunk cover is in place, it will keep the LED strip secure. Connect the wires for each strip to the trailer’s running-light circuit using marine-grade connectors with heat-shrink collars and shrink tubing.
Tip: You can install more than one LED strip per board, but the clear covers disperse the light throughout the surface, so one strip works fine. We chose red LEDs, but Gatorbak offers a wide choice of LED colors from PlashLights.
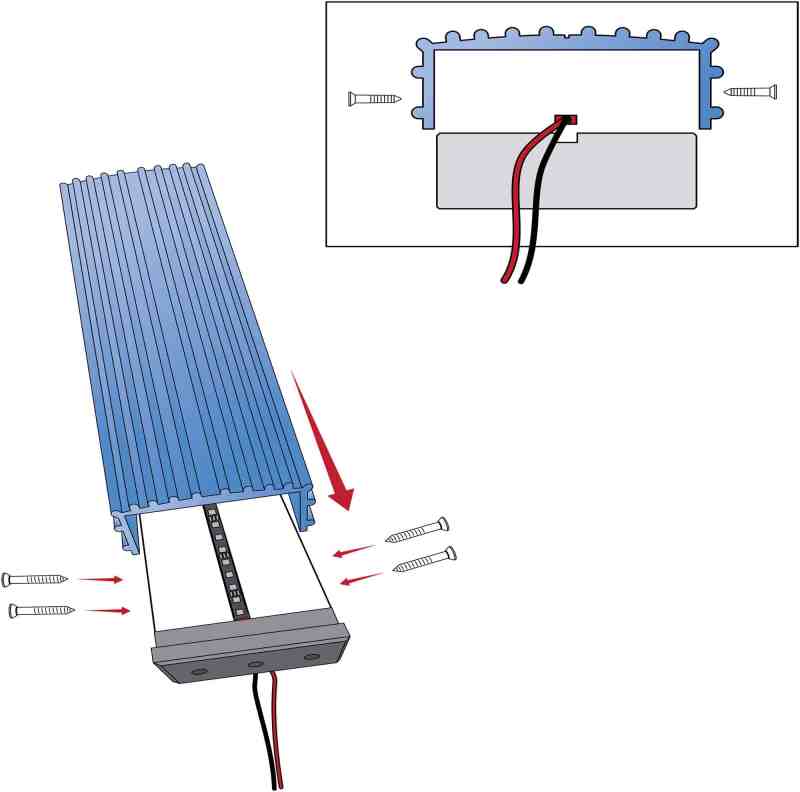
Trim the covers per the directions. Use trigger clamps to hold the cover against the sides of the board. Install the supplied mounting screws on the sides of the cover, driving the first and last screws about 1/2 to 3/4 inch from the end of the board. Place the next screw 1 inch from the first, and each screw thereafter 8 to 12 inches apart. Use the placement line on the side of the Gatorbak cover to align the fasteners. Repeat on the opposite side. Using the supplied hardware, install the Gatorbak end caps on the end of each board per the instructions.


