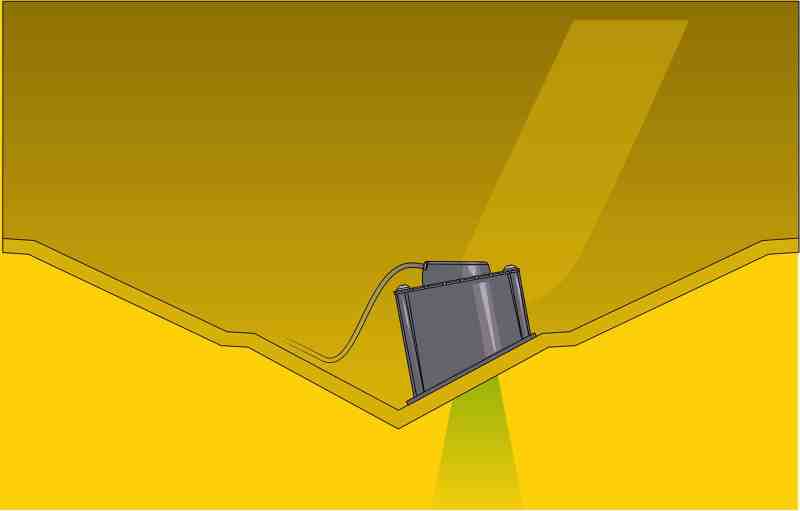
An in-hull (aka shoot-through) transducer mounts to the inside of the hull and transmits and receives sonar signals through fiberglass, eliminating the need for drilling holes in the hull.
This also eliminates the need to remove the boat from the water for installation, and there will be no protrusions under the boat. But there are downsides. For one, the transducer must be mounted on solid fiberglass; in-hull transducers will not function in cored fiberglass hulls without special modifications. Also, in-hull models exclude a sea-temp or speed sensor, so those will have to be added externally on the transom, if desired. That said, a properly positioned in-hull transducer offers outstanding performance when looking for fish and bottom features, with only minimal loss in range at the deepest capabilities of the transducer.
Read Next: Ask Ken: Install a Transducer Without Drilling a Hole in the Hull
One of the latest in-hull models is the M285HW chirp-ready transducer from Airmar. It operates at 1,000 watts on a — high-frequency band of 150 to 250 kHz with a fixed beam angle of 25 degrees for maximum coverage under the boat out to depths of 500 feet. The base easily compensates for deadrise angles ranging from zero to 22 degrees to ensure the beam shoots straight down. This is critical for optimal performance and accurate depth readings. It is suitable for powerboats up to 25 feet in length. Before getting started, make sure the transducer and the plug are compatible with your sonar unit.
Skill Level: 2 of 5
Finish Time: Approx. 3 hours (excluding on-water testing)
Tools and Supplies
• Airmar M285HW in-hull transducer ($741.99, anchorexpress.com)
• Disc sander
• Thin, sealable plastic bag
• Cable ties
• Broomstick
• Protractor or iNstall app
• Straightedge
• Carpenter’s square
• Level
• Phillips screwdriver
• Pencil
• Isopropyl alcohol and shop rags
• 14 oz. propylene glycol ($6.49/Star brite 28 oz., westmarine.com)
• Adhesive such as Marine-Tex ($36.99/ 14.6 oz., jamestowndistributors.com)
• Mixing cup and stir sticks
• Petroleum jelly
• Electricians snake (for routing cables)
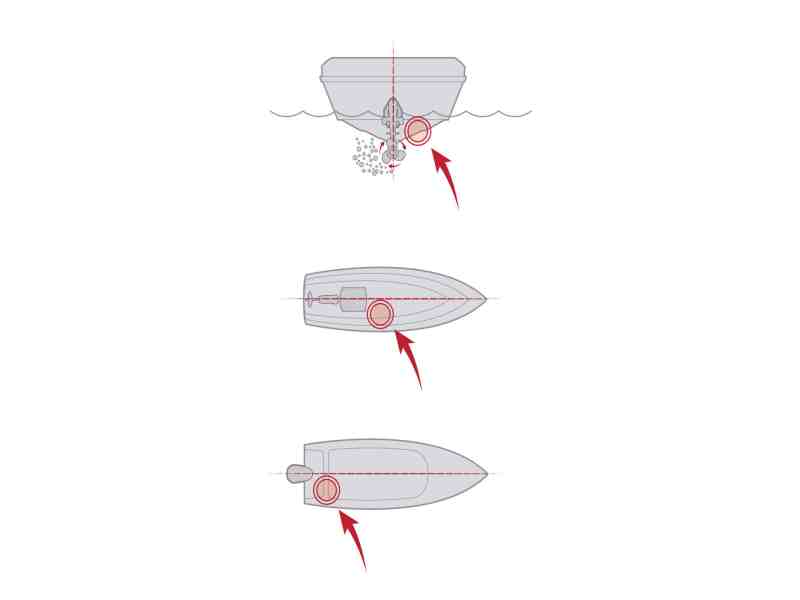
Though the transducer is inside the hull, it is crucial that there are no external strakes, intakes or other hull features that would cause aerated water to flow over the transducer’s location. Location depends on the type of hull and propulsion. On inboard planing hulls, just ahead of engine(s) and prop shafts is the best spot; displacement hulls allow for positioning farther forward. On outboards and sterndrives, an aft location is optimal, except on step hulls, which necessitate placement forward of the steps. Locate the transducer as close to the centerline as possible, If the mounting surface is not smooth, grind it flat with a disc sander.
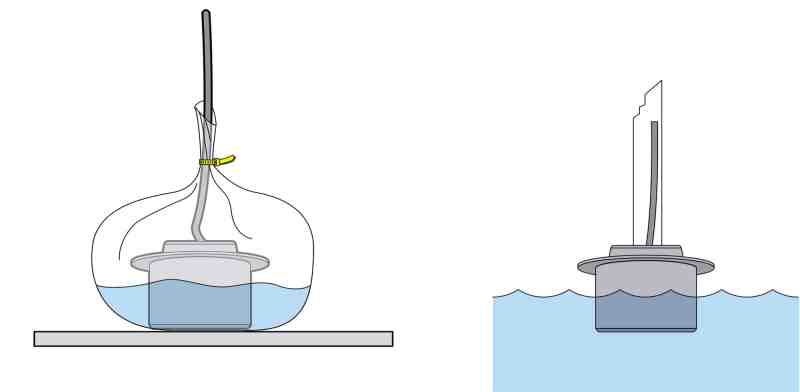
Establish a performance baseline by connecting the transducer to the fish finder and hanging the transducer overboard with the boat floating at rest in at least 25 feet of water and viewing the bottom return. At the same site, test the transducer inside the hull at the selected location. Place the transducer inside a thin plastic bag partially filled with water and cinched tightly with a cable tie. Wet the mounting surface and press the active face of the transducer against the hull. Compare the bottom return to the baseline, and if the reading is similar, the mounting location is good. If not, you will need to find another location and repeat the test.
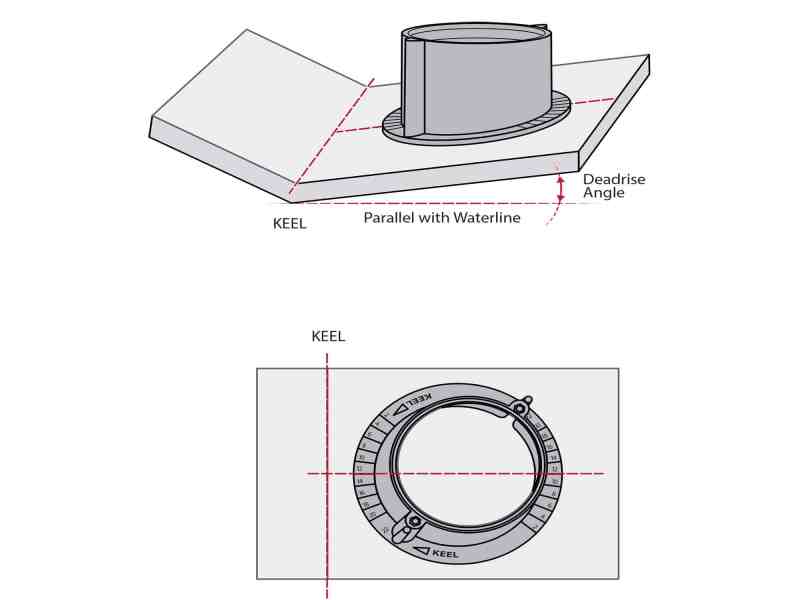
Measure the deadrise — the angle of the boat’s V — at the mounting location. A free app called iNstall enables your phone to be used to determine the deadrise angle. Another way is to create a straightedge either inside or outside the hull that runs parallel to the waterline, then use a protractor to find the angle. Using a carpenter’s square, draw a line on the inside of the hull perpendicular to the centerline through the center of the mounting location. Identify the number on the flange of the transducer base that corresponds to the deadrise, and find the matching number on the opposite side. These will align with the line you drew.
Tip: To prevent overheating of the liquid inside the transducer housing, mount in-hull models in cool, well-ventilated areas as far away as possible from inboard engines or other heat sources such as generators or air conditioners.
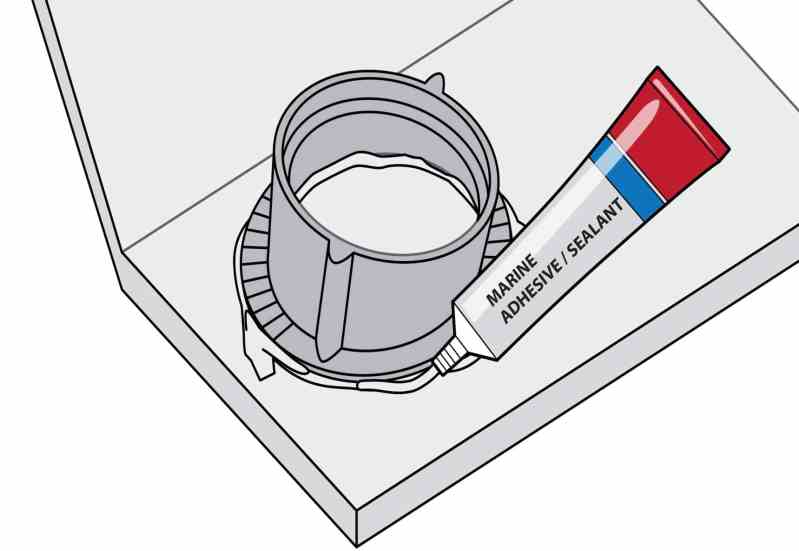
Ensure that the mounting surface is free of fiberglass wax, paint, oil or moisture. If necessary, lightly sand and clean again with isopropyl alcohol, then redraw the line that positions the base. Now you’re ready to secure the base to the inside of the hull. Remove the transducer from the base housing. Use a bonding agent such as Bondo 401, Marine-Tex Epoxy Putty or 3M 5200 Marine Adhesive/Sealant. Apply the adhesive per the manufacturer’s recommendation for optimal adhesion, and press the flange of the base firmly in place to form a liquid-tight seal. Allow the bonding material to cure per the manufacturer’s instructions.
Once the bonding material has cured, pour 14 ounces of propylene glycol (nontoxic antifreeze) into the housing. Lubricate the O-ring from the top of the housing with petroleum jelly. Carefully place the transducer into the housing to avoid causing the propylene glycol to overflow. Turn the transducer until the number on the rim that corresponds with deadrise is directly over the alignment boss closest to the keel. The transducer should drop into place. Insert a rubber washer and screw into each of the two holes by the alignment bosses. Snug up each screw to 1.3 foot-pounds. Route the cable to the fish finder and plug it in.


