Portable coolers are traditionally stowed under a leaning post or seat module aboard many of today’s center-console boats. This keeps the ice chest tucked away to eliminate a stumbling point; unfortunately, this also restricts full access when you want to grab a cold drink. You often need to drag the heavy, ice-laden cooler over a nonskid deck just to open the lid. Pushing it back underneath for stowage can be even more arduous.
That’s why many new center consoles come with bases on slide assemblies to ease the task of pulling out the cooler and pushing it back for stowage. Spring-loaded locking pins on the assembly keep it from sliding to and fro in rough seas.
If your boat did not come equipped with a slider, don’t fret. You can retrofit your center console with an aftermarket sliding base from companies such as West Marine, Birdsall Marine, Boat Outfitters and Engel Coolers.
Nearly all sliders are manufactured from King Starboard high-density polyethylene marine lumber for corrosion and UV resistance, and high durability. Some of these sliding bases are universal in nature in order to fit the dimensions of the cooler size you have in mind and the available space under the leaning post or seat. Here are the steps for installing one of Boat Outfitters’ popular universal cooler slides, which has small wheels for smoothness and ease of use.
Skill Level: 2 of 5
Finish Time: Approx. 2 hours
Tools and Supplies
- Boat Outfitters Universal Cooler Slide (starting at $317.70 for small white/white model with supplied stainless-steel hardware, boatoutfitters.com)
- Tape measure
- Power drill and drill-bit set
- Phillips screwdriver
- Marine sealant such as 3M 5200
- Marking pencil
- Shop rags to wipe away sealant
- Protective shop glasses
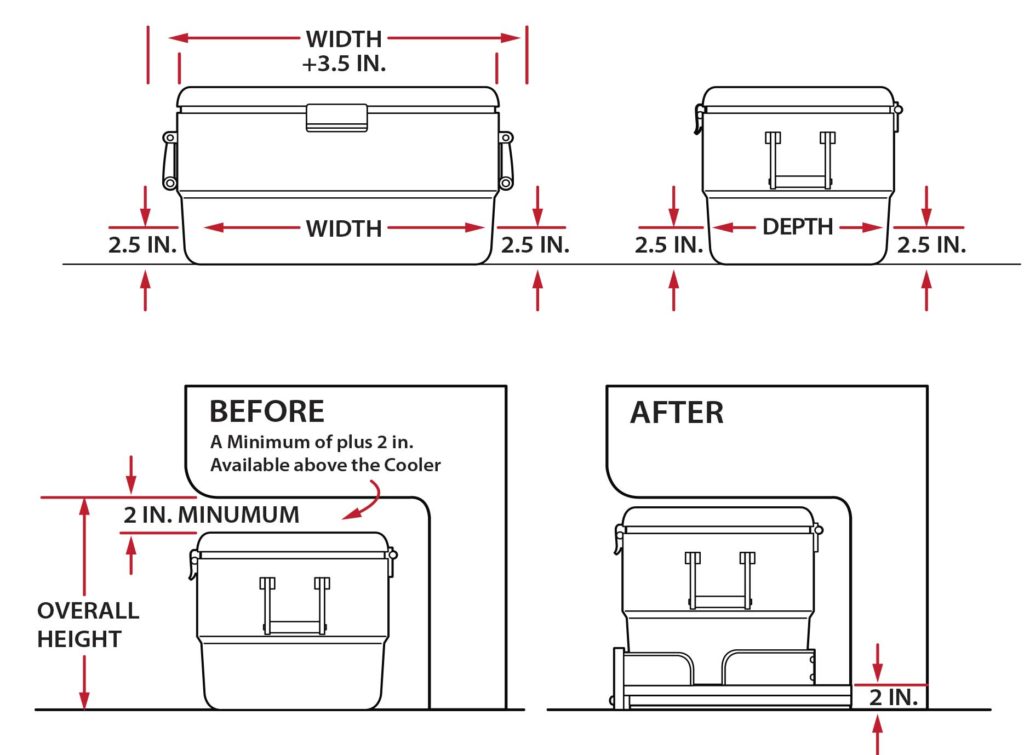
Tape out the width, depth and height available for the space underneath your leaning post or seat module, keeping in mind that the cooler slide will add 3 1/2 inches to the footprint’s width and 1 inch of depth to the base of the cooler, as well as 2 to 2 1/2 inches to the height. Be sure to account for a cooler seating pad if you plan to add one. If the cooler with the slide will not fit the available space, shop for a slightly smaller ice chest that will fit and still meet the cold-storage needs aboard your boat.
Pick from one of Boat Outfitters’ three universal slides based on the size of your cooler and available space. The Boat Outfitters small model accommodates coolers measuring 17 to 27 inches wide and 11 1/2 to 14 1/2 inches deep for ice chests up to 54 quarts; the medium slide handles models 18 to 41 inches wide and 14 1/2 to 17 1/2 inches deep for coolers up 125 quarts; the large slide fits coolers ranging from 33 to 49 inches wide and 17 1/2 to 20 1/2 inches deep for models up to 200 quarts.
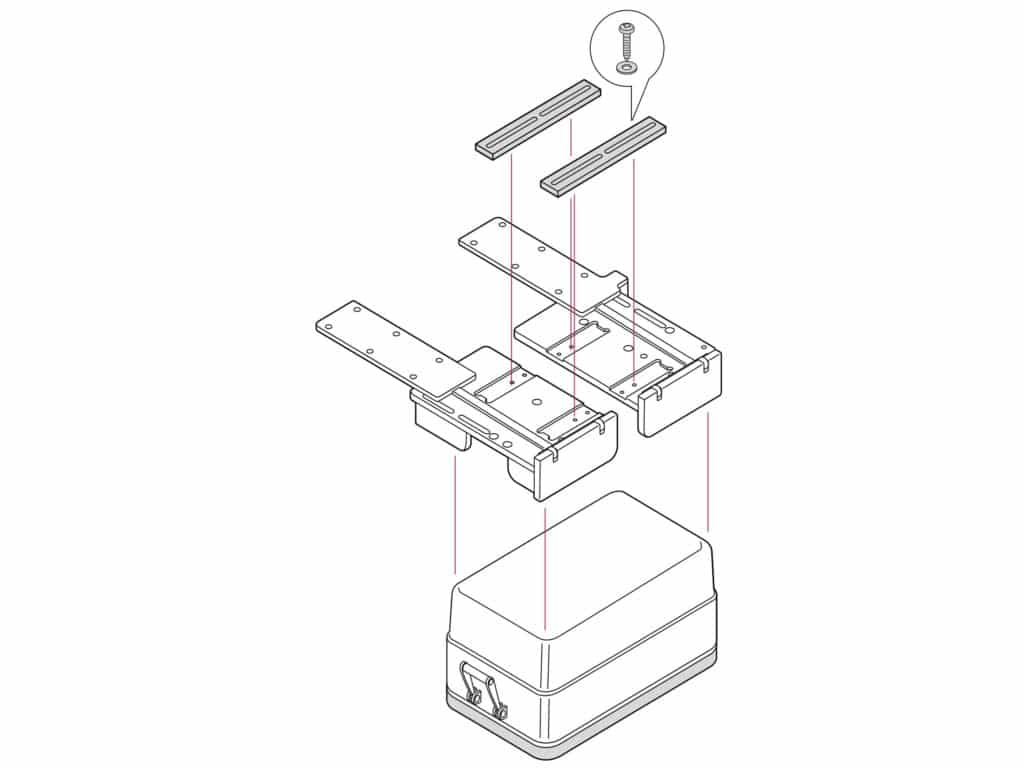
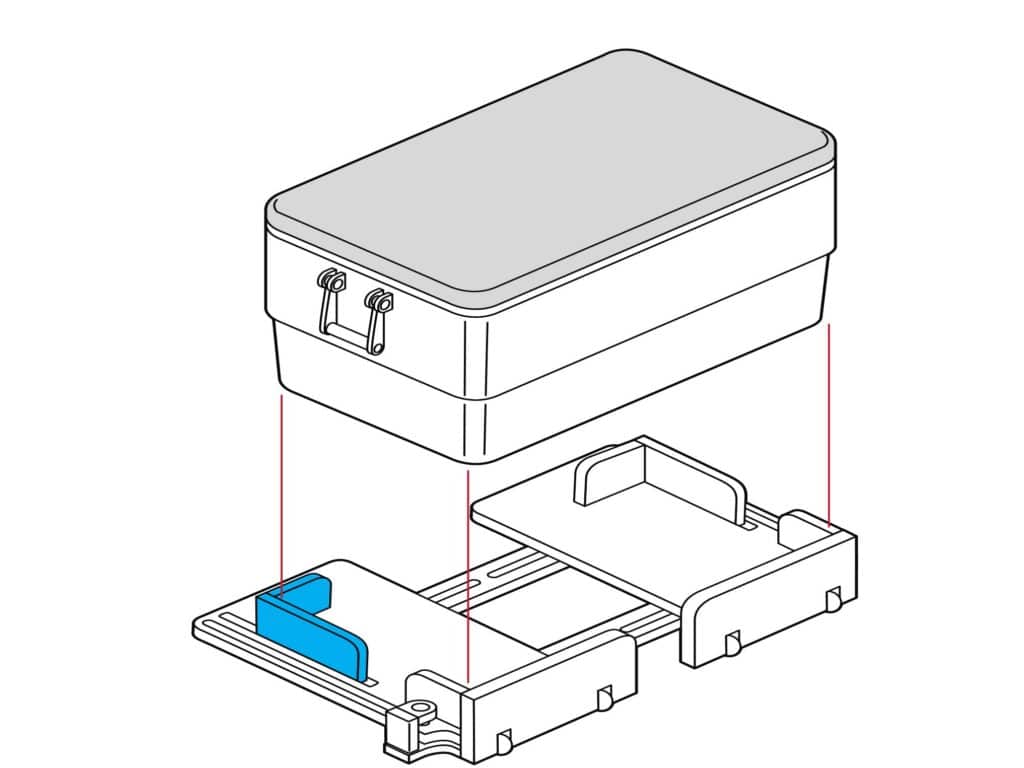
To fit the slide assembly to the ice chest, turn the cooler upside down and place the slides upside down on the bottom of the cooler. Slide the retainer tight against the cooler’s base, then push the slide tracks back to access and tighten the retainer fasteners to secure the retainer position. Multiple sets of spanners are supplied to fit different coolers; pick the pair that fits your cooler. Then use the eight supplied 8/32-by-3/4-inch stainless-steel set screws to secure the spanners and the slides’ position.
Tip: The spanners ensure easy installation and that the slides install square and parallel to each other. The spanners also force the slides to move in unison to help eliminate binding, no matter where you pull or push on the cooler.
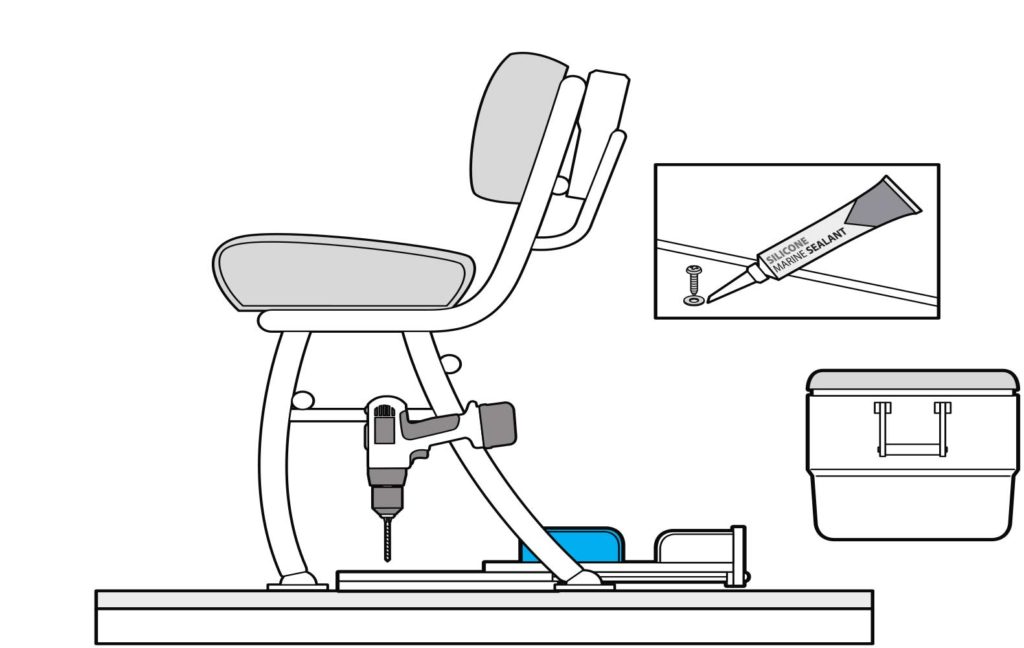
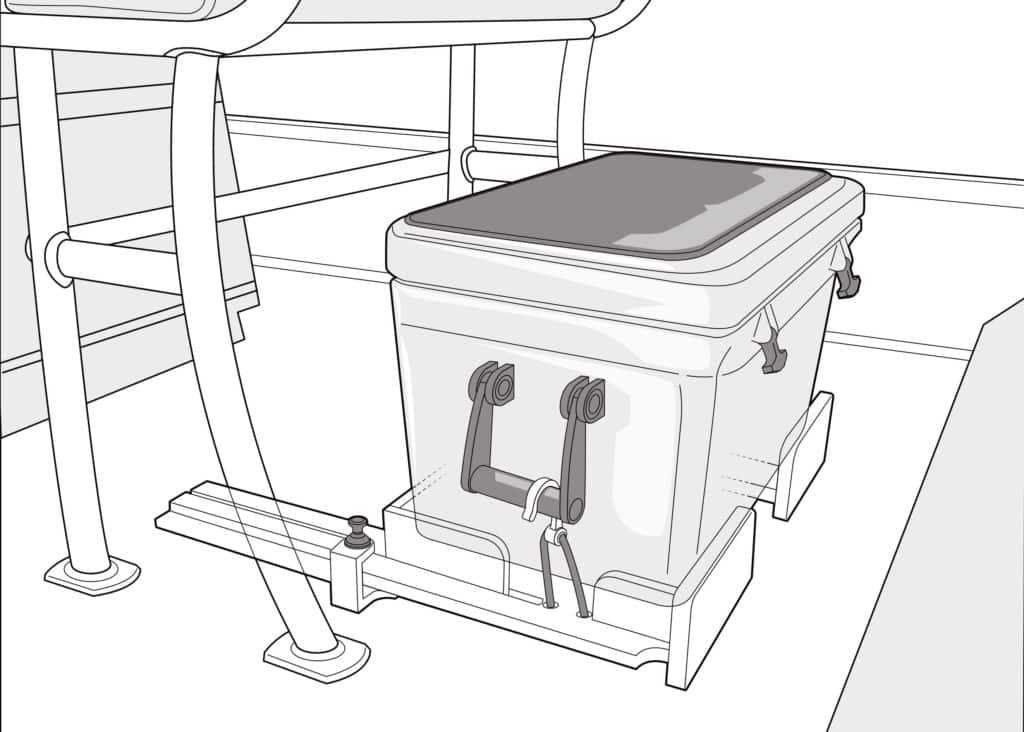
Place the assembled slider with the cooler inside (in the retracted position) below the leaning post or seat module, or the location you have selected. Then remove the cooler and, without moving the slides, mark the six mounting holes in the deck, ensuring that no tanks, hoses or cables can be damaged from drilling or fasteners. Drill the holes with a 9/64-inch drill bit. Bed each hole with marine sealant, and secure the slider with the supplied No. 10 1-inch stainless-steel self-tapping screws.
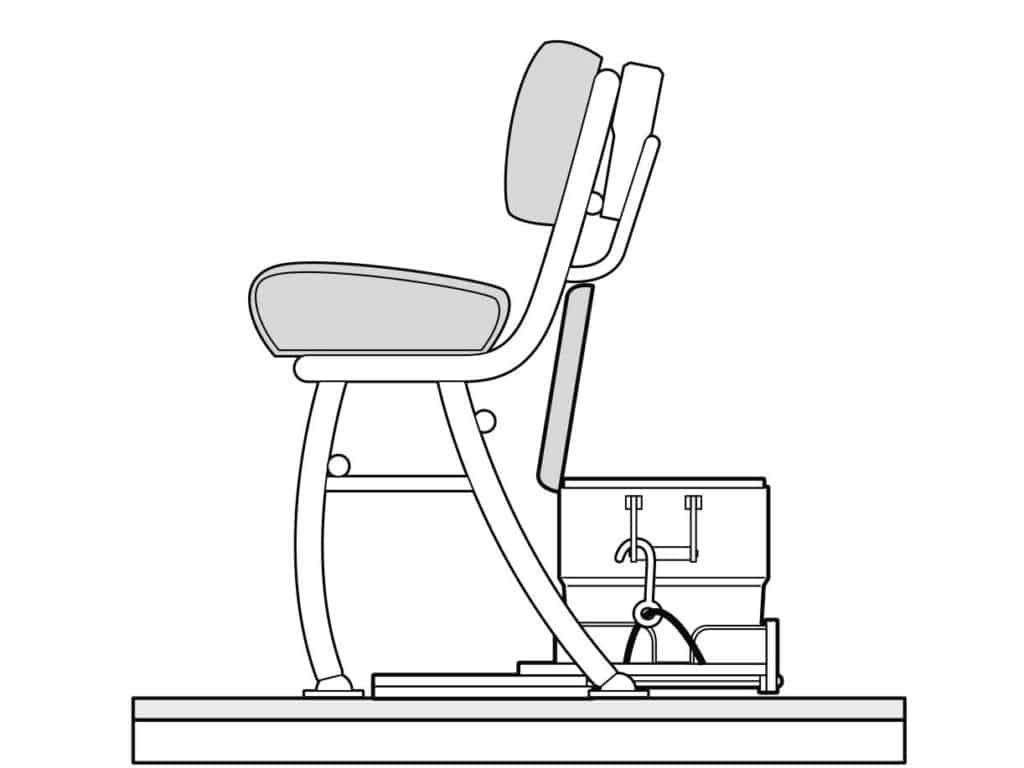
Place the cooler inside the slider and secure the slider bungee hooks to the cooler handles or other attachment point. Pull up on the spring-loaded stainless-steel locking pin on the port side of the slide assembly and pull out the cooler, checking to make sure it slides smoothly and locks in the extended position, and there is no binding. Then reverse the procedure, pulling up on the locking pin and pushing it back. If there is any binding, check to make sure the slides are parallel.
Tip: It’s a good idea to test the slider function with the cooler full of ice and drinks. It might require a bit more muscle, but the wheel-equipped slides should still function smoothly with the cooler fully loaded.
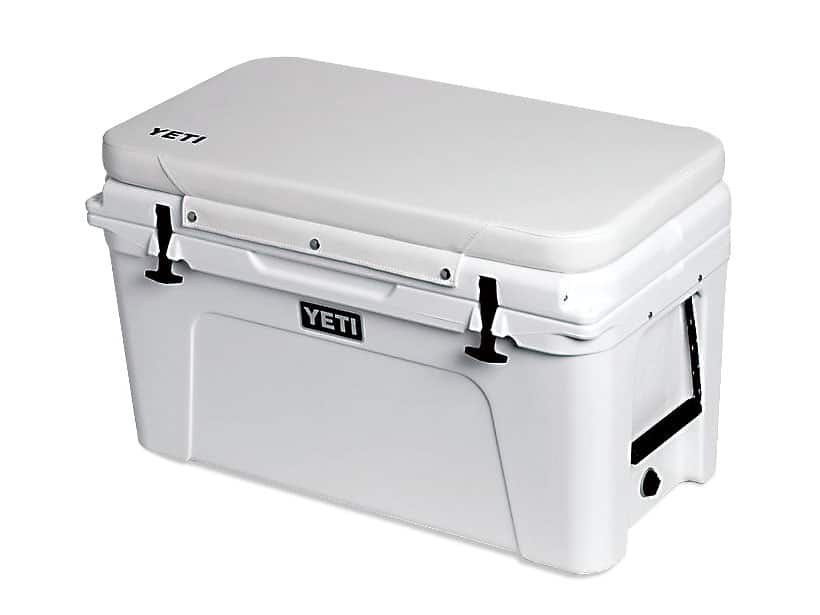
The cooler slides from Boat Outfitters are designed to handle the weight of a crewmember sitting on the cooler in the extended position. With this in mind, you might want to fit your cooler with a cushion top for greater comfort. Yeti, for example, offers white vinyl seat cushions (starting at $100, yeti.com) for its wide selection of Tundra coolers. The cushion kits include studs that screw into the cooler’s lid to snap the cushion in place. All hardware is stainless steel. Make sure there is enough clearance under the leaning post or seat module when the cooler is retracted for the addition of a 2- to 3-inch-tall cushion.