Knowing the air pressure of your boat-trailer tires is critical to towing safely. A tire that loses too much air pressure can affect trailer balance and support, lead to overheating of the tire, result in uneven tread wear, and cause catastrophic tire blowouts. That’s why it’s important to keep pressures of special trailer (ST) tires at the maximum rated psi (pounds per square inch) printed on the sidewall. Also important is stopping periodically during long tows to check the air pressure with a gauge to see if the tires are in good condition.
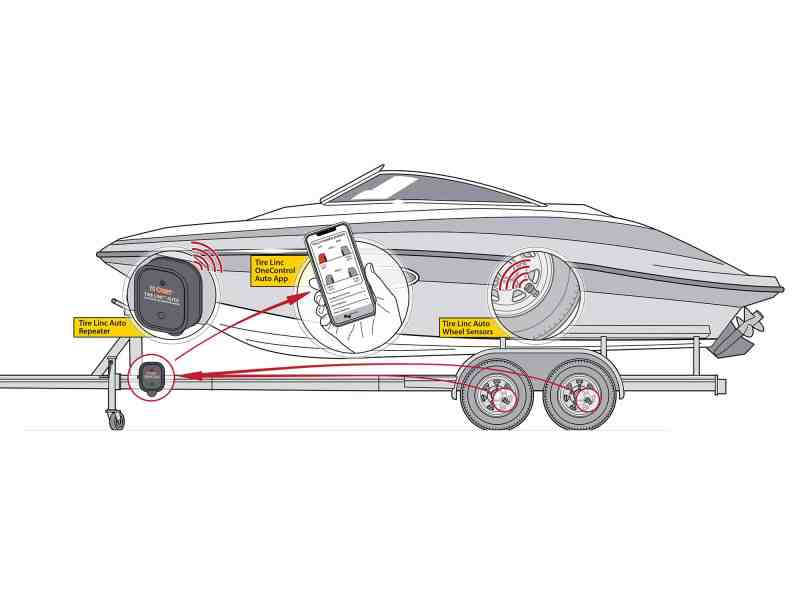
Today, however, you don’t necessarily need to stop as often to do that. Now there are aftermarket systems available that let trailer boaters monitor tire air pressure and temperature on the fly. Similar to the systems found on many new automobiles that show tire pressure on a dash display, trailer-tire monitors use Bluetooth in battery-operated sensors on the valve stems, which connect with a repeater that boosts the wireless signal to connect to an app on a smartphone.
The systems not only display this information for each tire, but also can send alerts through the app when air pressure or temperature exceeds certain predetermined thresholds. Systems such as the Curt Tire Linc Auto prove relatively easy to install on a boat trailer. The tire sensors and repeater boast IP67 waterproof ratings and corrosion resistance. They can take a dunking to 1 meter when you launch and load, resisting corrosion and water intrusion to continue operating effectively. Here’s how to install the system.
Skill Level: 1 out of 5
Finish Time: Approx. 1-2 hours
Tools and Supplies
- Curt Tire Linc Auto Kit ($379.95; amazon.com)
- Smartphone with Bluetooth
- Power drill and bits
- Phillips screwdriver
- Marking pencil
- Eye protection
Charge and Download
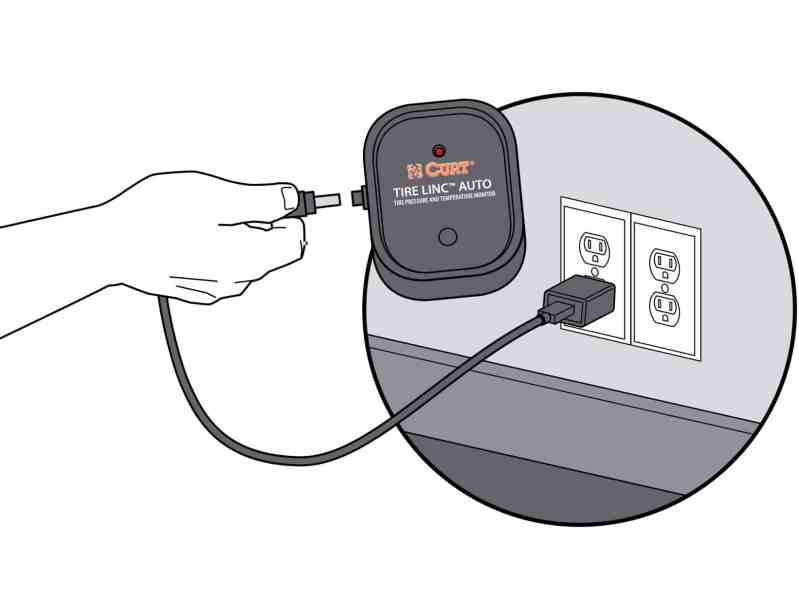
Before starting the installation, use the supplied household charging cord to fully charge the internal battery in the Tire Linc Auto repeater. At the same time, download the OneControl Auto app to your smartphone, available for free on the App Store for iOS devices and Google Play for Android devices, then register as a user. While the repeater is easy to remove between trips for charging, it can also be installed with a supplied power cord that connects to a 12-volt DC source on the trailer. For this project, we chose to rely solely on the internal battery for power.
Install the Repeater
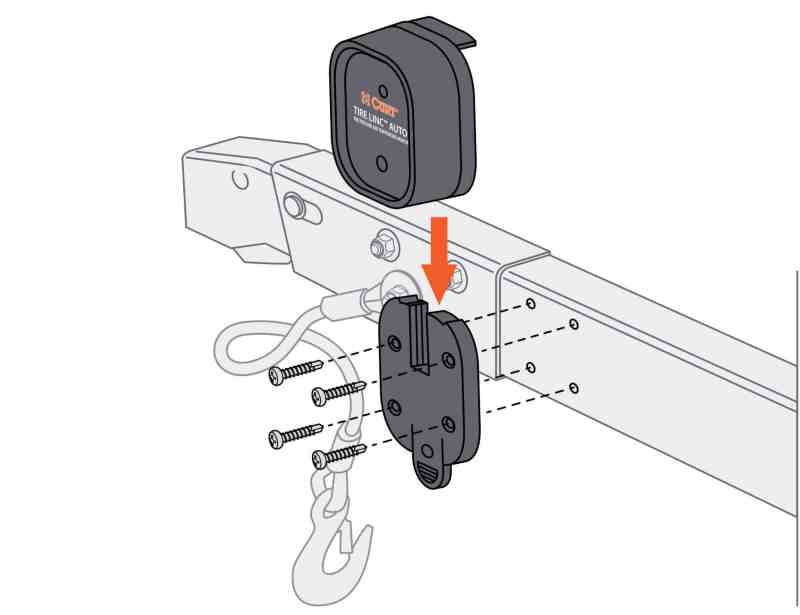
The repeater uses a quick-release bracket that you must fasten to the trailer. Choose a location on the trailer that is as low and as close to the tow vehicle as possible. We chose an easy-to-access spot on the trailer tongue. The repeater is waterproof and corrosion-resistant, so no need to worry if it gets wet when launching and loading. Mark and drill holes for the bracket’s four supplied self-tapping mounting screws, then screw the bracket to the trailer. Attach the repeater by sliding it into the bracket until the locking tab clicks, indicating it is securely in place.
Pair the App With the Repeater
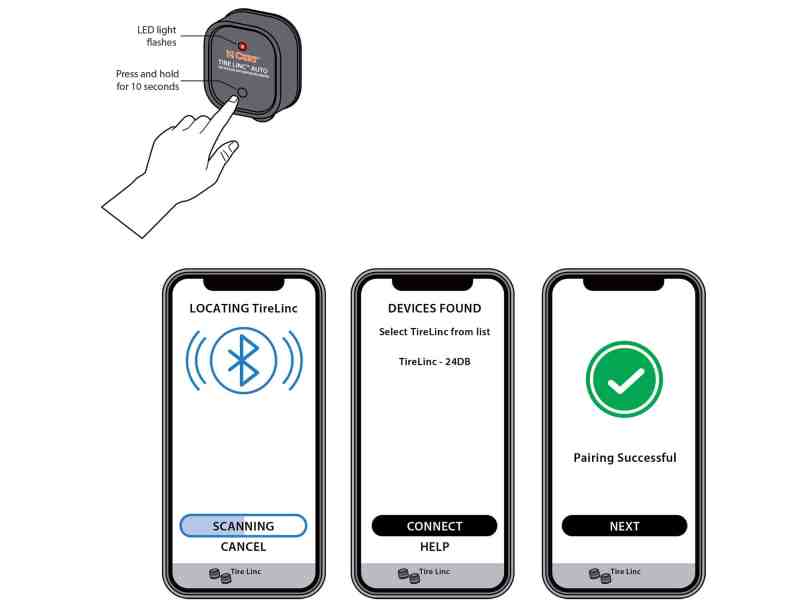
Turn on the installed repeater by pressing the button on the face of the device; a red light will illuminate for five seconds to indicate it has power. Launch the OneControl Auto app on your smartphone and select “Pair Device” under the Tire Linc Auto icon. On the “Devices Found” screen, the app should display any available repeaters in range. Select the device ID with the decibel (dB) value closest to zero. Select and tap the desired device ID and then tap the “Connect” button. Once the pairing is successful, a notification will appear stating the process is complete.
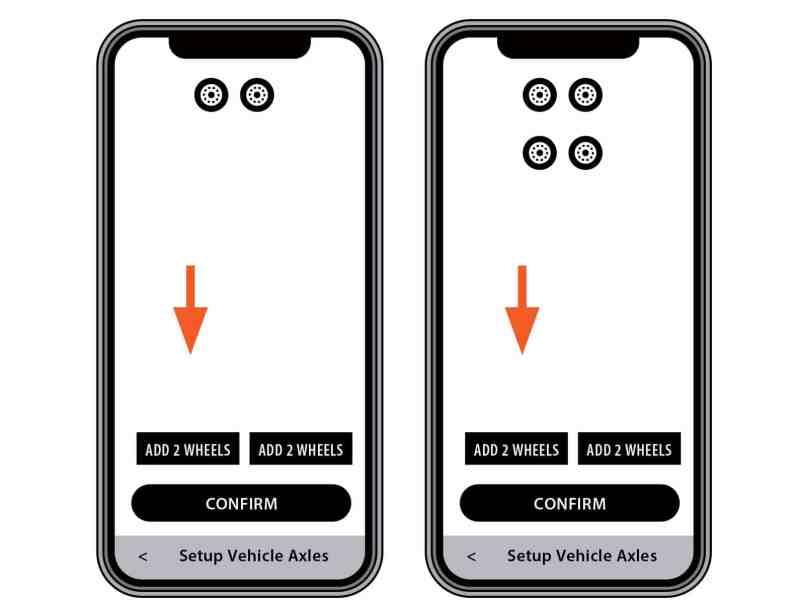
Configure for the Trailer in the App
After pairing successfully, the app will return to the home page. At the bottom screen are three buttons, including “Add 2 Wheels,” “Add 4 Wheels” and “Confirm.” For a single-axle trailer, select “Add 2 Wheels” once. For a tandem-axle trailer, select the same option twice. Once the trailer axle and tire quantities are defined, select “Confirm,” leading you to the “Pair Sensors” page. If an error occurs and you choose the wrong sequence of wheels, select “Set Up Vehicle Axle” to go back one screen to set up the vehicle and reconfigure.
Read Next: How to Protect Your Boat Trailer from Corrosion
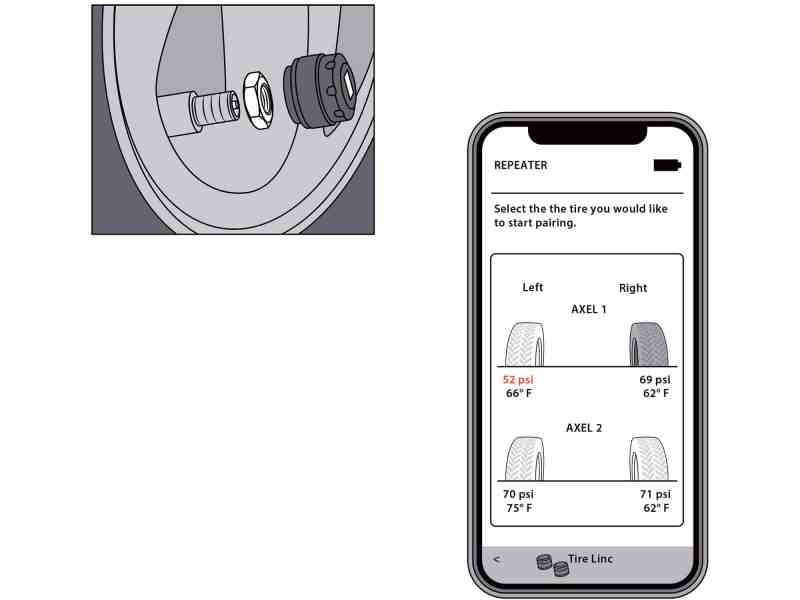
Pair and Install Sensors
Using the “Pair Sensors” screen, tap the tire you’d like to pair, but do not install the sensor at this particular point. Tap “Connect,” then screw on and fully tighten the tire sensor. It may take up to 90 seconds for the sensor to awaken and be found. If the sensor is not detected by the app within 90 seconds, unscrew it, wait approximately 10 seconds, and reinstall the sensor. Do not install any other sensors until the app shows the sensor is found. Then proceed to the next tire and repeat the steps described above until all of the tire sensors are paired.


