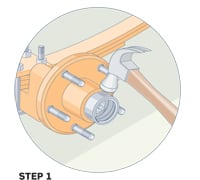
After jacking up the trailer, chocking the tires and removing the wheel, use a hammer or rubber mallet to gently tap the bearing protector loose while rotating the hub. If you have older-style dust covers, use a screwdriver to loosen the cover’s lip while rotating the wheel. Remember to keep body parts away from the wheel, never under the trailer frame.
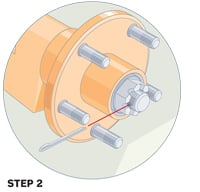
Wipe away any excess grease and remove the cotter pin, castle nut and washer, then slip the hub free of the axle spindle. Have some rags or paper towels handy; wipe off the spindle and inspect it to be sure it’s free of burrs or scratches.
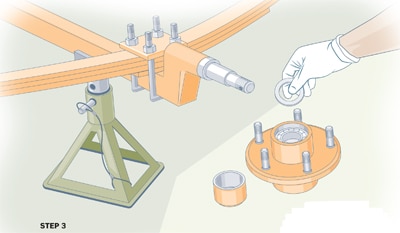
Place the hub’s inner side down on a clean surface. The outer bearing should lift out easily with a finger. The bearing races may require some prying or tapping with hammer and dowel or wooden peg.
Use the dowel or peg inserted through the hub to gently tap out the rear bearing and grease seal. Then tap out the other race. Clean the inside of the hub to remove all old grease. Dishwashing soap works, but a commercial degreaser spray is better.
To pack the bearings, lay a dollop of grease in your palm and press the bearing into it with the other palm, working in a “warming hands” motion until the grease is well-packed. Smear grease inside the hub. Insert the rear races and bearings first, followed by the grease seal, which will require light tapping with a block of wood to seat it. Flip the hub and install the front bearings. Need We Add – After cleaning and coating the outer edge of the rear seal with a liquid sealant, reseat it flush with the lip of the hub.
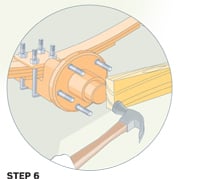
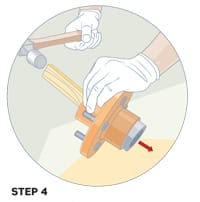
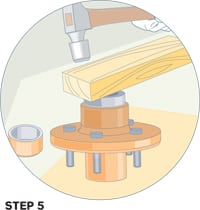
Coat the axle shaft lightly with grease, slide the hub in place and replace the washer and castle nut. Tighten the nut to the point where the hub does not wobble, but not so tight as to slow the hub’s ability to spin freely. Grasp the top of the tire and rock the wheel. You shouldn’t have any noticeable wobble or “play.” If you do, loosening and retightening the nut several times often helps everything to seat properly. Insert a cotter pin, tap the bearing protector into place and fill with grease. Shortcut – Packing new bearings with grease can be a messy business. A faster, cleaner and better way is to use a bearing packer, which allows you to use a grease gun to thoroughly infuse the bearings with no hand-packing. Bearing packers run around $20 at Harbor Freight Tools.
Stopped on the shoulder, with acrid smoke pouring from a trailer wheel — it’s not a fun place to be. With a bit of preventive maintenance, there’s a good chance you’ll never have to deal with a highway meltdown. Keep your trailer bearings well-greased and they will last all season — or perhaps several if you don’t tow far and often. Sooner or later, however, it’s time for a replacement. Some will choose to farm this task out, because it can get a bit messy dealing with wheel grease. But it’s a task well within the grasp of the average DIY boater; just keep plenty of shop towels and some degreaser handy, and put a dropcloth or old cardboard box under the work area.
Getting Started
Skill Level: 2/5
Finish Time: 1 to 2 hours per axle
Tools and Supplies
*Replacement bearing set, including inner and outer bearings and double-lip rear seal
*Disposable gloves
*Fresh bearing grease (synthetic is preferred)
*Heavy-duty degreaser or gasoline
*Cotter pin
*Hammer or rubber mallet
*Floor jack
*Wooden block
*New bearing protector/dust cap
*Slip-joint pliers
*Needle-nose pliers


